
- The Desert Campaign
- Derna
- The Desert Air Force and the SAAF
- December 18, 1941 – February 3 1942
- “Yellow 2”
- Eduard’s 1/48 Scale Messerschmitt Bf109F-2 (built as an F-4)
- Gallery
- References and Sources
The Desert Campaign
The North African campaign during World War II was defined by its constant motion, with both the Axis and Allied forces locked in a struggle for control over vast stretches of desert. Unlike in other theatres of the war, where battles often became bogged down in trenches or fortified lines, the wide-open terrain of North Africa allowed for sweeping manoeuvres. The flat, featureless landscape offered few natural barriers, giving mechanized units the freedom to advance quickly, retreat just as rapidly, and reposition as needed. This created a fluid and unpredictable campaign where the frontlines were rarely stable for long.
Strategically important locations like Tobruk, along with various airfields scattered across the region, became key objectives in this contest. Control of these points determined who could sustain their operations in the harsh desert environment. The battle for these sites often saw them change hands multiple times, with each side seeking to maintain its own mobility while denying the same to the enemy. The airfield at Derna, for example, was just one of many such locations where control was fiercely contested, illustrating the shifting fortunes that marked the entire campaign.

Derna
Air power played a crucial role in the mobile warfare of the North African campaign, providing both strategic reach and tactical flexibility to ground operations. In the vast, open desert, where frontlines were constantly shifting and long supply routes were vulnerable, control of the skies became a decisive factor. Aircraft were vital for reconnaissance, giving commanders the ability to spot enemy movements and adapt their plans accordingly. Bombers and fighter-bombers were equally essential, capable of striking at enemy supply lines, disrupting troop concentrations, and providing close air support to advancing armoured units. The mobility of air power allowed both sides to respond swiftly to changes on the ground, whether by reinforcing vulnerable points or launching pre-emptive strikes. Given the limited infrastructure in the desert, securing airfields became a priority, as these locations served as critical bases from which air operations could be sustained. As a result, air superiority was often the difference between success and failure in this theatre, enabling swift advances and forcing retreats, and making air power an indispensable element in the fluid and rapidly evolving battles of North Africa.
The airfield at Derna serves as a telling example of the back-and-forth nature of the North African campaign, where control of strategic locations could shift rapidly depending on the flow of battle. Situated along the Libyan coast, Derna’s airfield was a crucial asset for both Axis and Allied forces due to its location and its role in supporting operations across the region. The airfield’s significance lay not only in its ability to host aircraft for reconnaissance and bombing missions but also as a logistical hub, enabling the rapid deployment and resupply of ground forces.
Control of Derna’s airfield changed hands multiple times during the campaign, reflecting the fluid dynamics that defined the conflict in North Africa. Each time one side seized the airfield, it was often quickly forced to defend it against counterattacks as the opposing force sought to regain control. This constant tug-of-war illustrated how neither side could afford to stay static; success depended on remaining agile, adapting to shifting conditions, and exploiting brief opportunities to strike or withdraw. The airfield’s contested status throughout the campaign highlights how key positions in this theatre were not easily held and how mobility was central to the strategies employed by both Axis and Allied commanders.
The Desert Air Force and the SAAF
The Desert Air Force
“Anyone who has to fight, even with the most modern weapons, against an enemy in complete command of the air, fights like a savage against modern European troops, under the same handicaps and with the same chances of success.” – Field Marshal Erwin Rommel
The SAAF
Between April 1941 and May 1943, the eleven squadrons of the SAAF flew 33,991 sorties and destroyed 342 enemy aircraft. In North Africa, the SAAF fighter, bomber, and reconnaissance squadrons played a major part in enabling the Desert Air Force to attain total air superiority over the Axis air forces by the beginning of 1942.
“The SAAF’s involvement in the North African campaign was marked by tenacity and adaptability, with airfields such as Derna serving as pivotal bases for reconnaissance, bombing, and air support missions that disrupted enemy supply lines and bolstered ground offensives.” – SAAF archives
December 18, 1941 – February 3 1942
Taking a look at the Summary of Operations for Number 1 Squadron, SAAF over the six weeks between late December and early February 1943 is ample illustration of the challenges and fluidity of the campaign. The absolute importance of airfields like Derna, and the difficulties of operating from them, is quite clear.
Dec 18 – 1S begins move to GAZALA
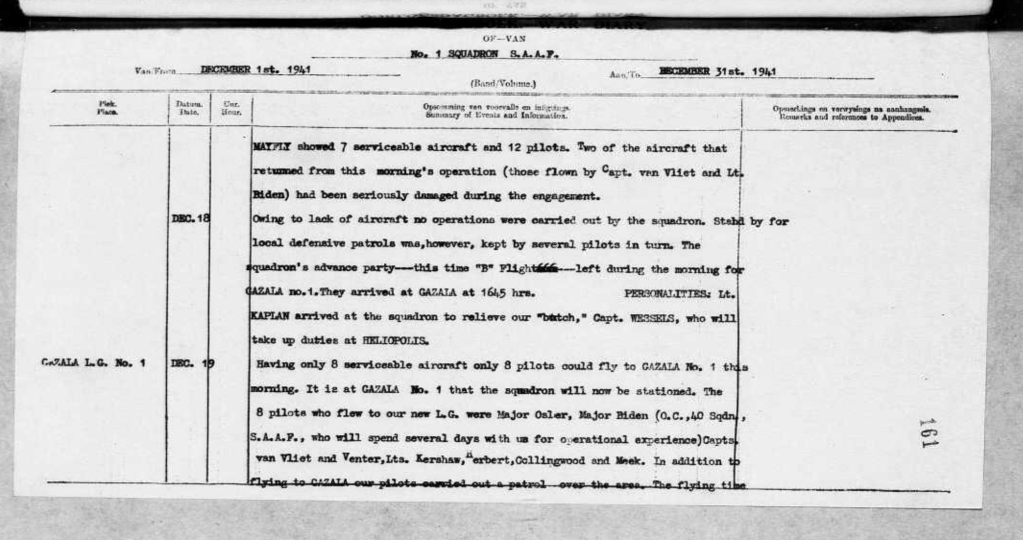
Dec 20 the Indian Brigade attacks and takes DERNA
Dec 21 – Squadron receives orders to move to MACHILI

Dec 23 – first operation form MECHILI
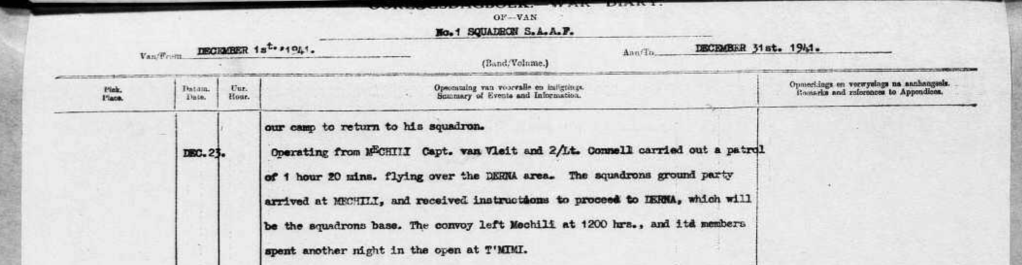
Dec 23 – Squadron’s ground party arrives at MECHILI and receives orders to proceed to DERNA
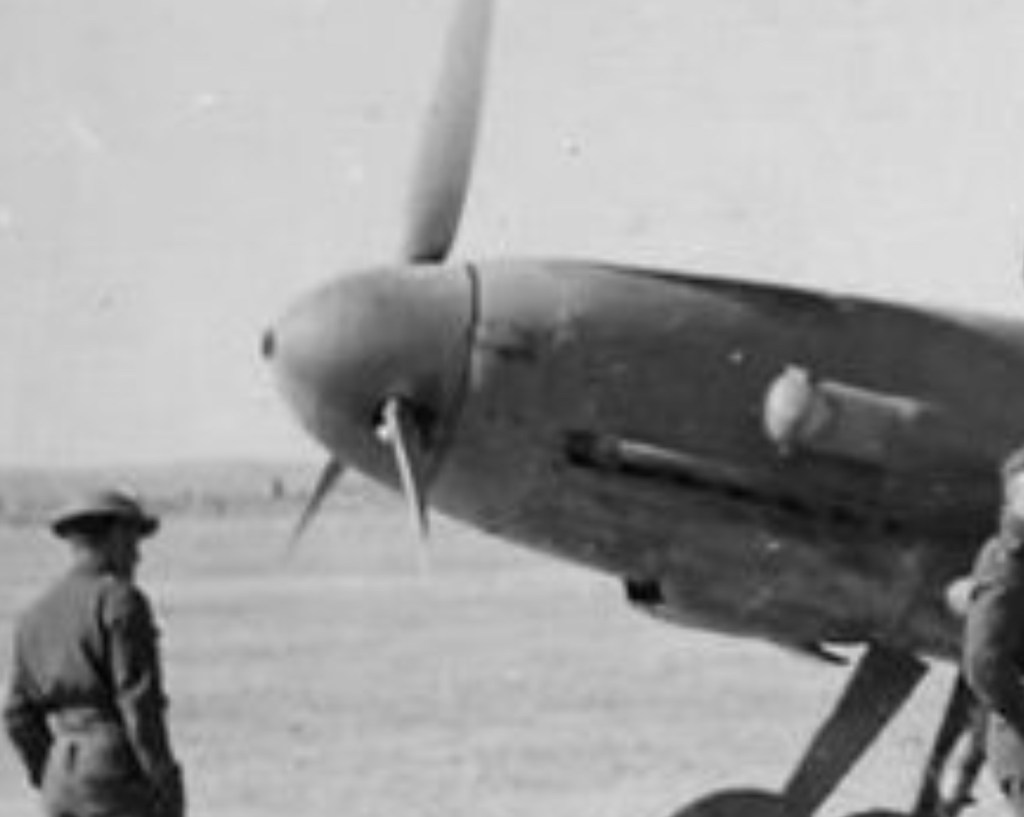
Dec 24 – Squadron arrives DERNA and finds it a “sea of mud” and a crash-landed Bf109F-4 “Yellow 2”.

Damage to prop, wings and undercarriage and most of the instruments had been removed from the cockpit.

Dec 26 – four Hurricanes are able to take off to begin operations from DERNA

Jan 5 – after nearly a week of rain, a detachment of Squadron aircraft are moved to MATUBA

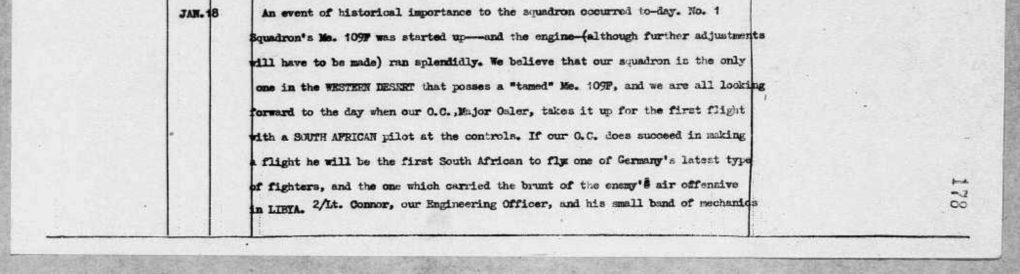
Jan 18 – At DERNA, Bf109F-4 “Yellow 2” was started for the first time after Squadron Engineering Officer 2/Lt. Connor and his ground crew succeeded in repairing the 109 to this point. Work continues to bring it to airworthiness.
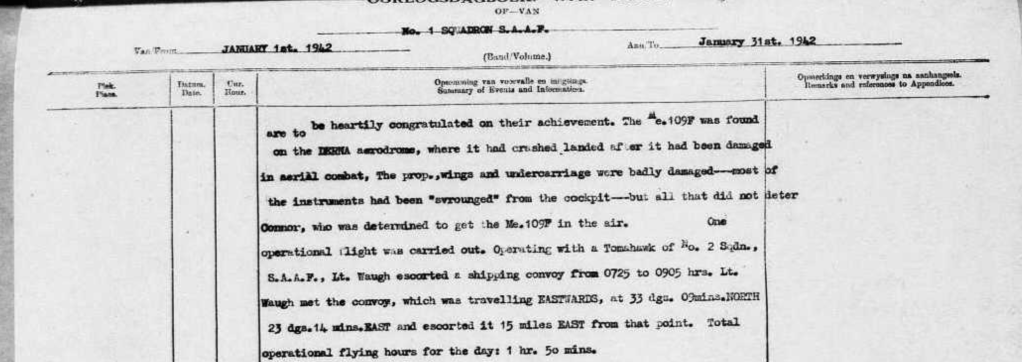
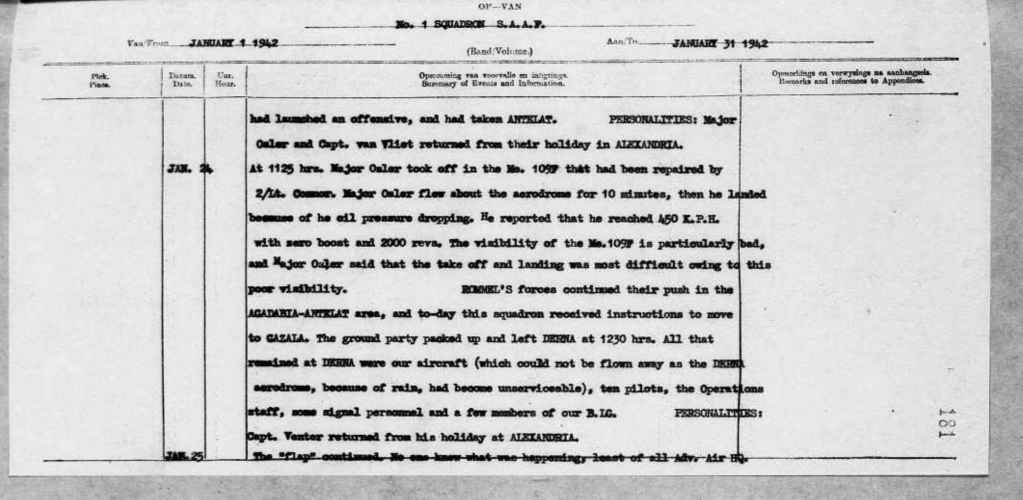
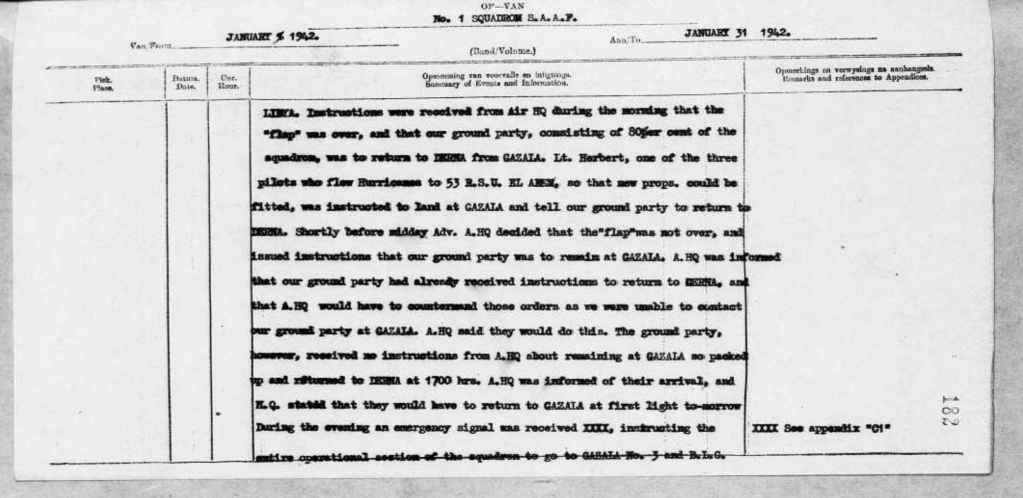
Jan 24 – Major Osler flies “Yellow 2” for the first time. Flight time is 10 minutes and he returned to base as engine oil pressure was falling. Squadron receives orders to move to GAZALA due to German forces advance in the AGADAHIA-ANTELAT area.

Ground party departs DERNA at 1230hrs but all aircraft remain due to waterlogged airfield.

Jan 24/25 – In the morning, the Squadron ground party ordered to return to DERNA. In the afternoon, the orders were countermanded but too late to stop the ground party’s progress and they could not be contacted en route. Ground party arrived DERNA at 1700hrs and were told to return to GAZALA at first light. Major Osler flew “Yellow 2” to MATURBA.
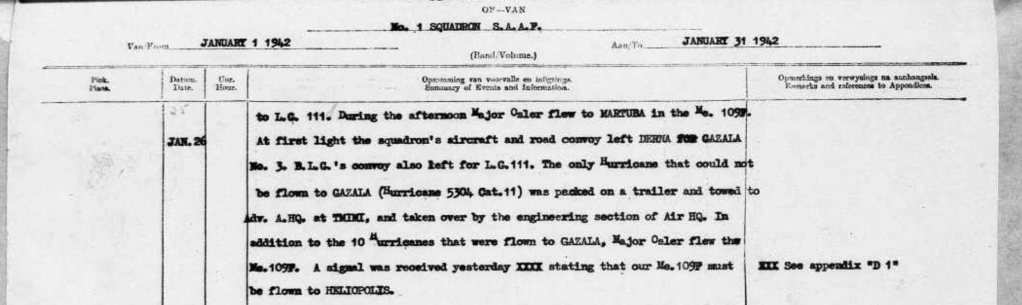
Jan 26 – Squadron’s aircraft and ground convoy left DERNA for GAZALA. Major Osler flew “Yellow 2” again but in the afternoon a signal was received ordering the 109 to be flown to HELIOPOLIS.
Feb 3 – Major Osler flew “Yellow 2” from GAZALA to HELIOPOLIS as the stage of its journey to the UK for further assessment.


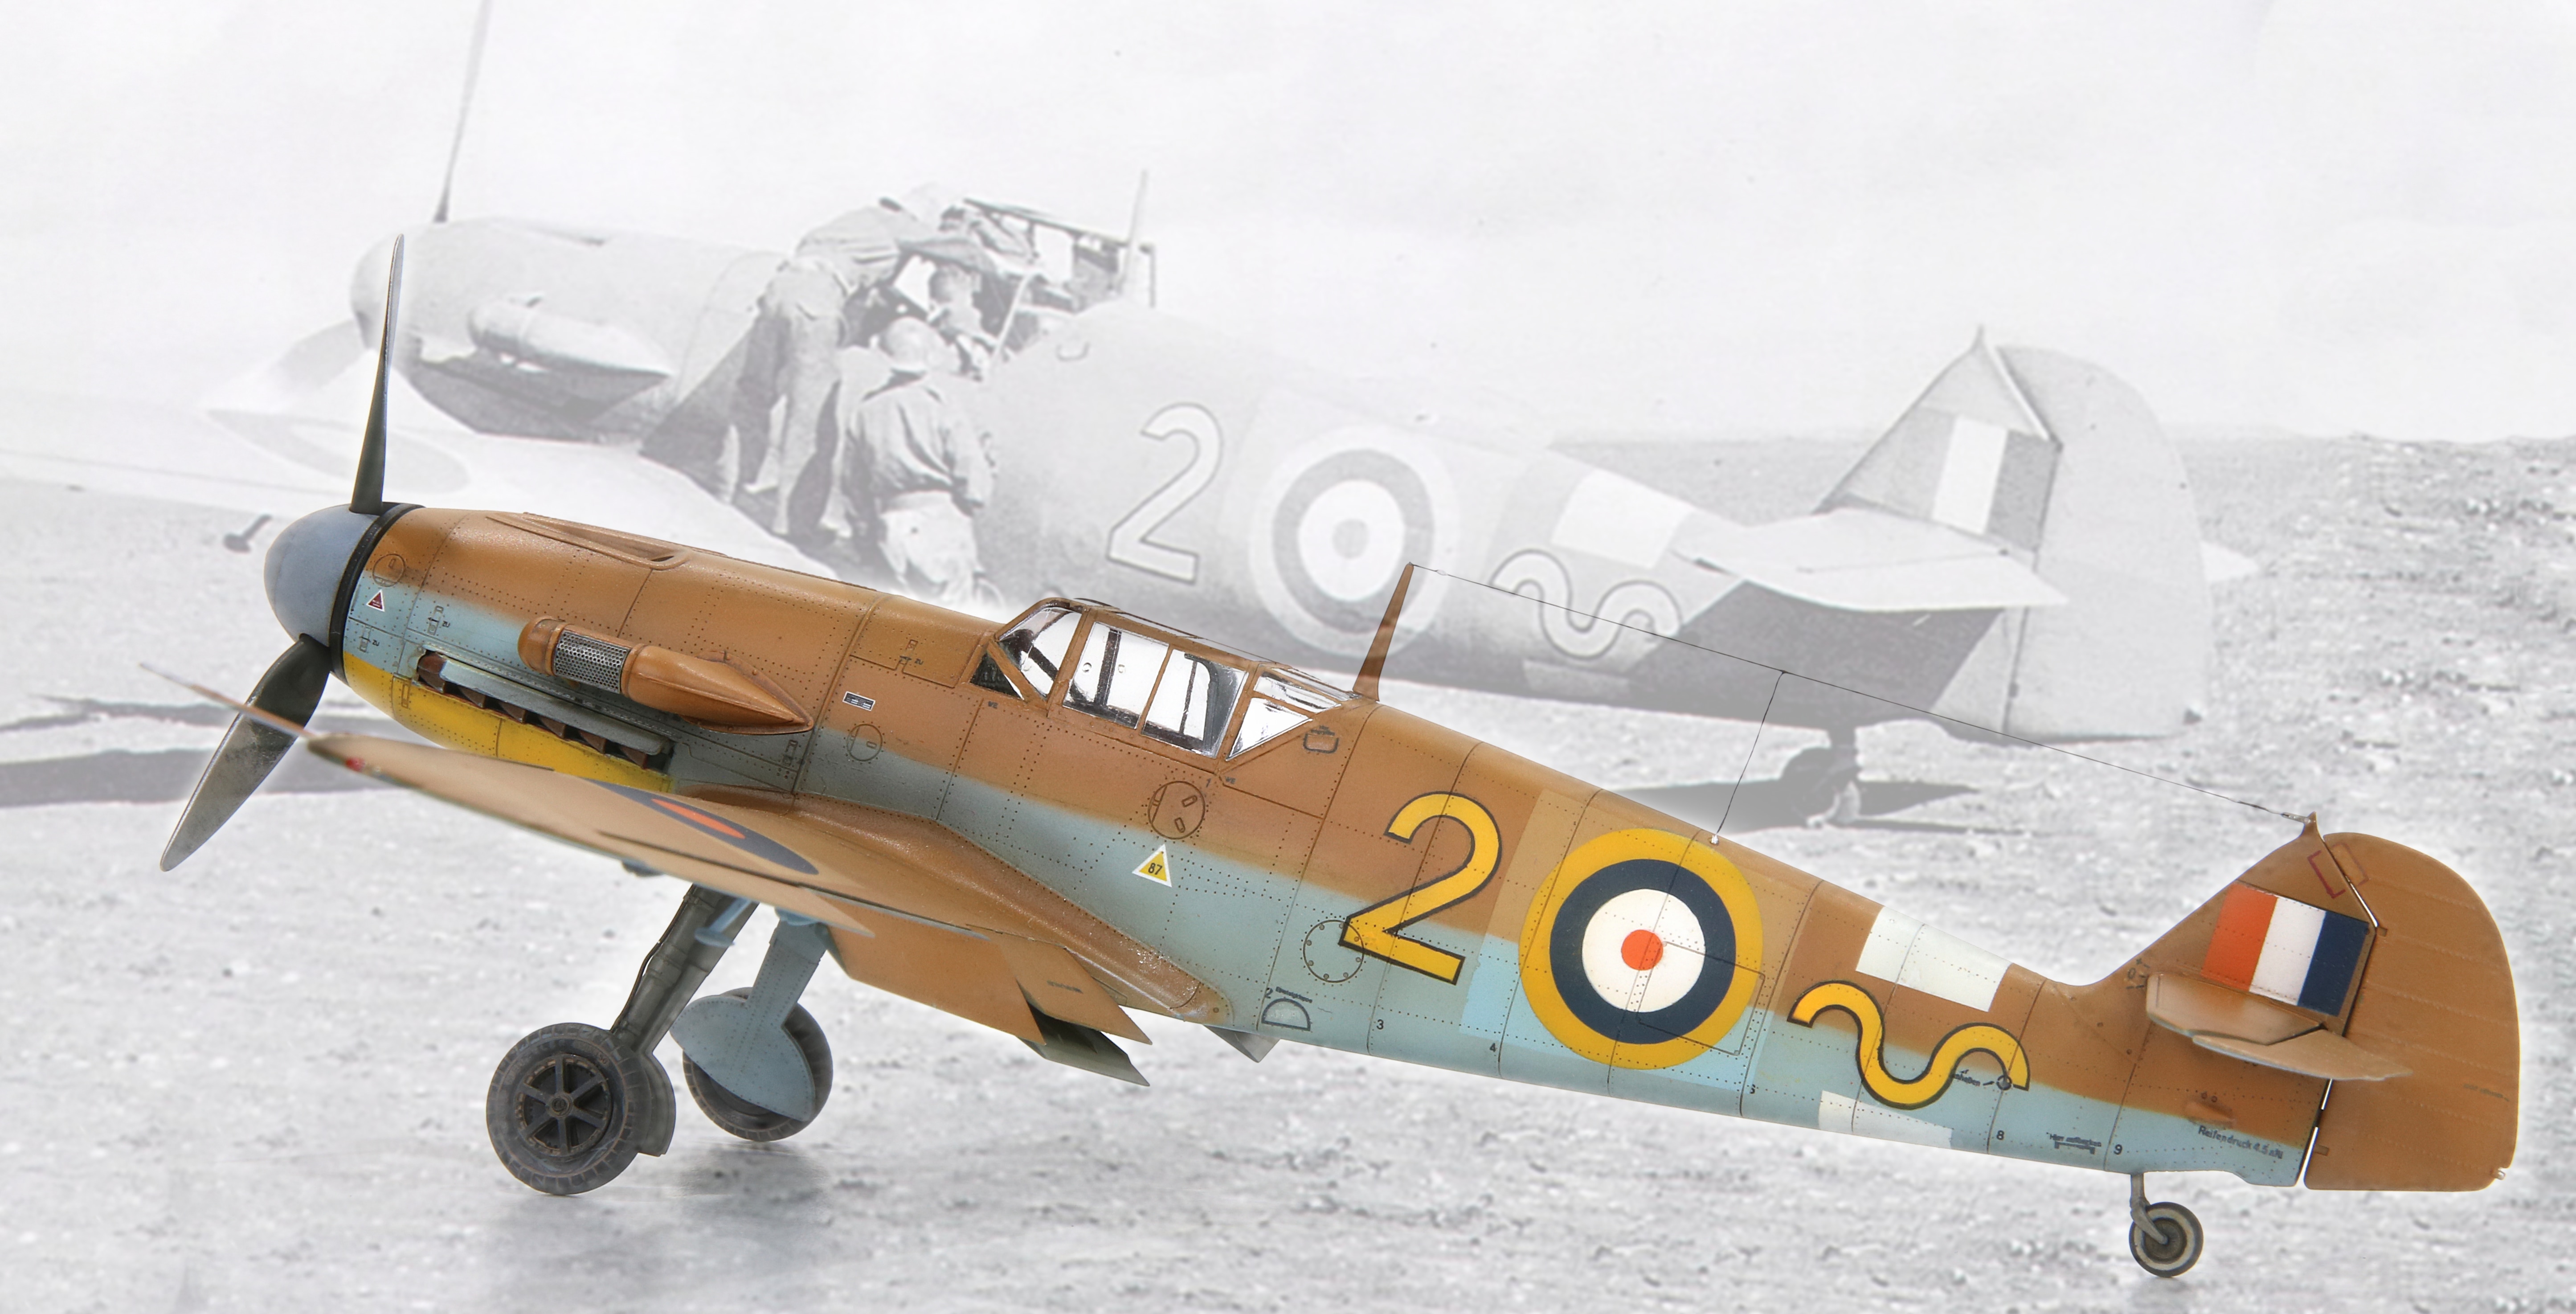
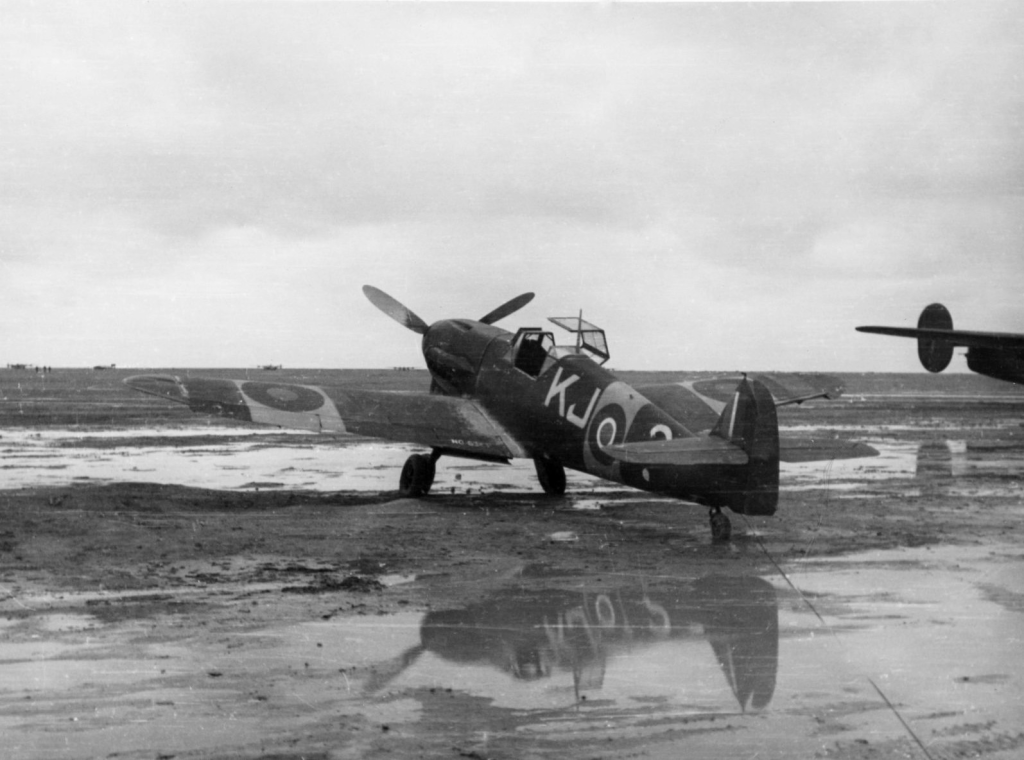
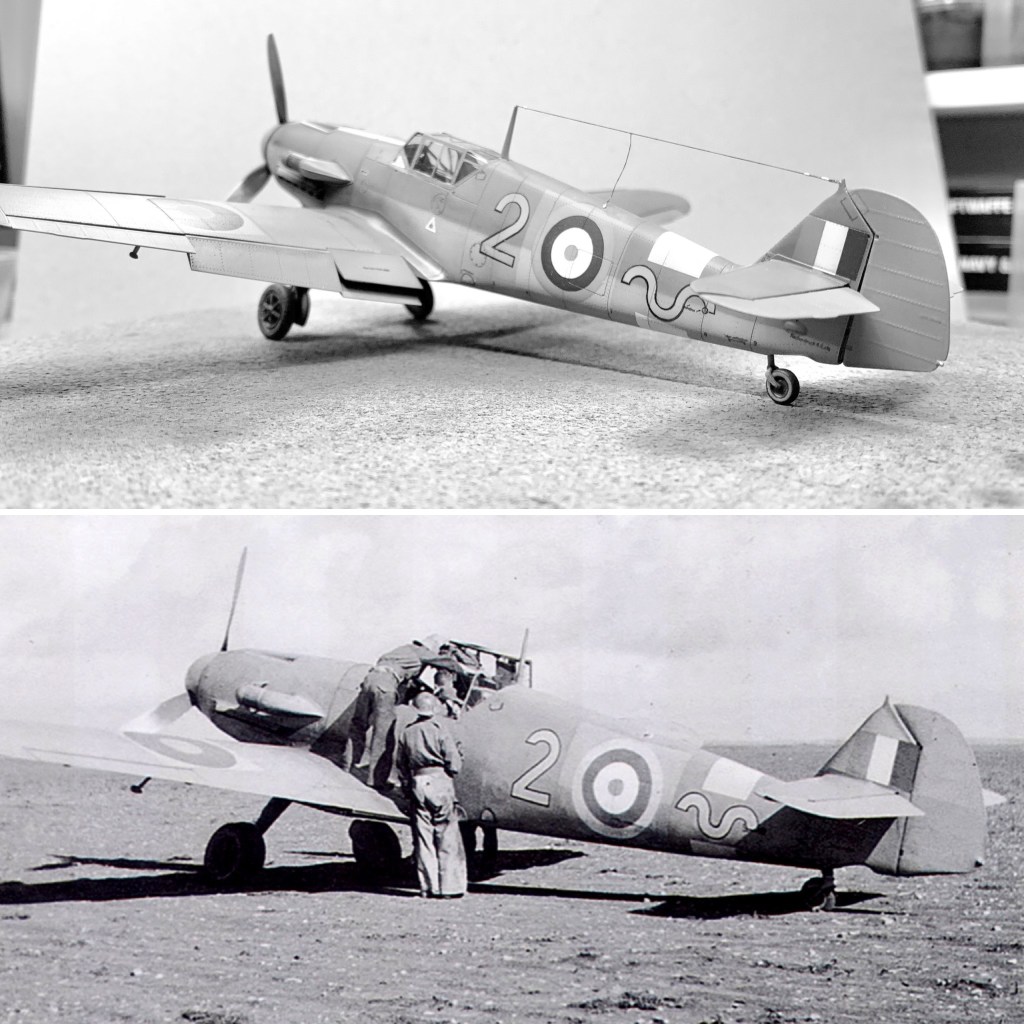
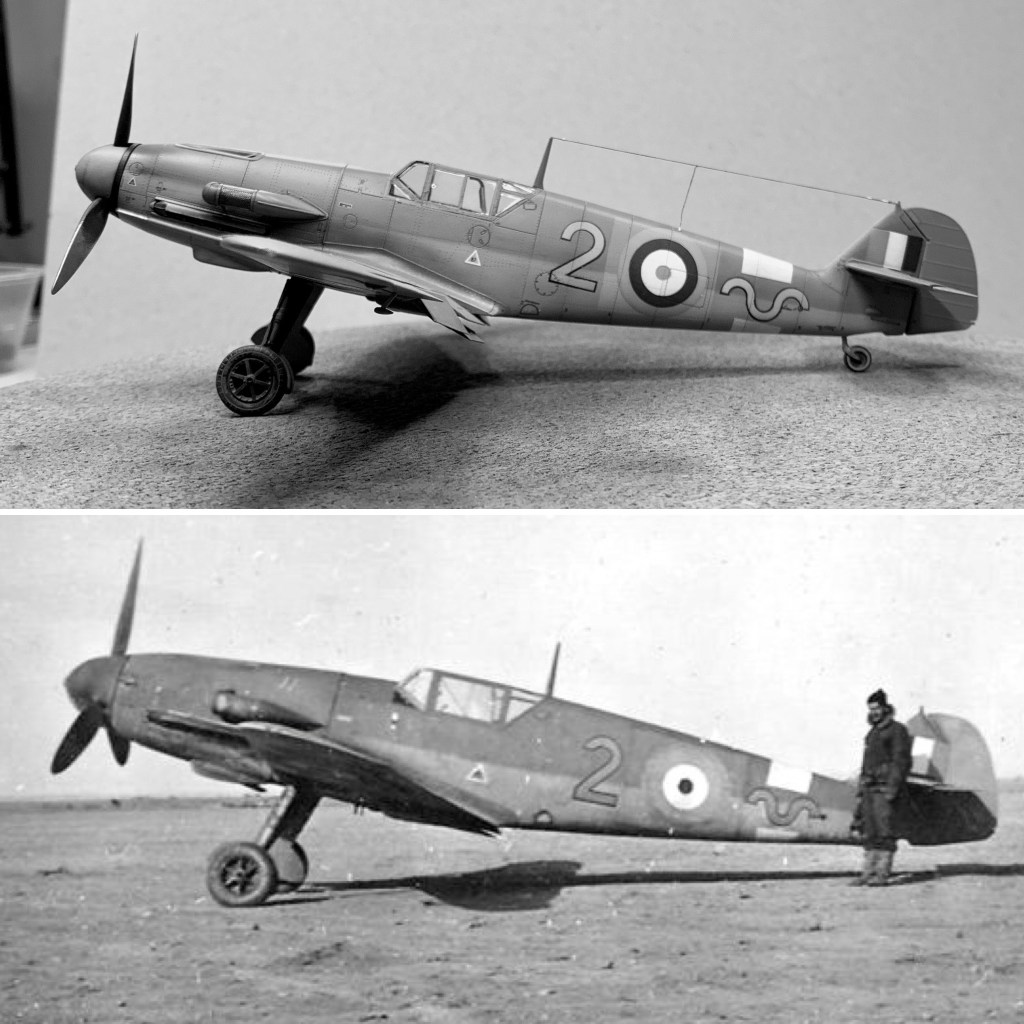
“Yellow 2”
Number 1 Squadron’s prize was significant as it was the first 109F the Allies were able to capture intact and potentially airworthy. It was found with damage to the propeller, undercarriage and with missing instruments. 1S’s Engineering Officer 2/Lt. Connor and his team were able to get it airworthy in four weeks.
In its short time with the Squadron it was flown at least three times. First impressions were that it flew well enough, had terrible visibility and that Maj. Osler at least, preferred his Hurricane.

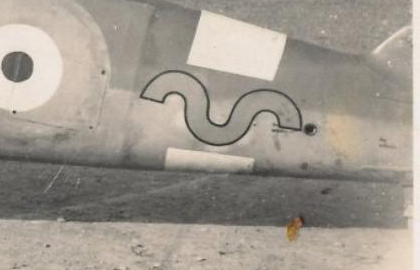
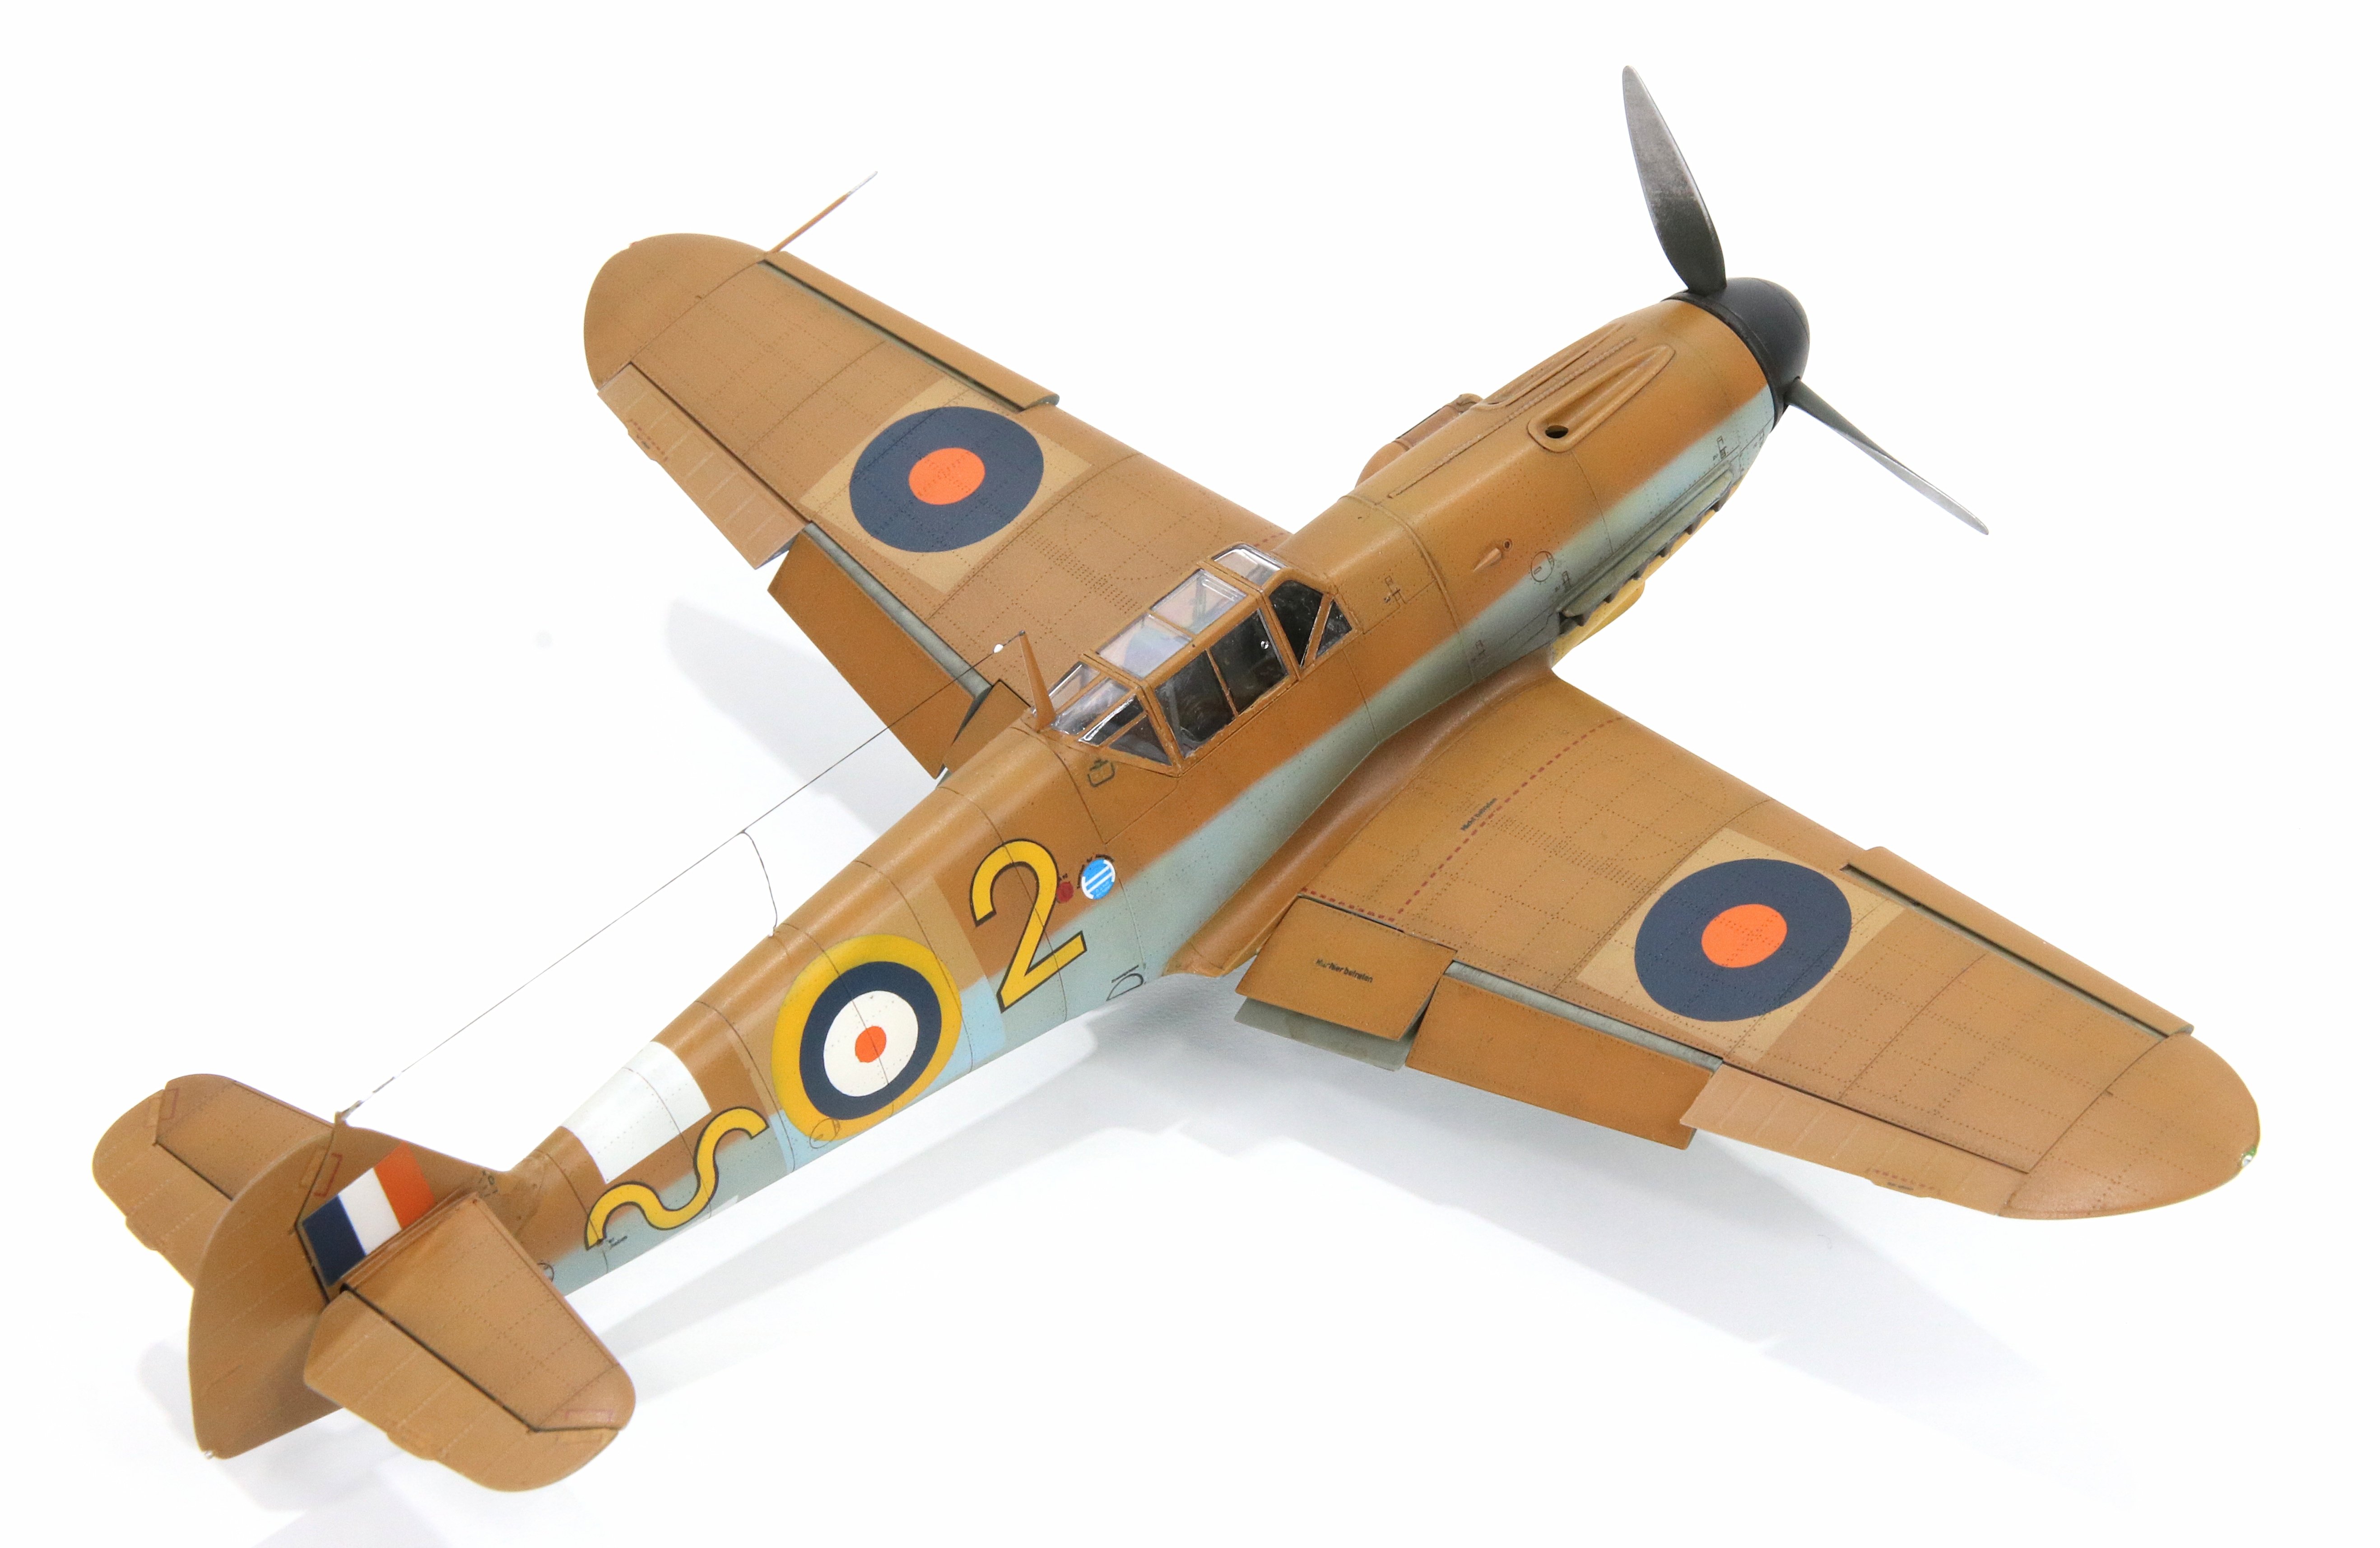
The airframe went through an evolution in its captured markings; by the time the photo above was taken some effort had been made to blend them in to the original Luftwaffe scheme and it is in this style that I planned to build me version of “Yellow 2”.
Eduard’s 1/48 Scale Messerschmitt Bf109F-2 (built as an F-4)
I had this one in my stash for a long time waiting for inspiration on a scheme. It finally arrived in the form of a captured F-4 and after checking that the required air intake filter was in the box, it landed on the bench. My only previous experience with Eduard kits was a Mk.IX Spitfire which I did not enjoy, so I approached this with some trepidation. It turned out my fears were for nought, this was a joy to build from first to last. Read on…
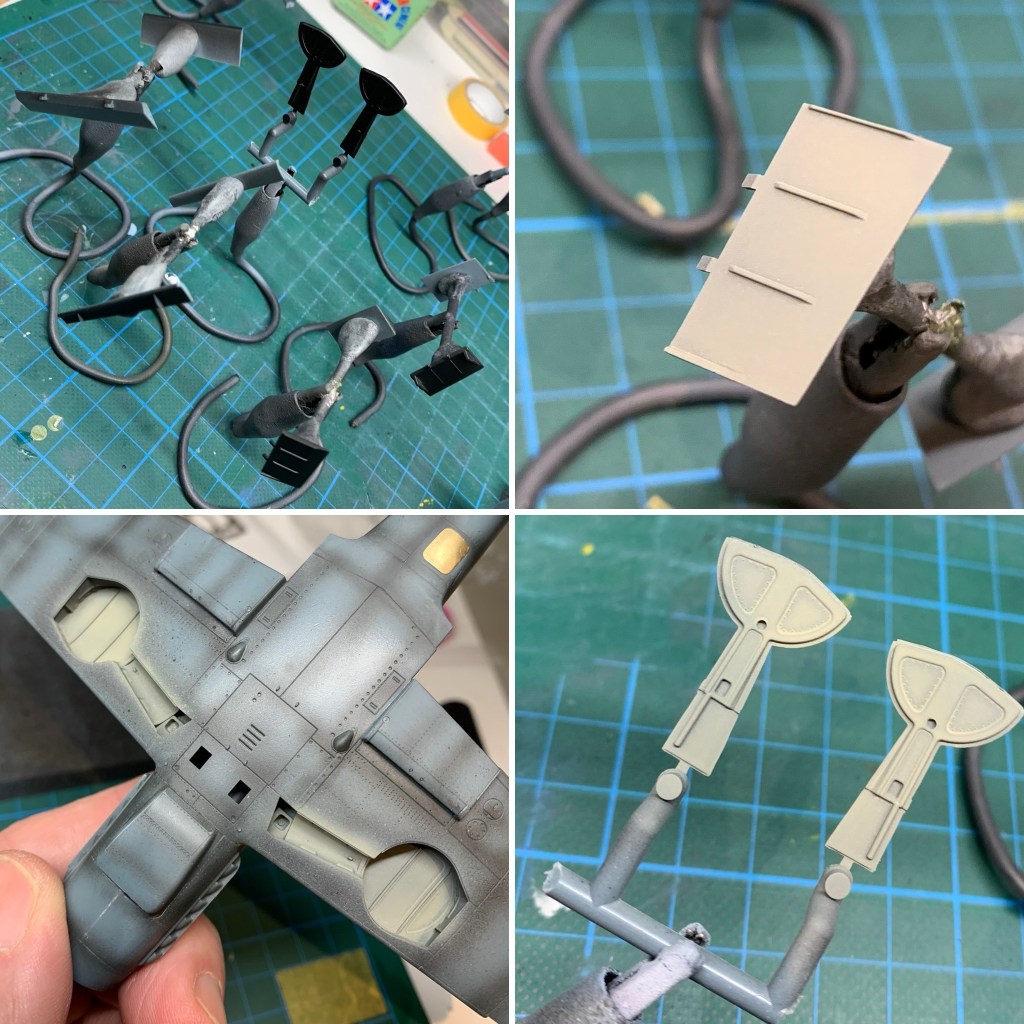
Assembly
When I built that Eduard Spitfire I found the engineering and parts breakdown to to fussy and overcomplicated. In contrast, this kit is as close to perfect in terms of its design as I’ve come across. Everything fitted, assembly was appropriately detailed and the finished result utterly convincing in this scale.
Click on any of the images below to scroll through the gallery.
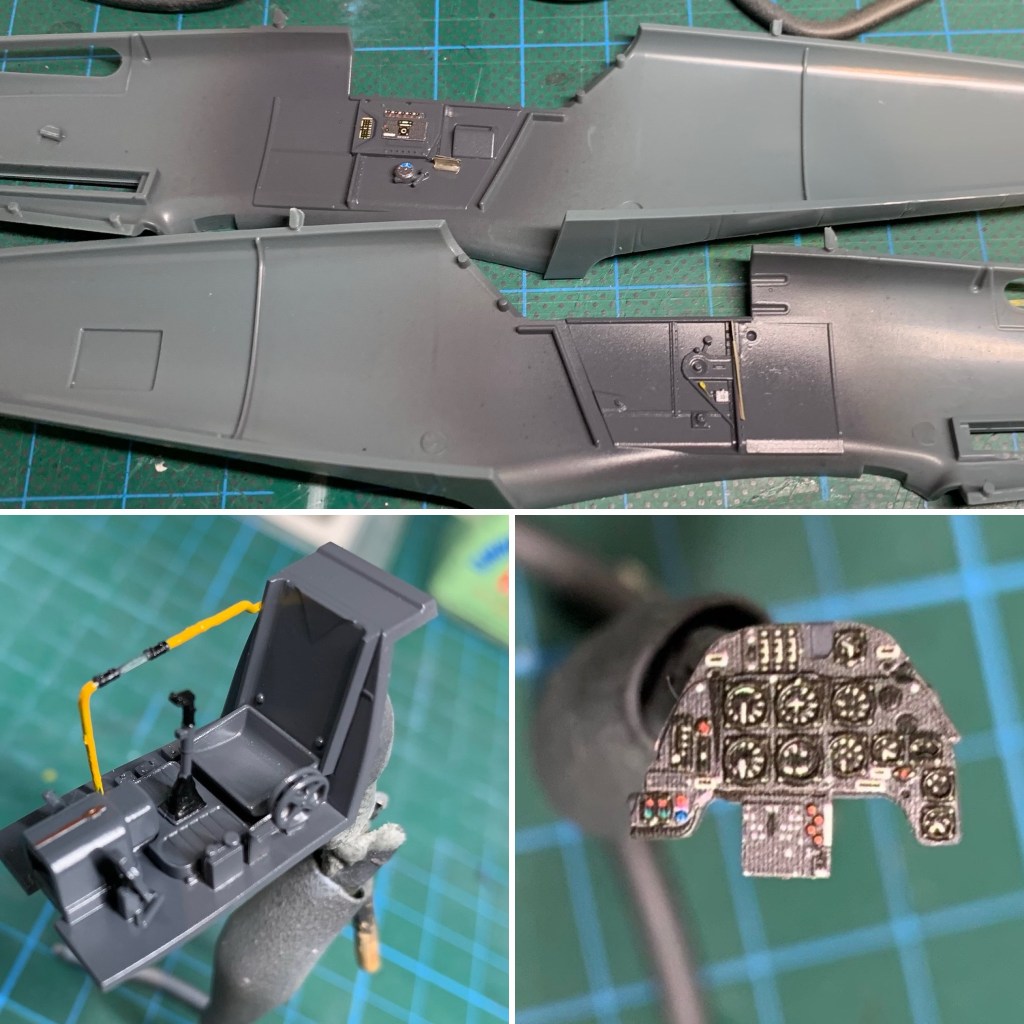
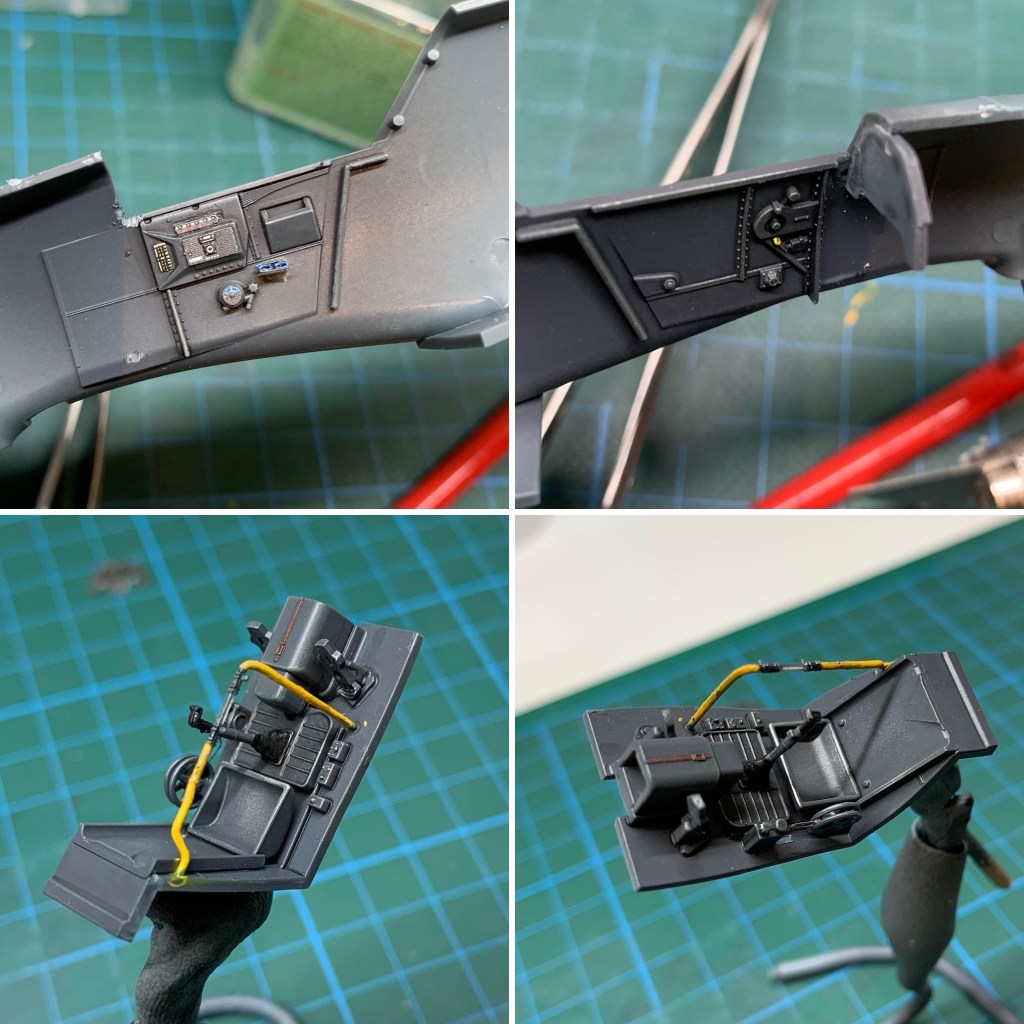
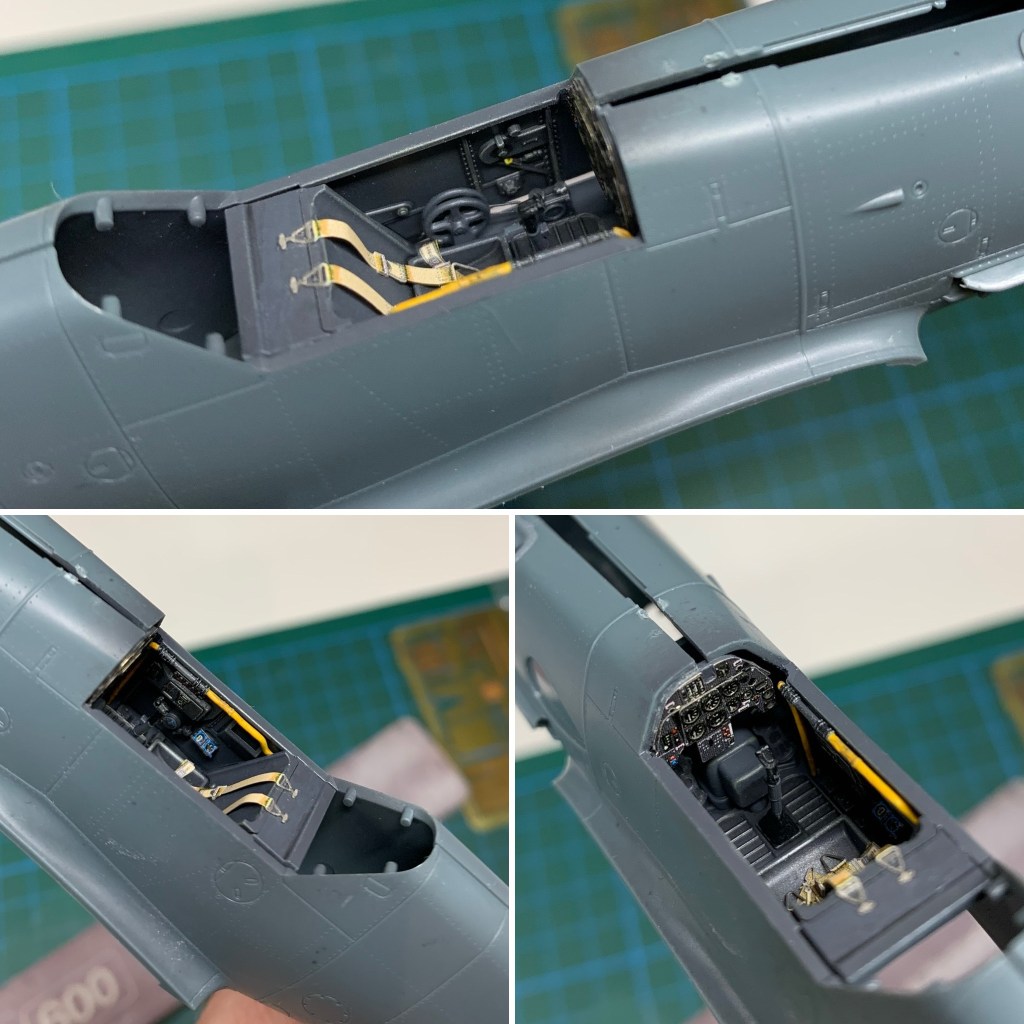


There’s about an hour’s work in the pics above – except for the cockpit. The only filler used was on one wing tip. Not bad, especially for someone as unskilled at assembly as I am.
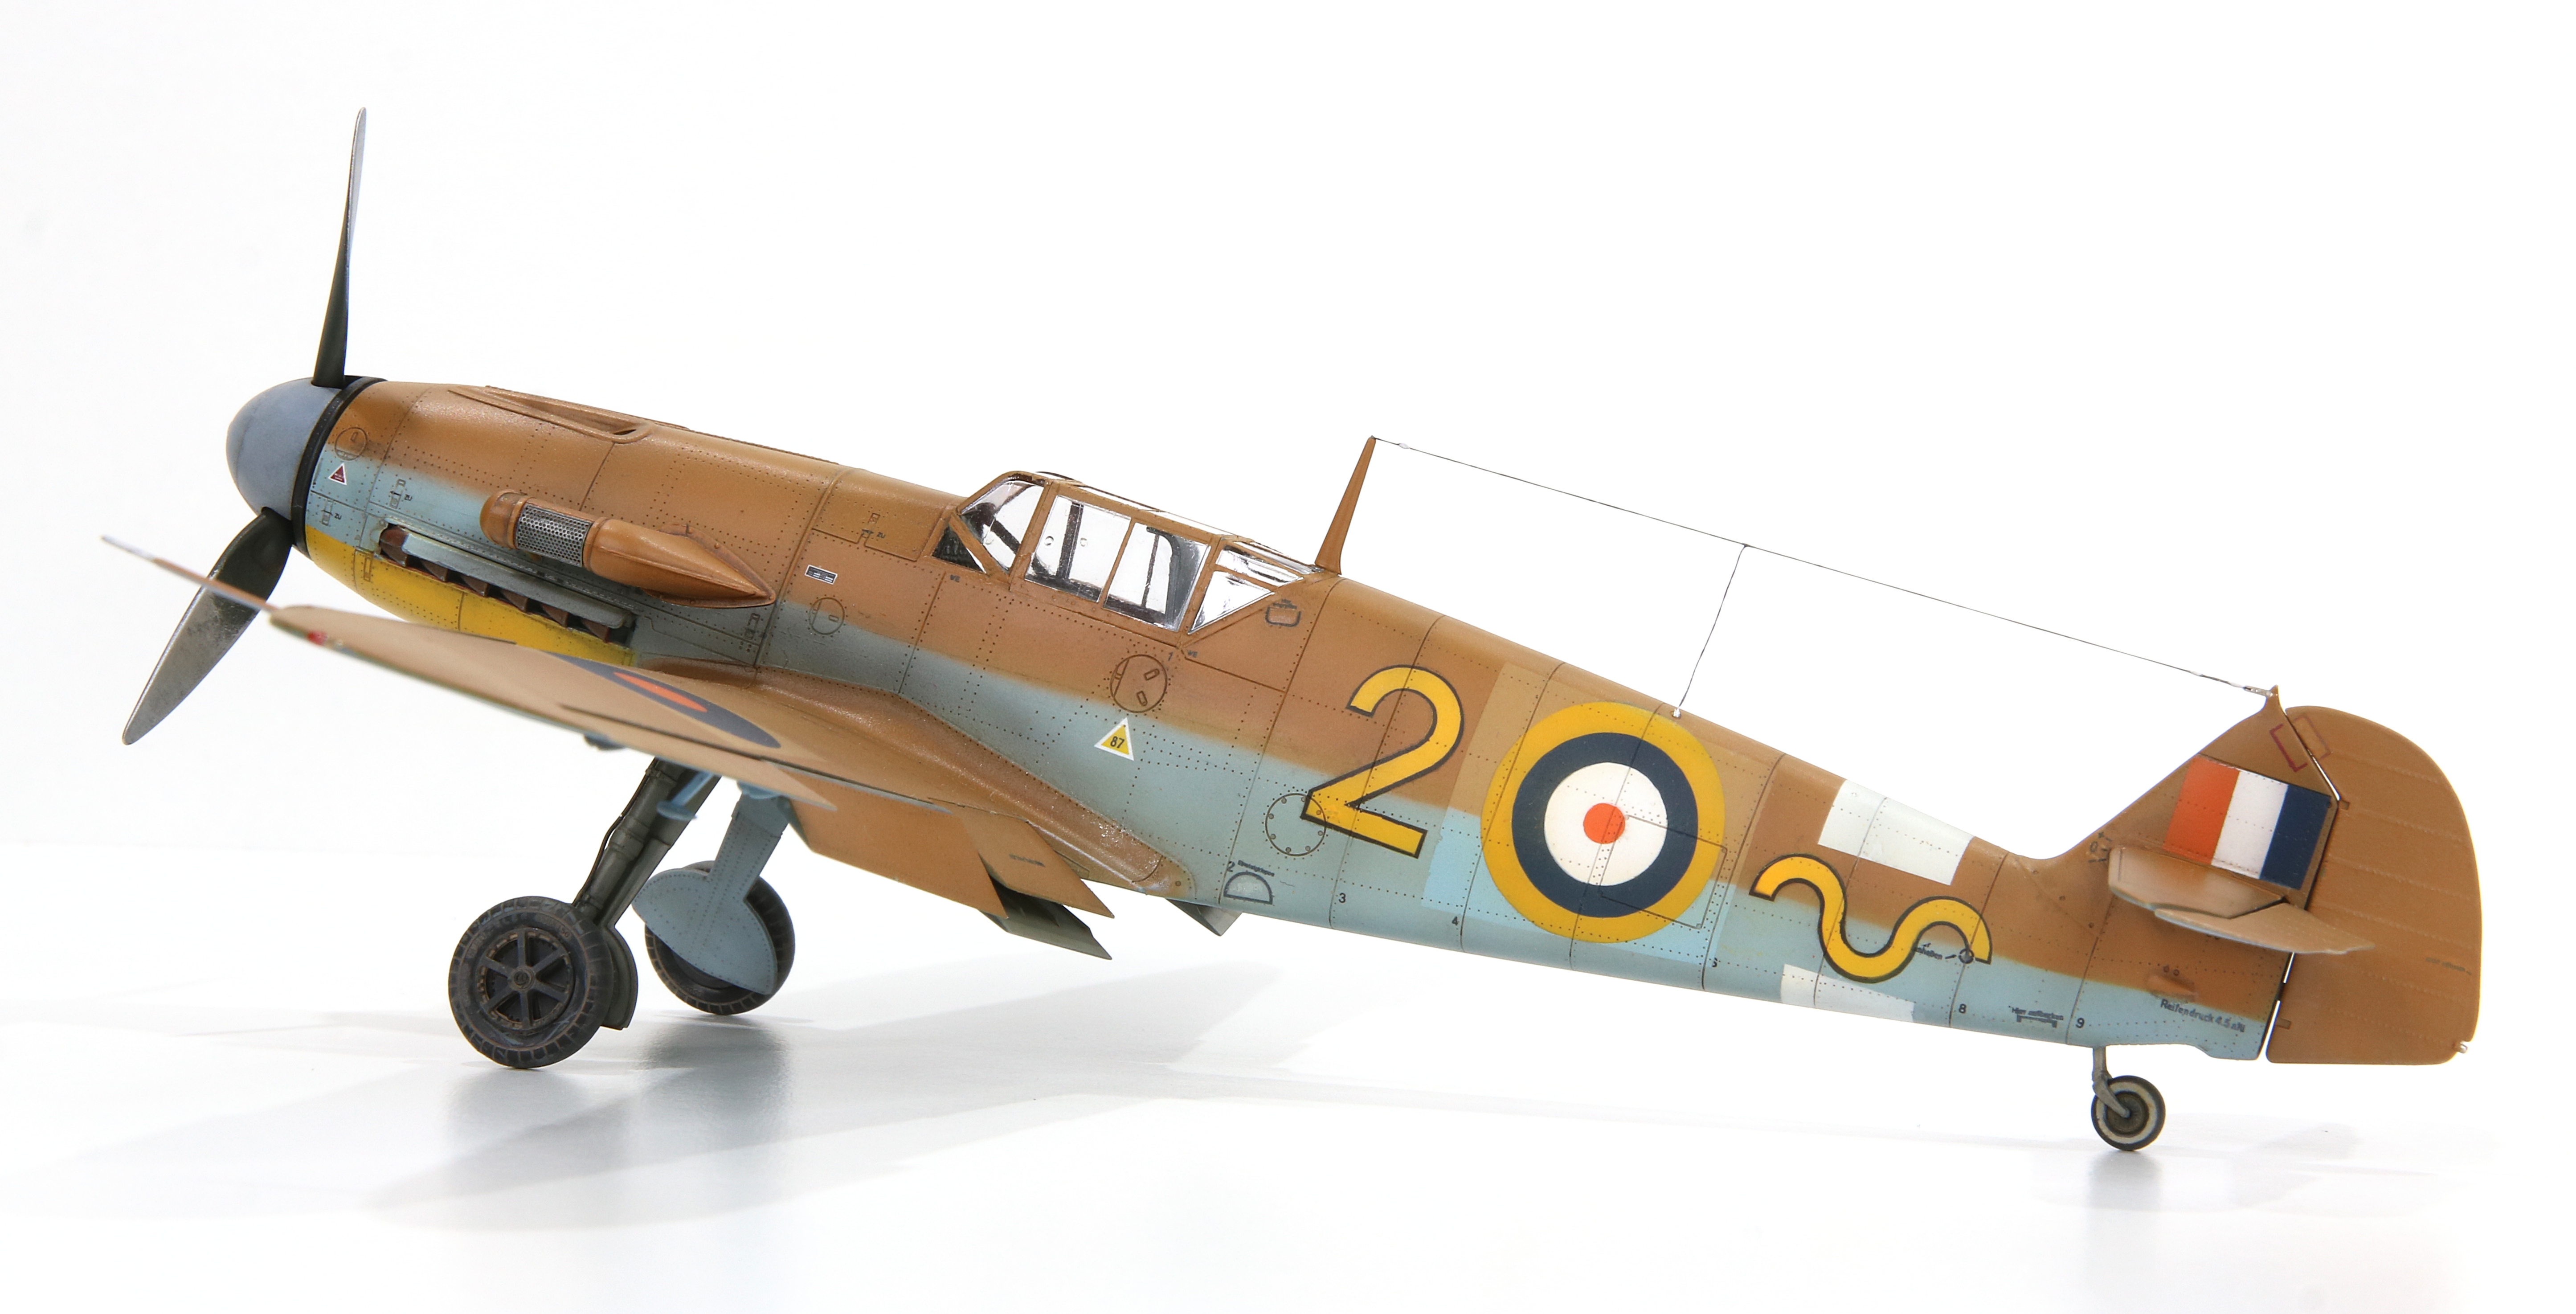
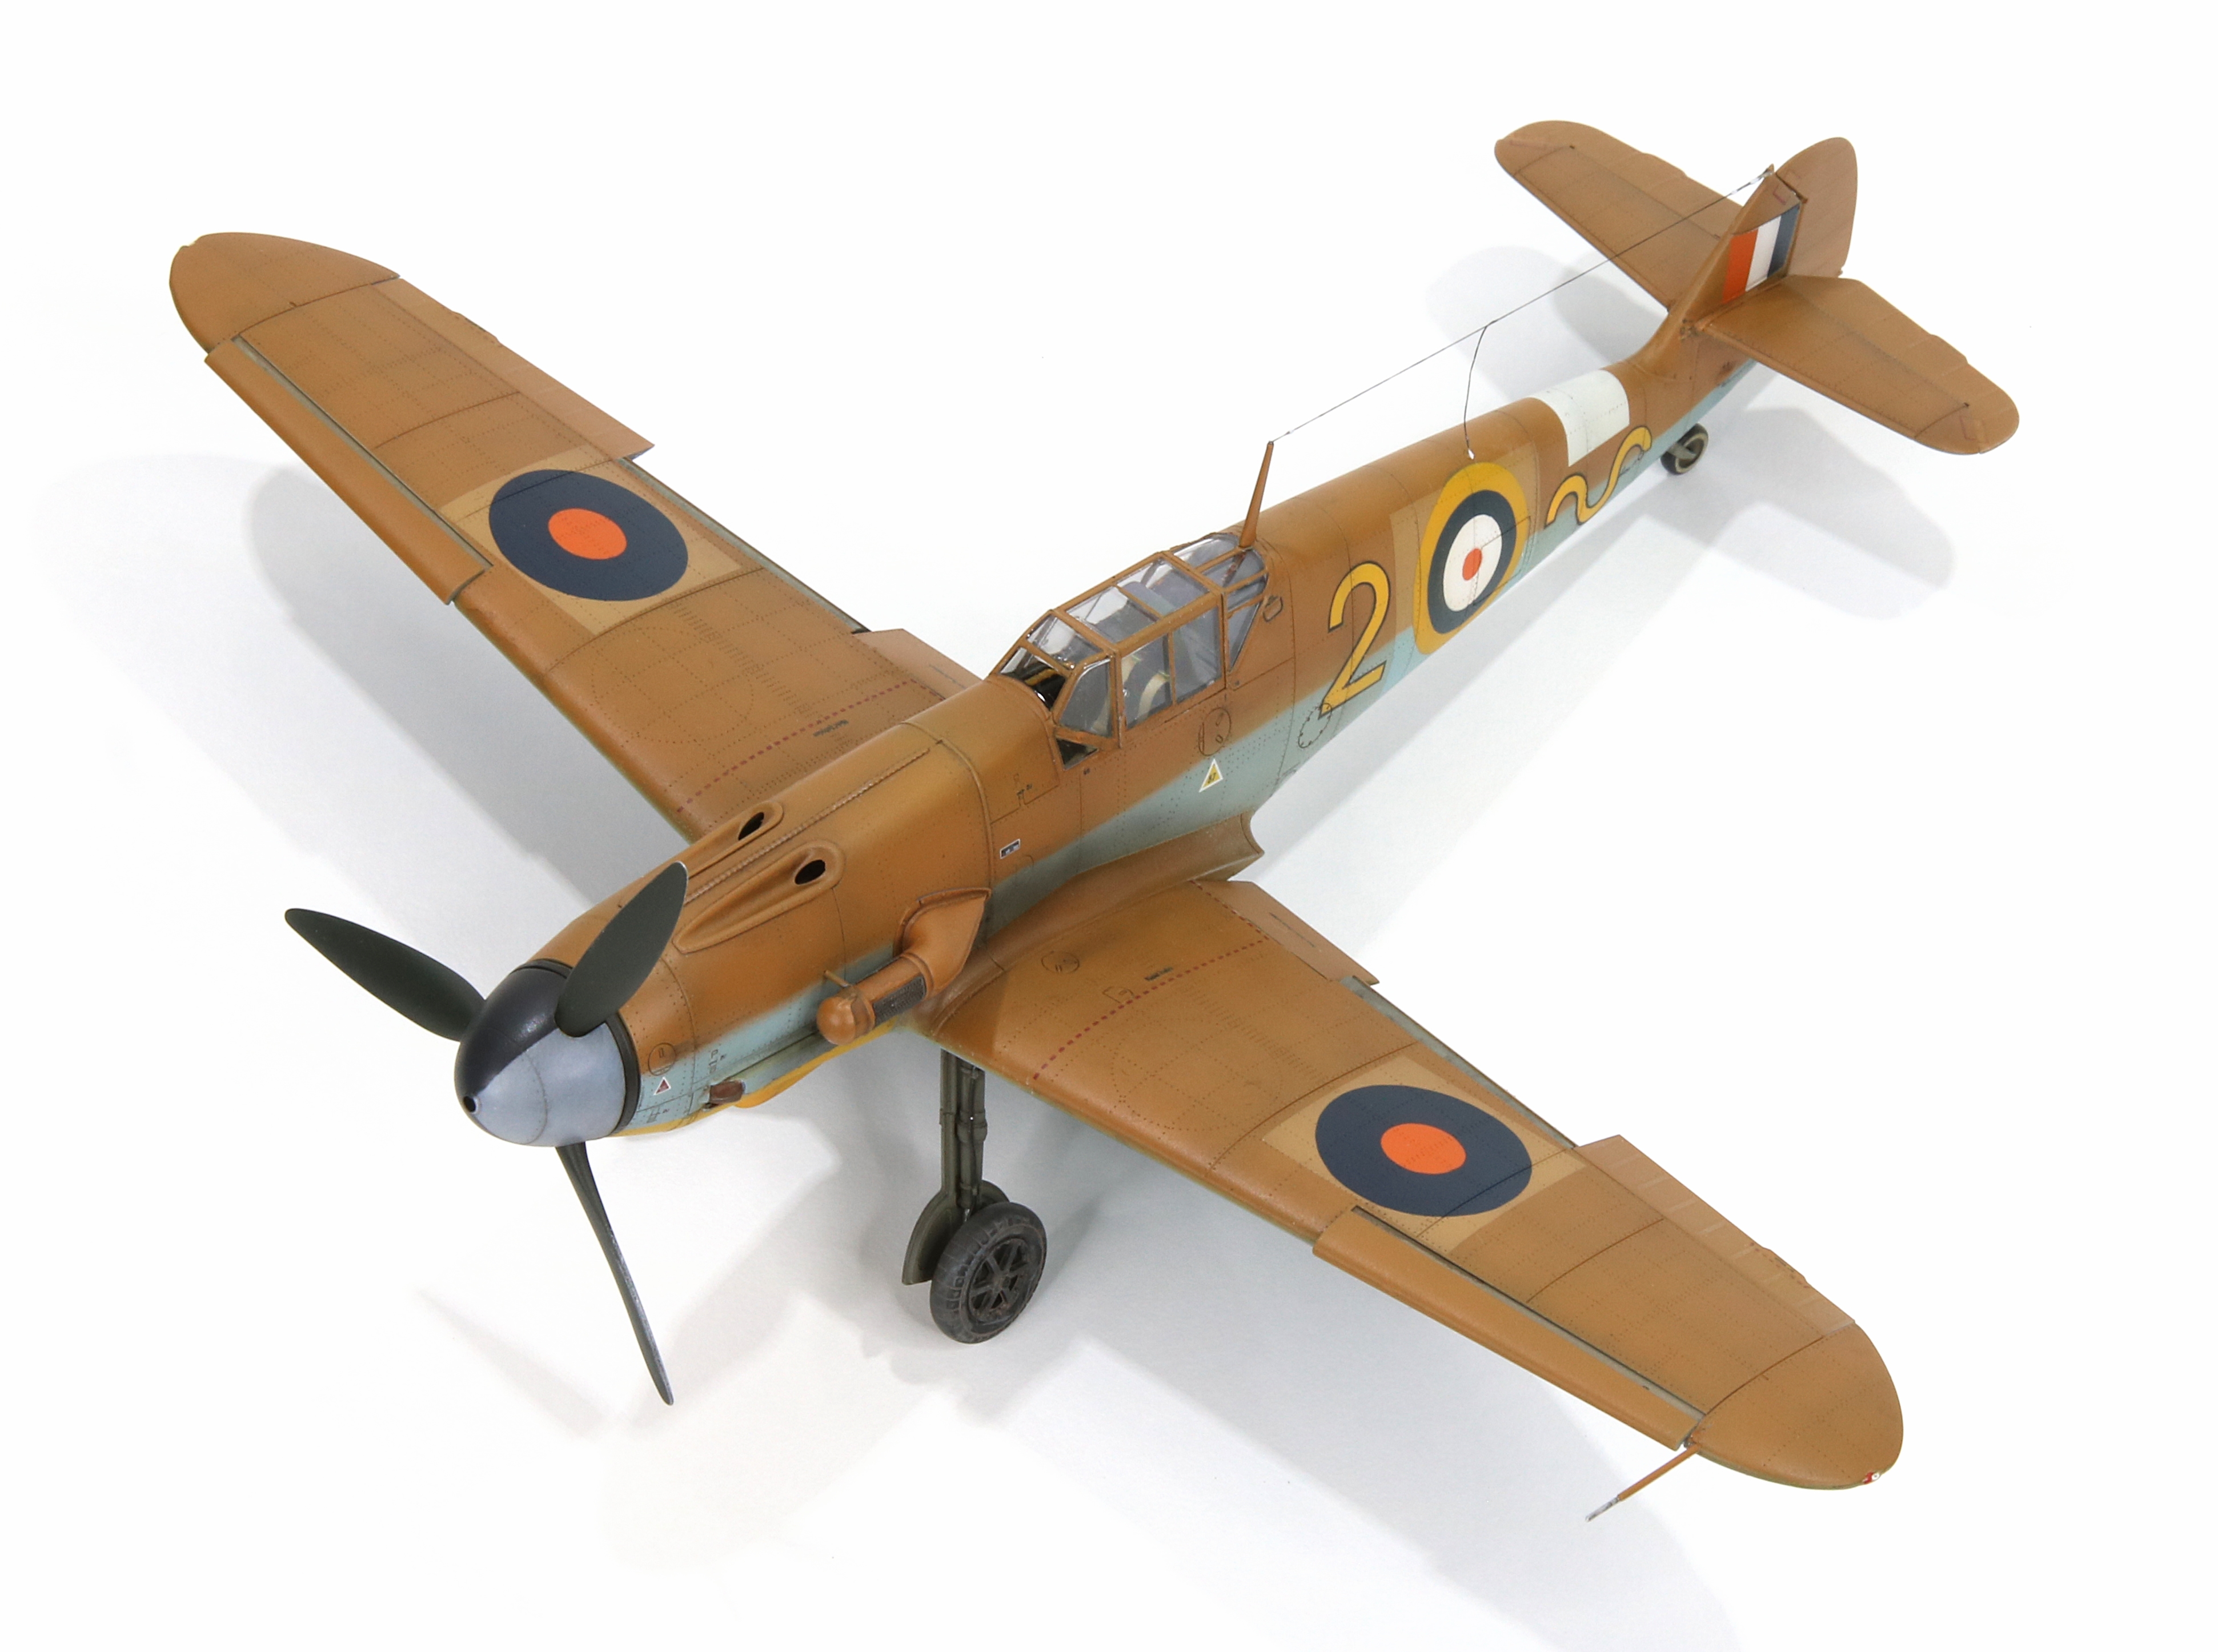
Paint – “Yellow 2”
First, a brief history of my chosen airframe.
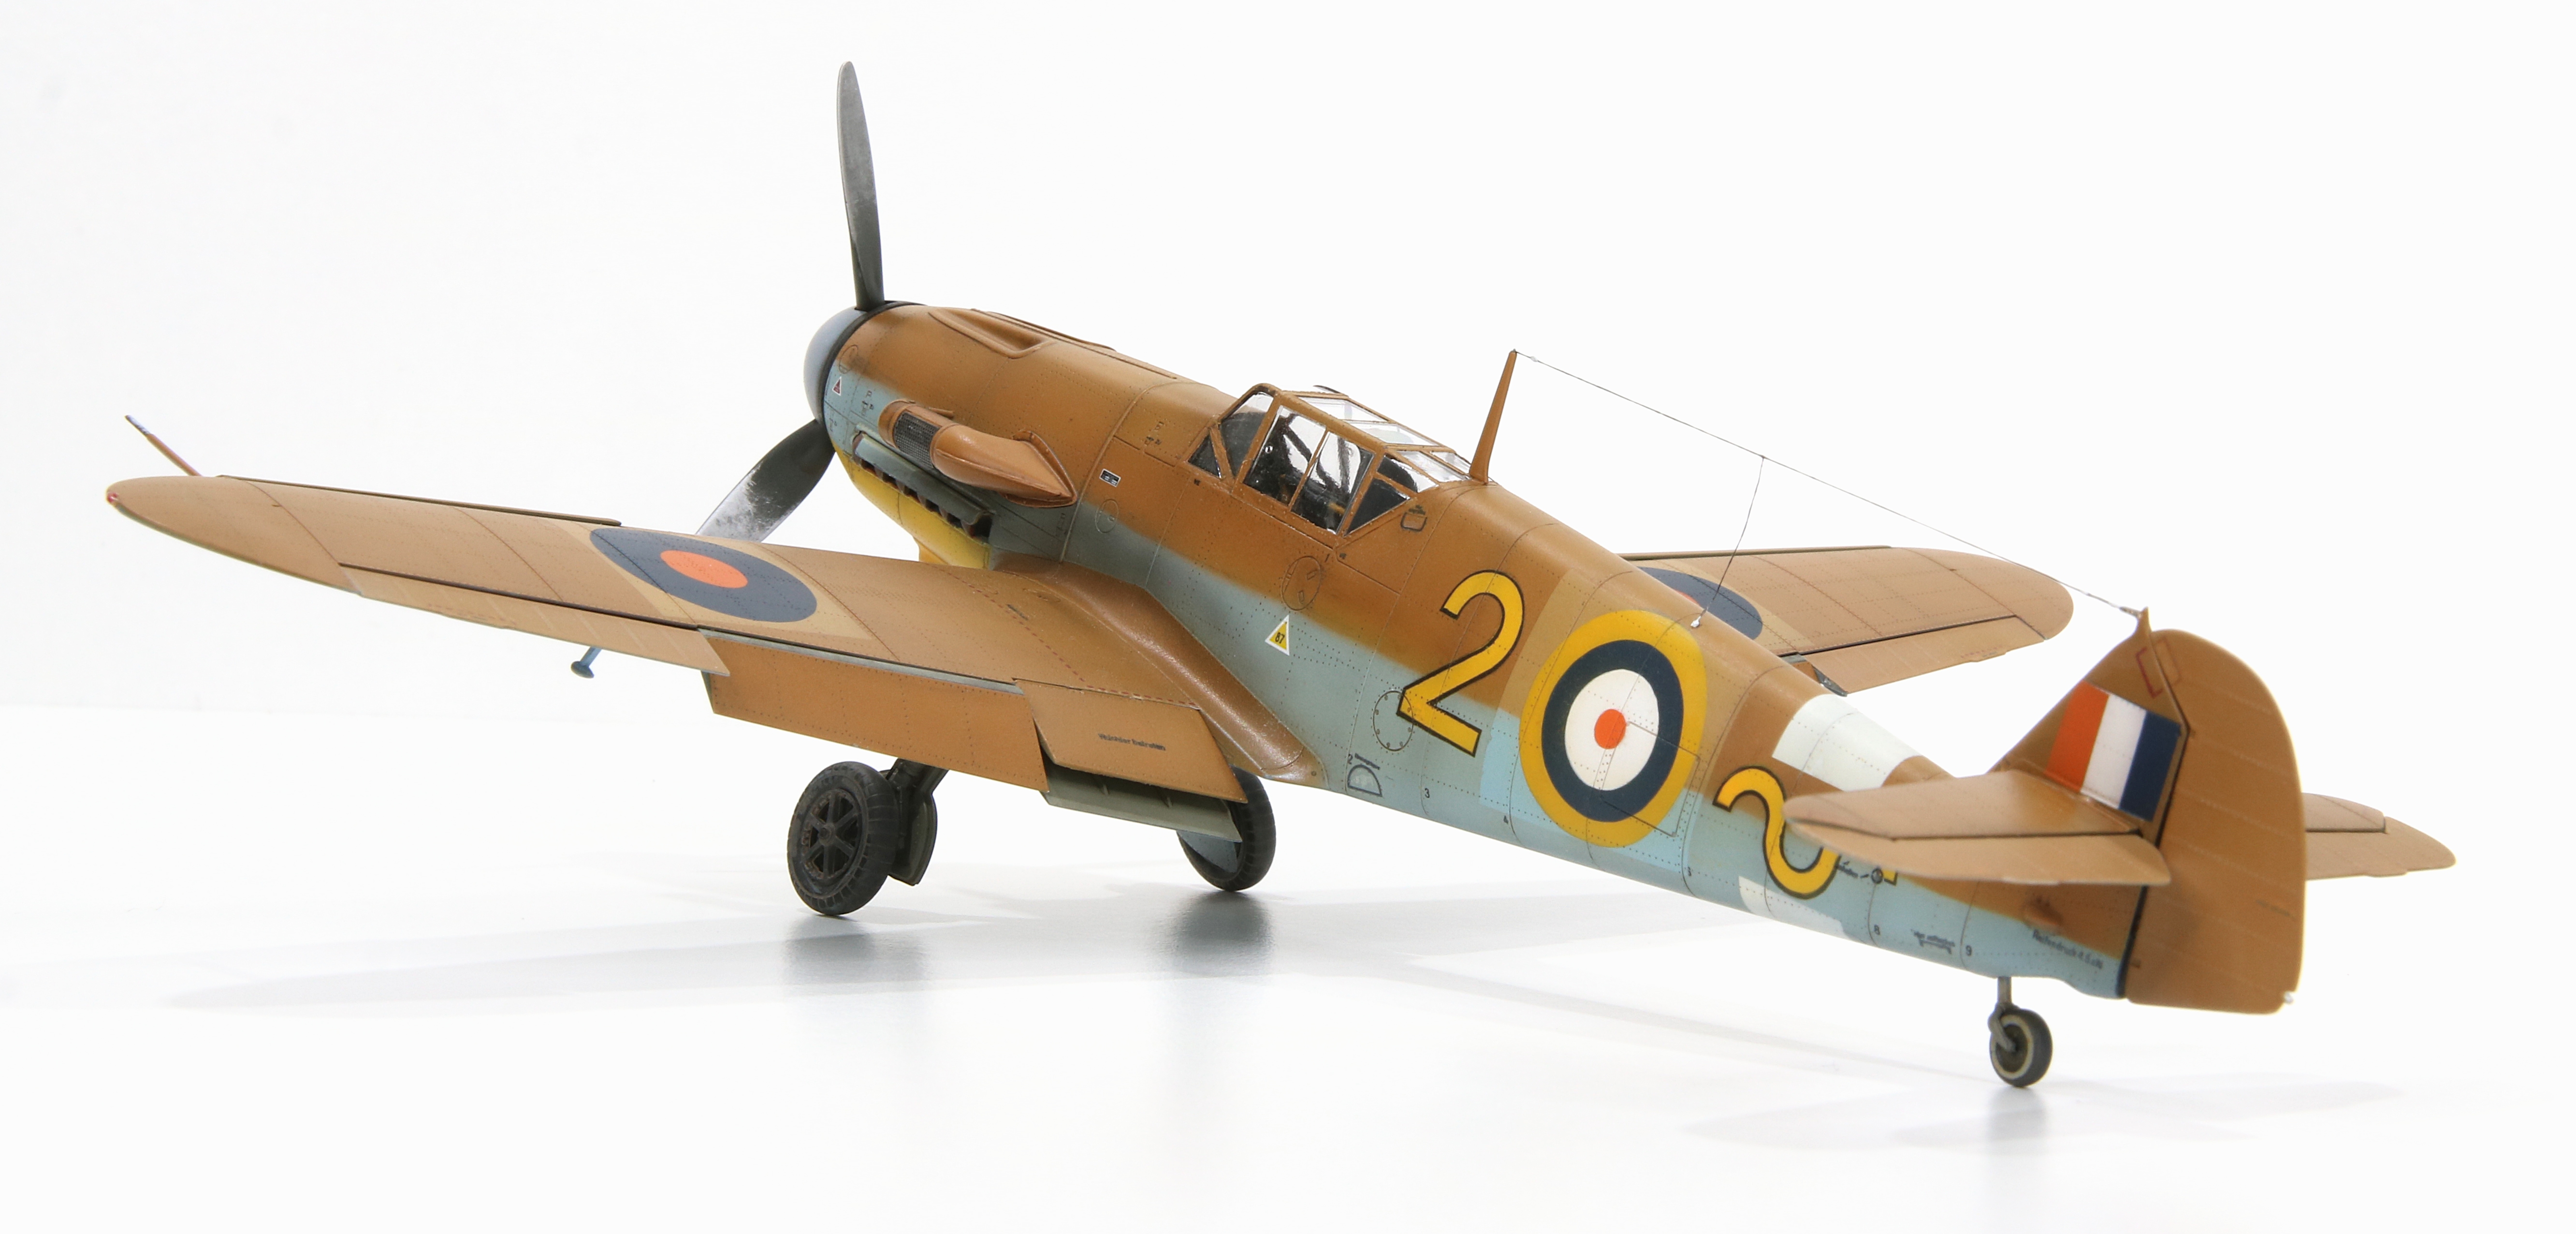
Maj Osler of Number 1 Squadron was the first SAAF pilot to fly a captured Bf-109F, doing so in celebration of his DFC which had been awarded to him on 7 January 1942. “Yellow 2” had been made serviceable to fly by the Squadron’s ground crew. After the flight his first comment was “Give me a Hurricane any day”. He found the view from the Bf109 poor, and flew it to Heliopolis on the first stage of its journey to England. Bennie, therefore became the first Commonwealth pilot in the desert to fly the Bf109, and 1 Squadron was pleased at this distinction.

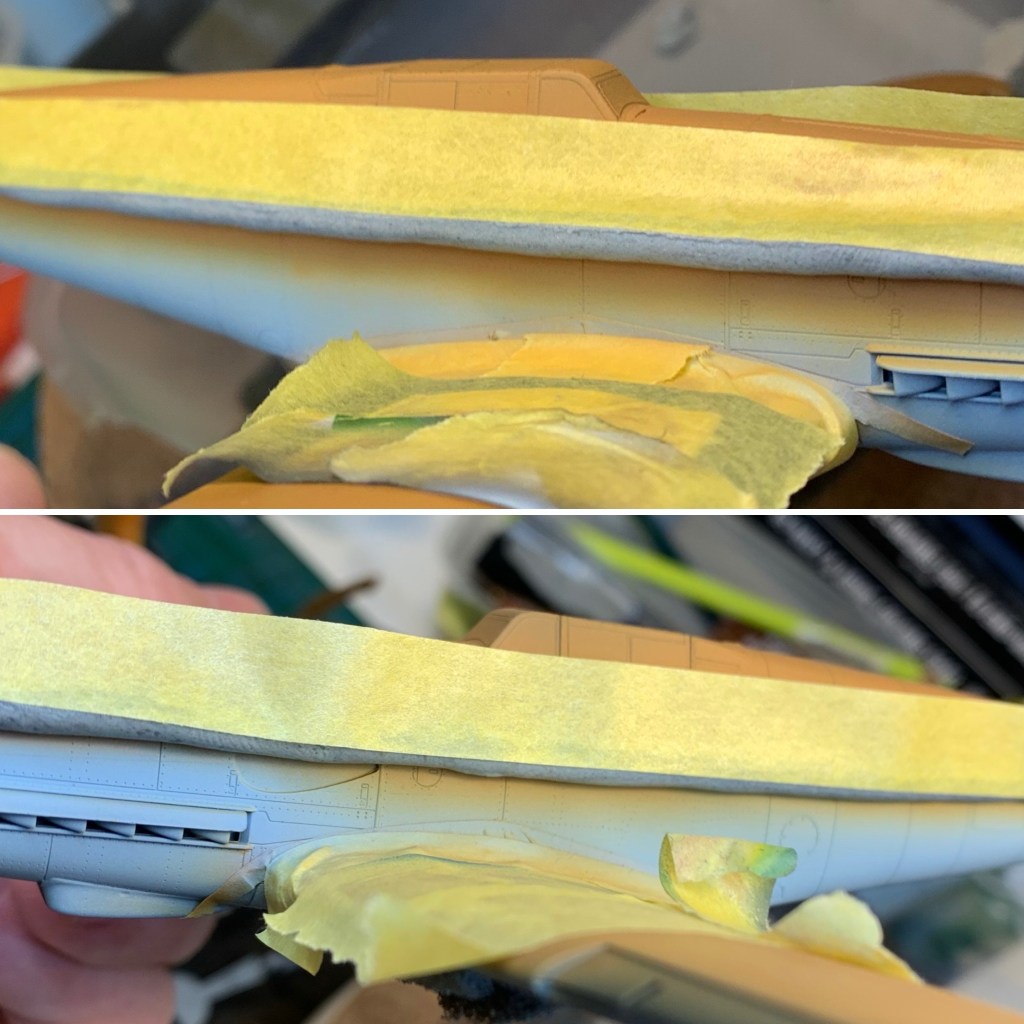
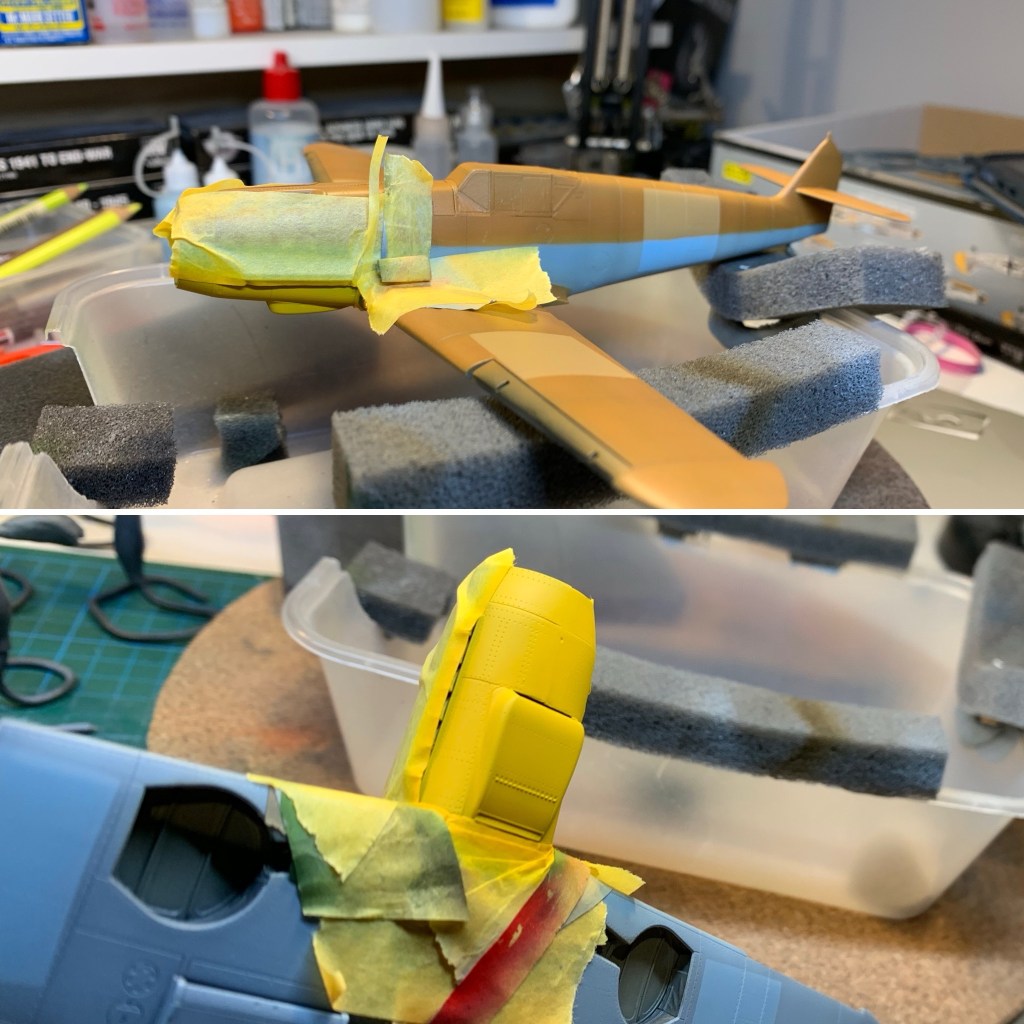
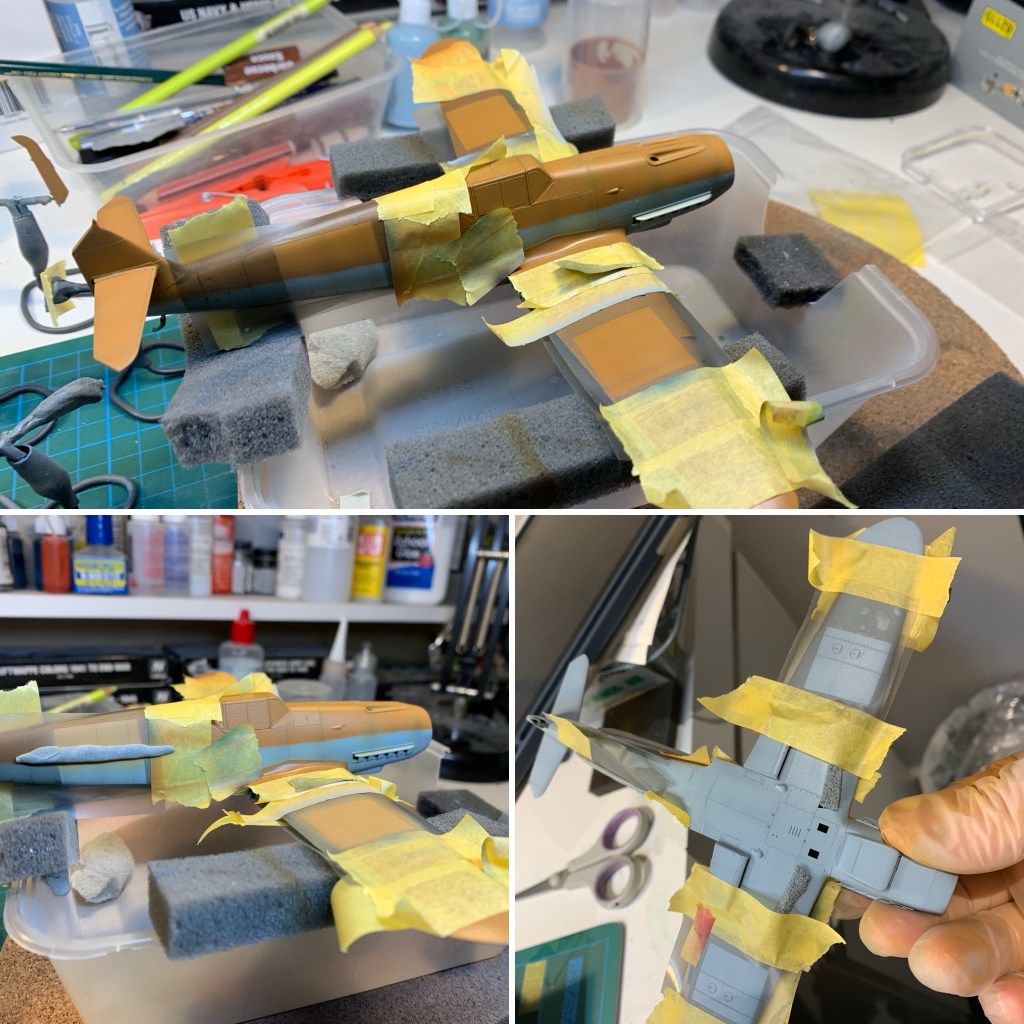
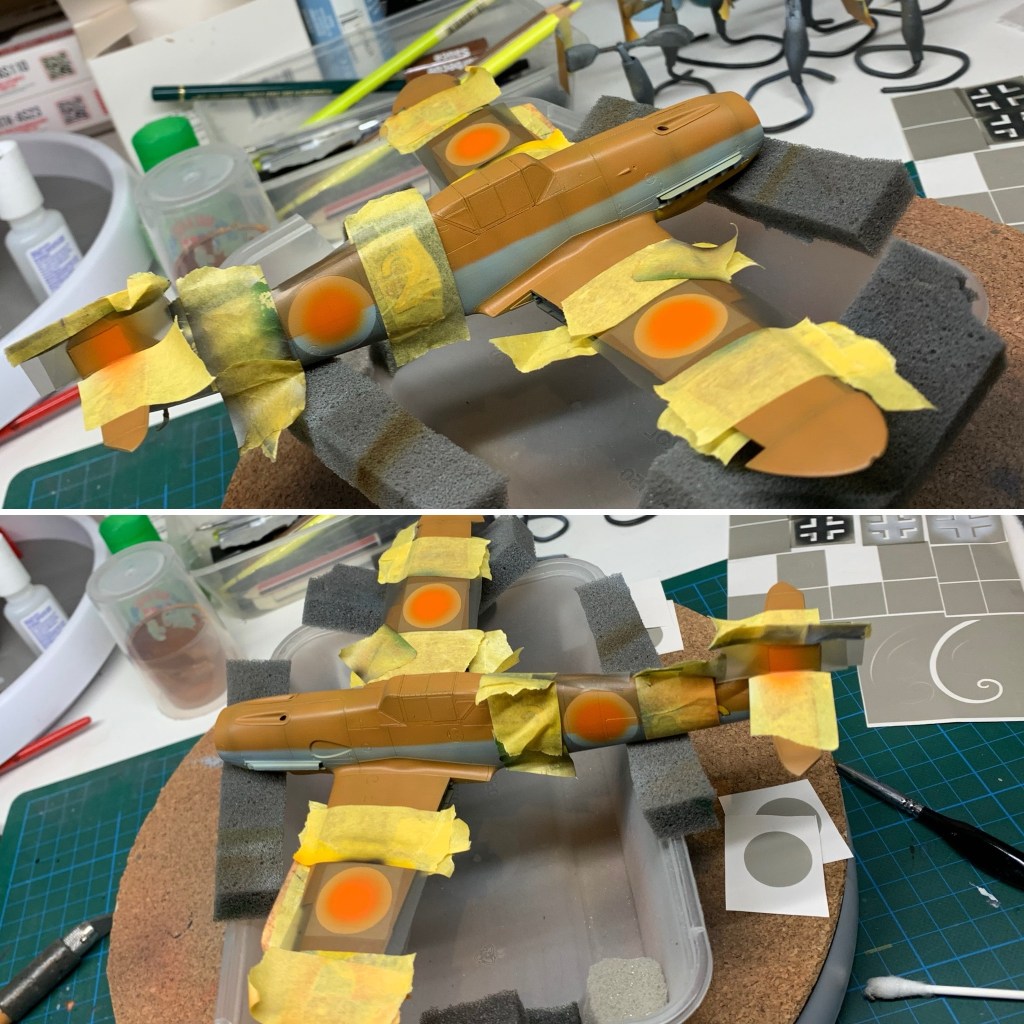
The basic paint scheme is quite clear; RLM 79 or RLM78 at a mid-fuselage demarcation with a tight transition. The transition still looked soft to me, but very tight. Otherwise the initial paint phase looked to be simple.
I used blu tack for the camo masking which worked as well as it always does. Following that, I added a bit of post-shading because I’d obliterated the pre-shade as usual, and then sealed everything with a light clear gloss.
Click on any of the images below to scroll through the gallery.
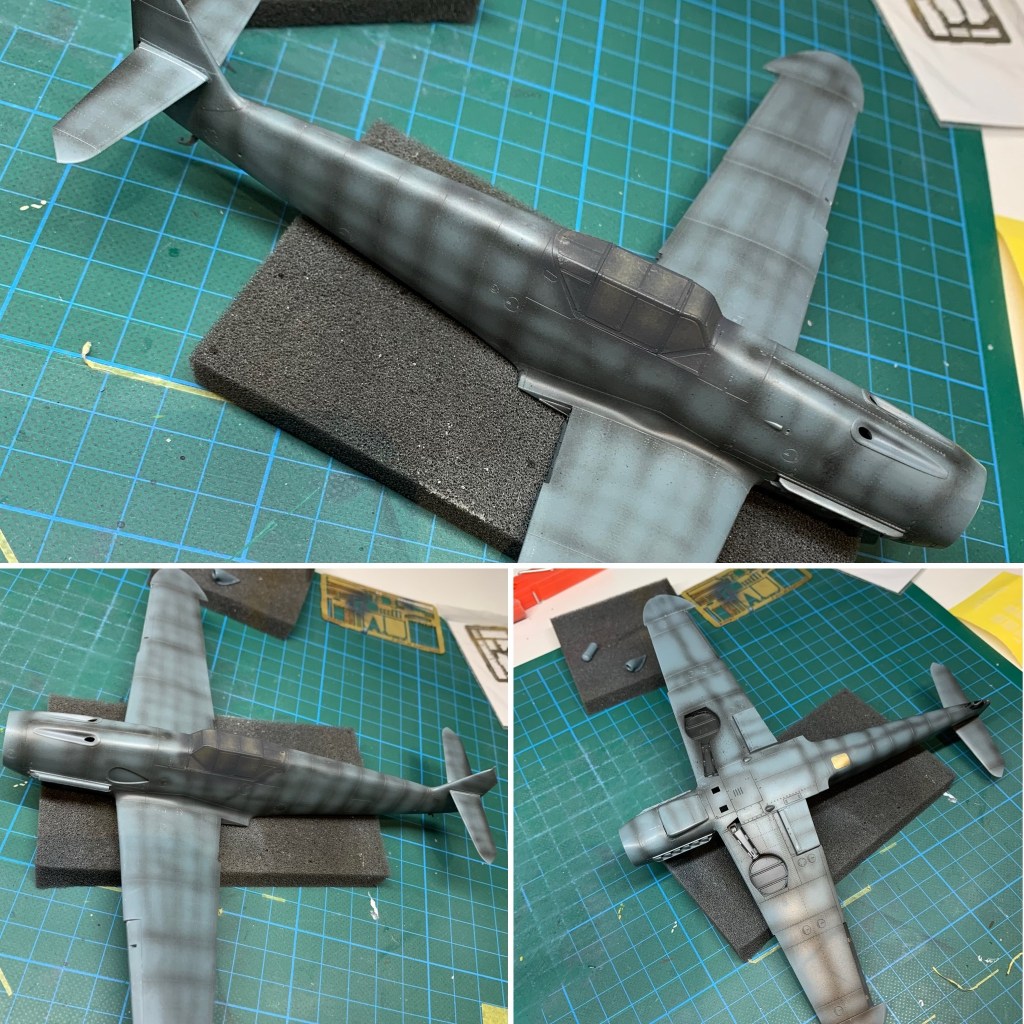


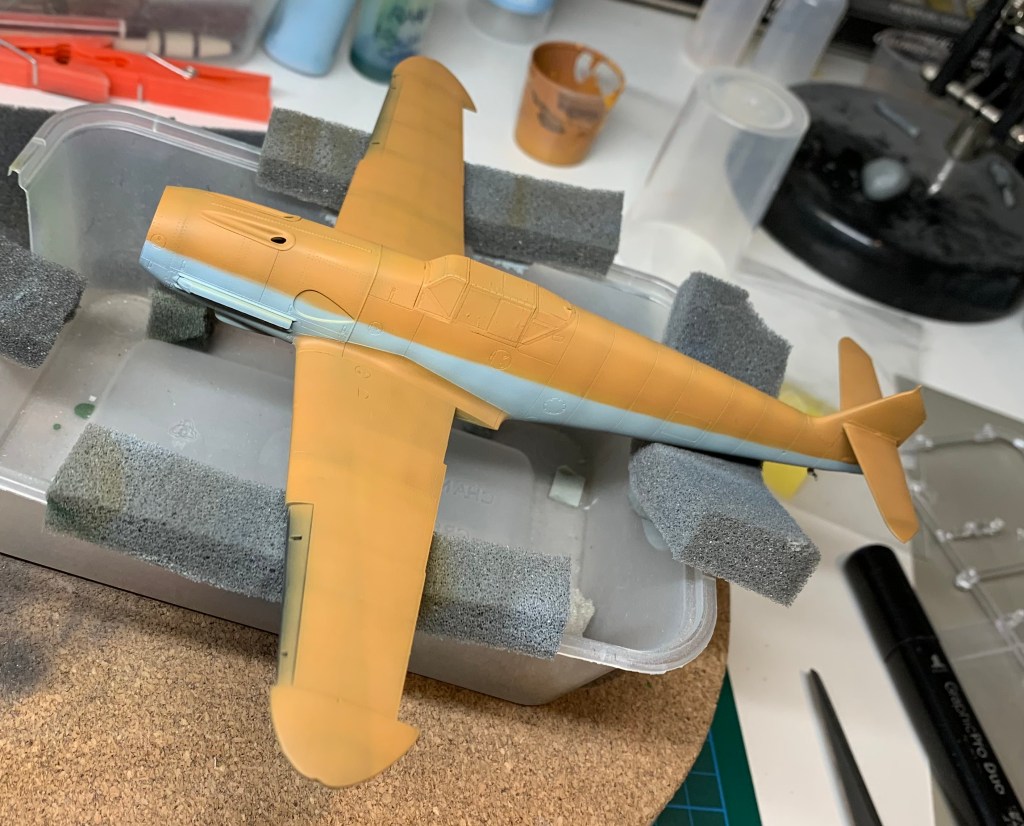

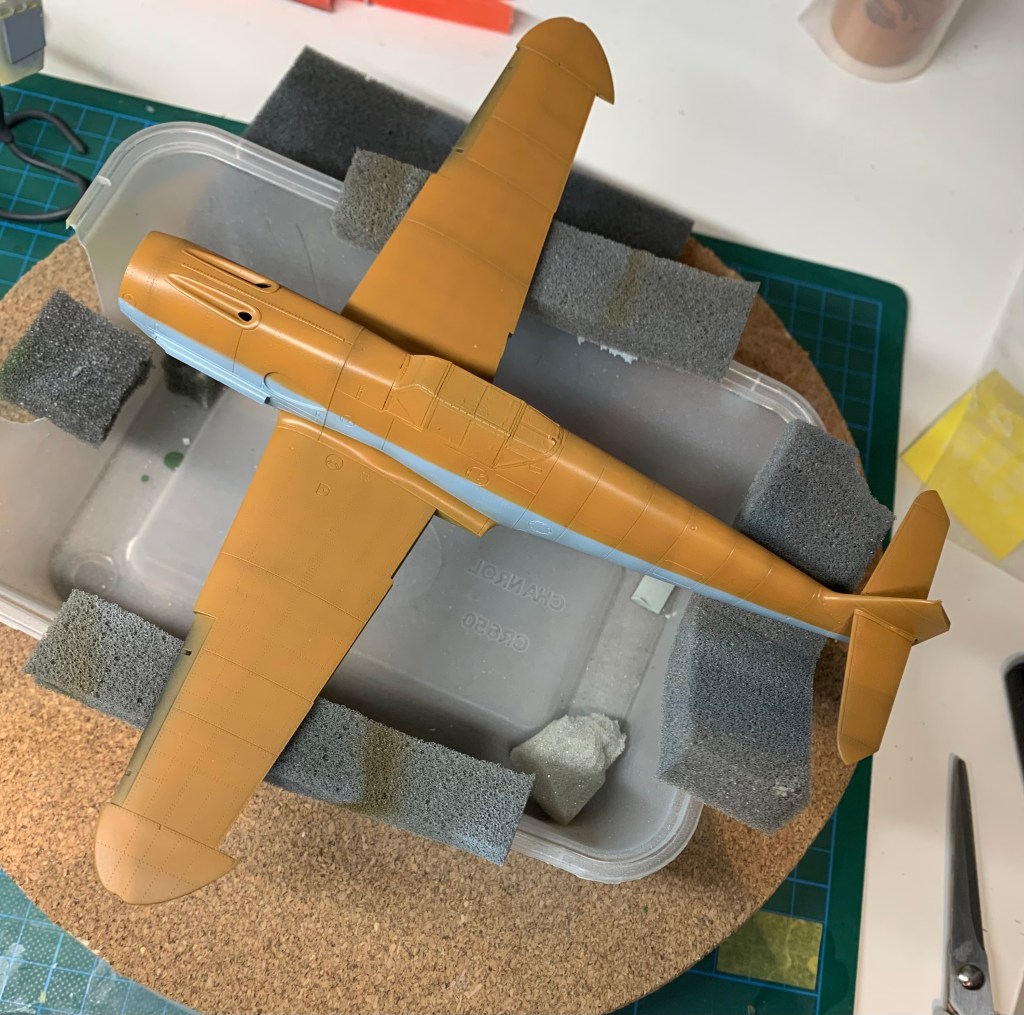
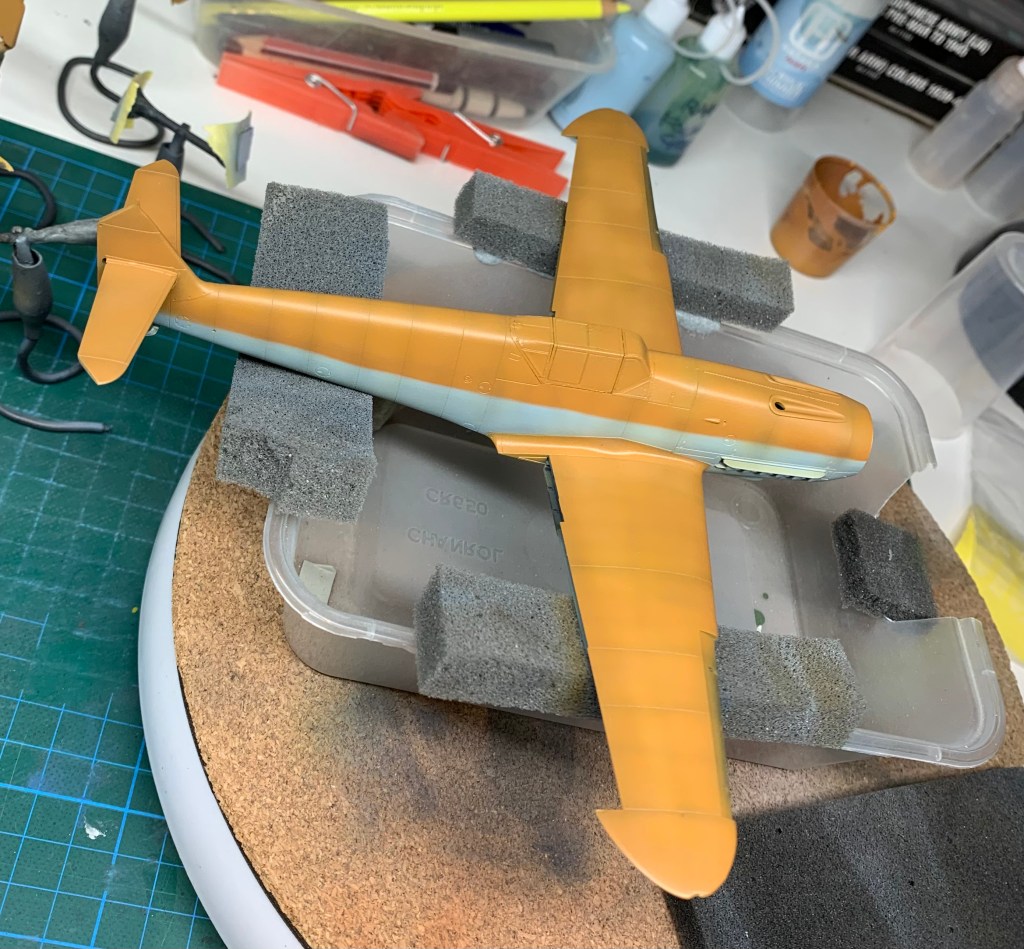
At this point I felt I’d overdone the post-shading a little but thought the final treatments would tone it down. Ultimately, that wasn’t the case I had to revisit this during weathering.
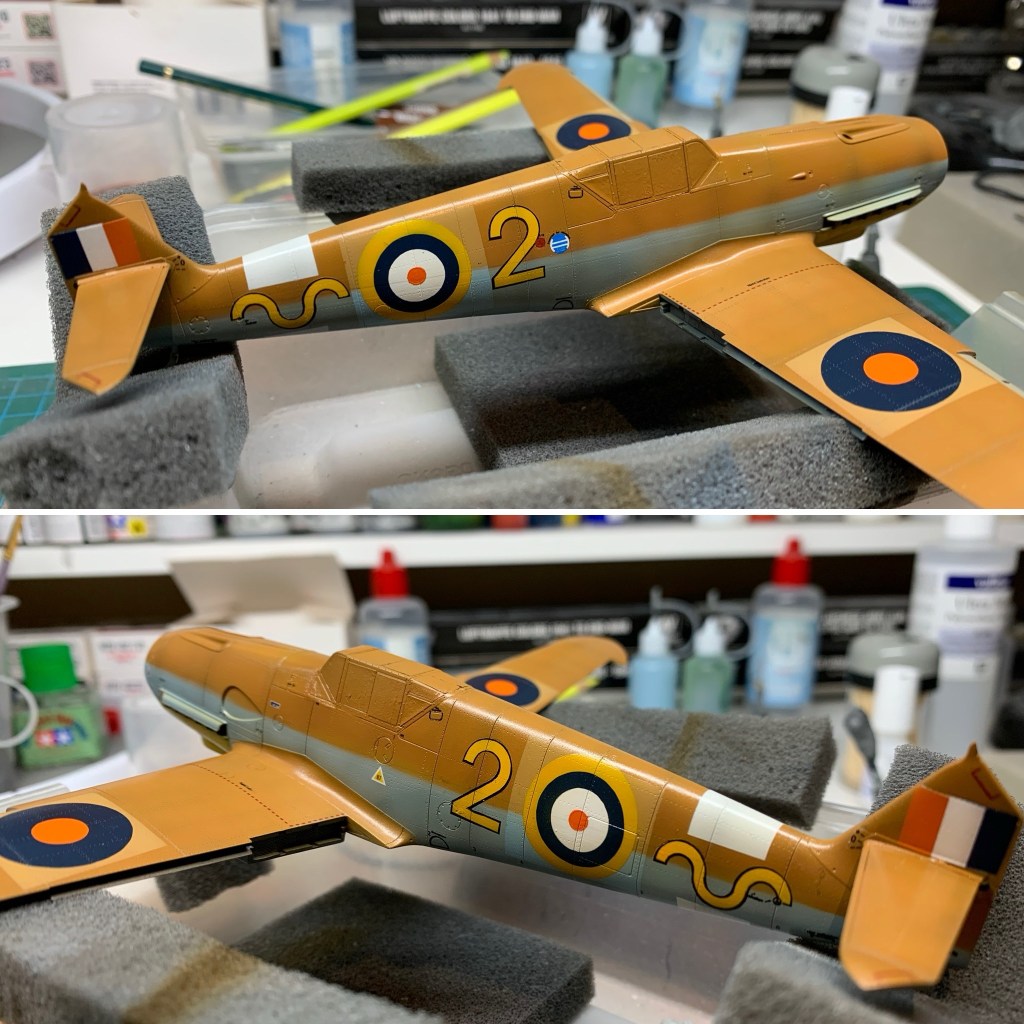
Markings


I was fortunate to have lots of photos of this airframe, almost all of which came from Tinus le Roux’s priceless website, the SAAF WW2 Heritage Website and I am in his debt for allowing me to use some of these photos.
The observations I used in marking my model were as follows.
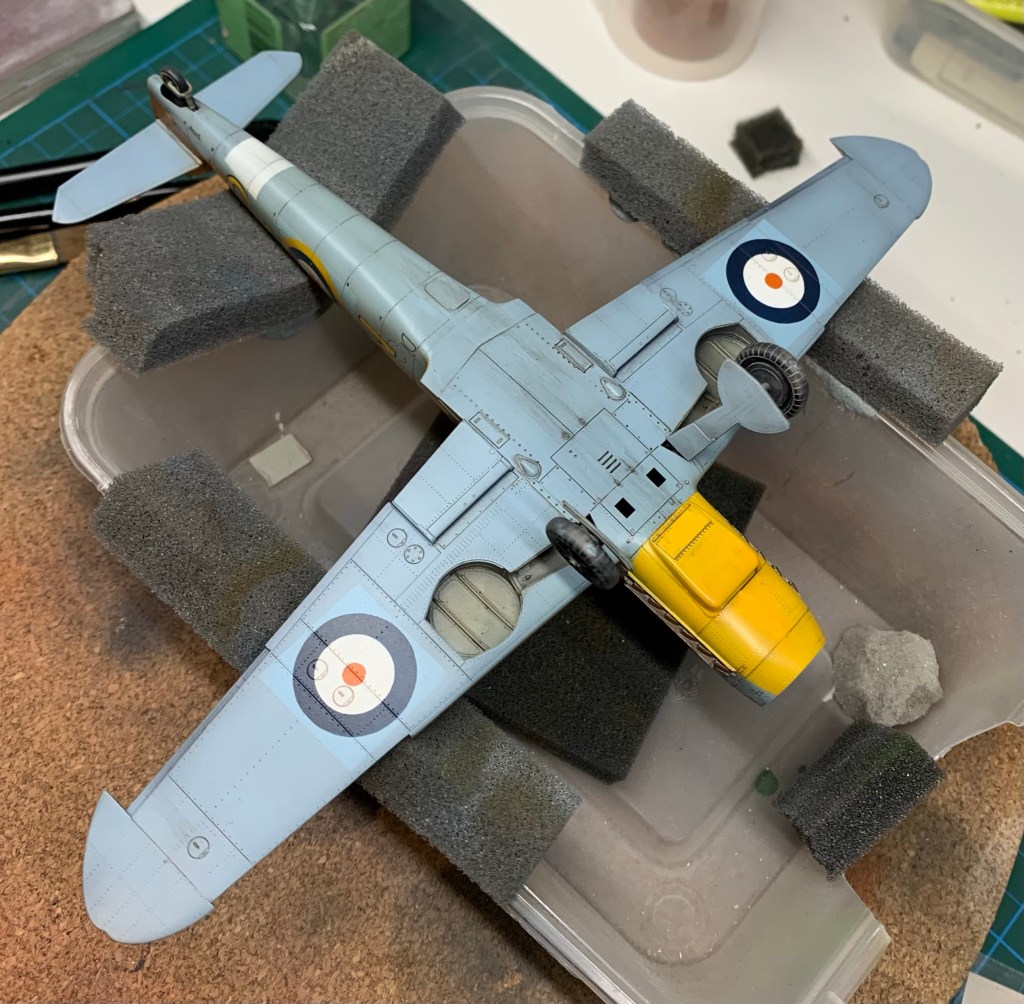
- The earliest iteration of the SAAF markings was a very simple overpaint of the German markings (except the swastika, initially, at least). There’s a high contrast between the overpaint and the original camouflage.
- Later, the overpaint was redone to match the original camouflage. This is particularly evident in the third pic, top right above and the detail photo below.
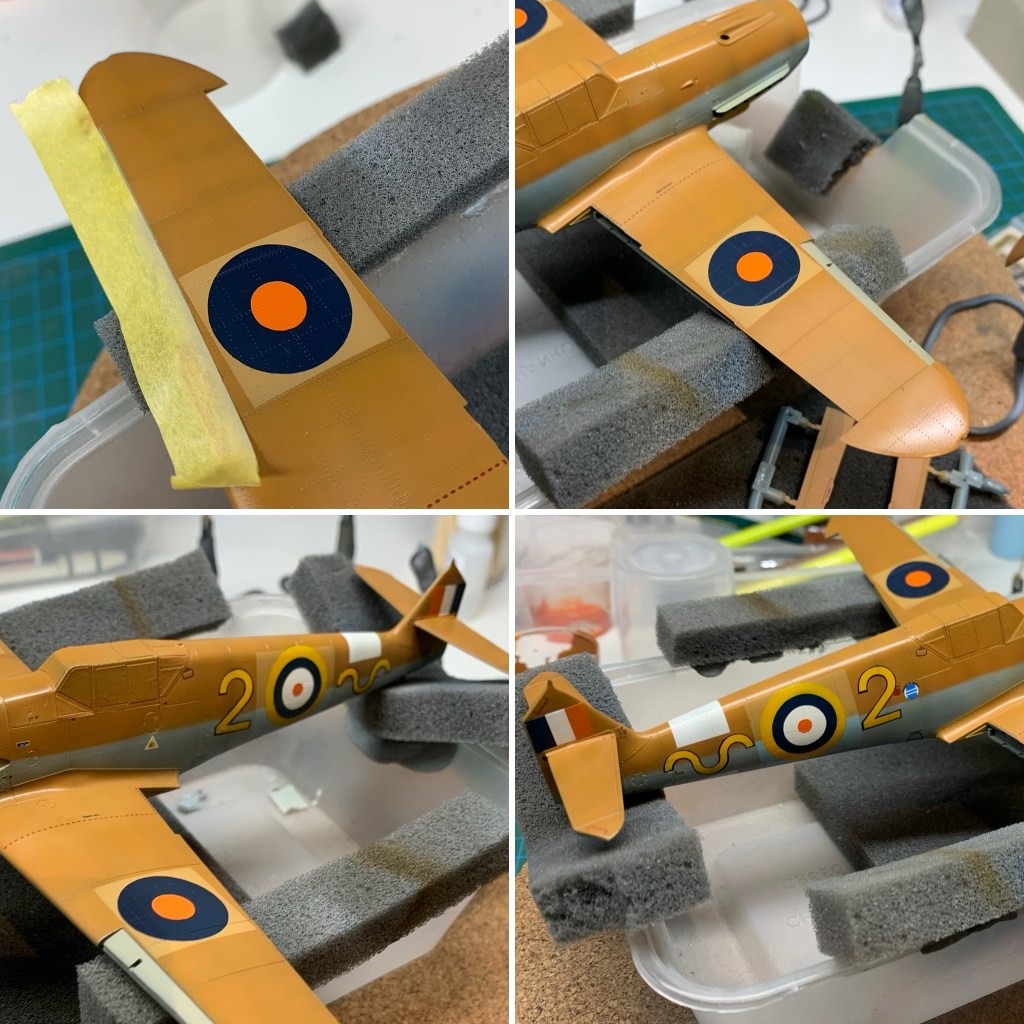
- The SAAF markings were applied quite tidily with roundels only, no numbers or other squadron markings.
- The remaining German markings remained, including all or most of the airframe stencils.
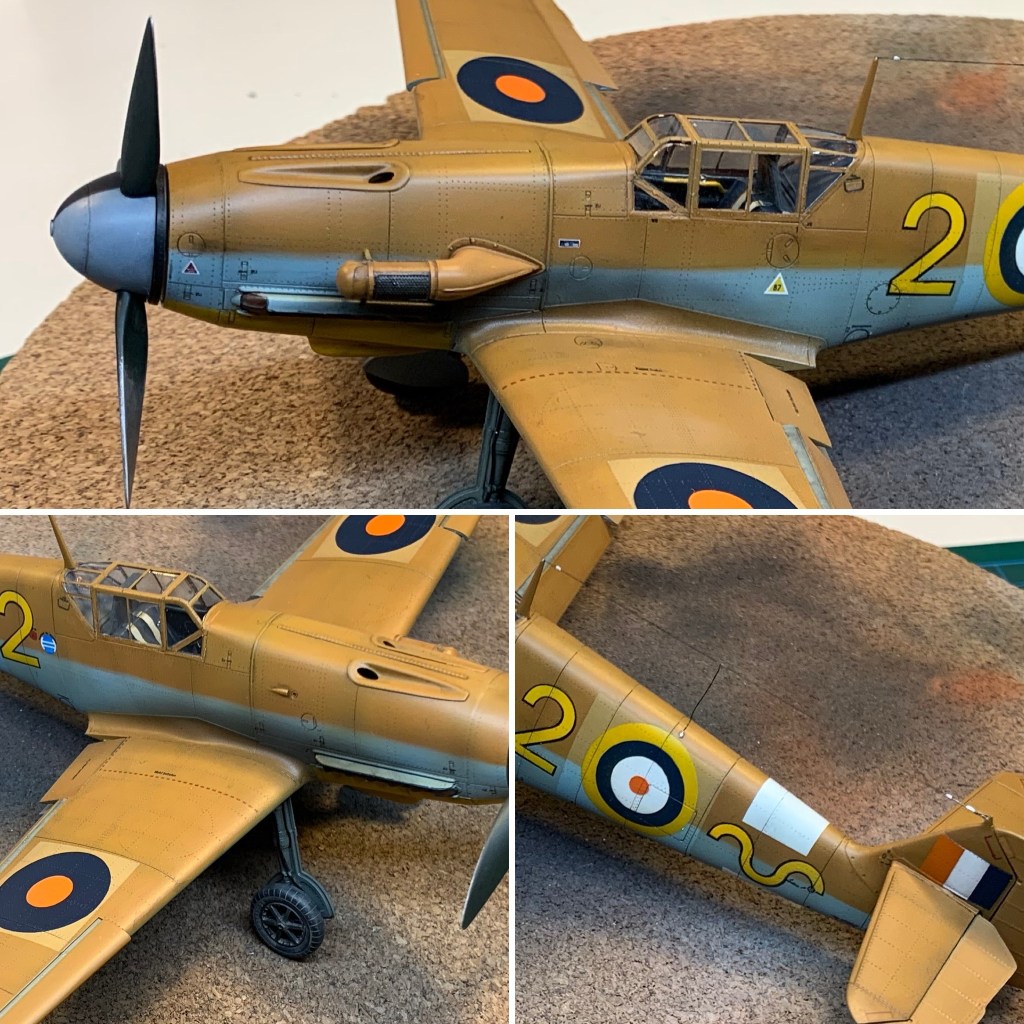
I started the paint process with a yellow lower cowling. It’s not completely clear that this marking was present but I think that in the fourth pic above, there’s a contrast on the lower engine cowl between it and the paint colour above it.
Next I applied the overpaint and then the number “2” which was a little tricky but after a couple of touch ups came out very nicely. After that, the roundels and fin flash. I was unhappy with the first attempt at the orange centre on the fuselage roundels so I revisited them with a larger dot which looked much better.
Click on any of the images below to scroll through the gallery.

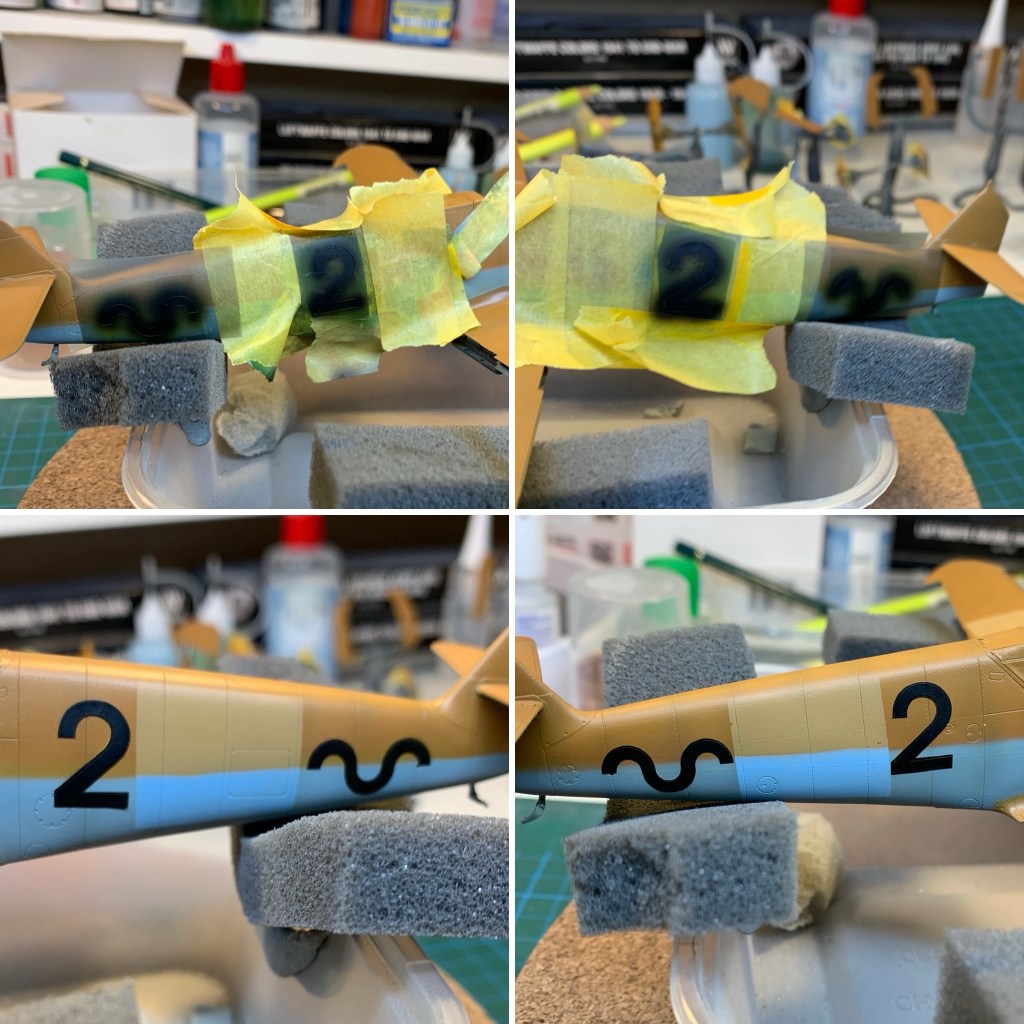


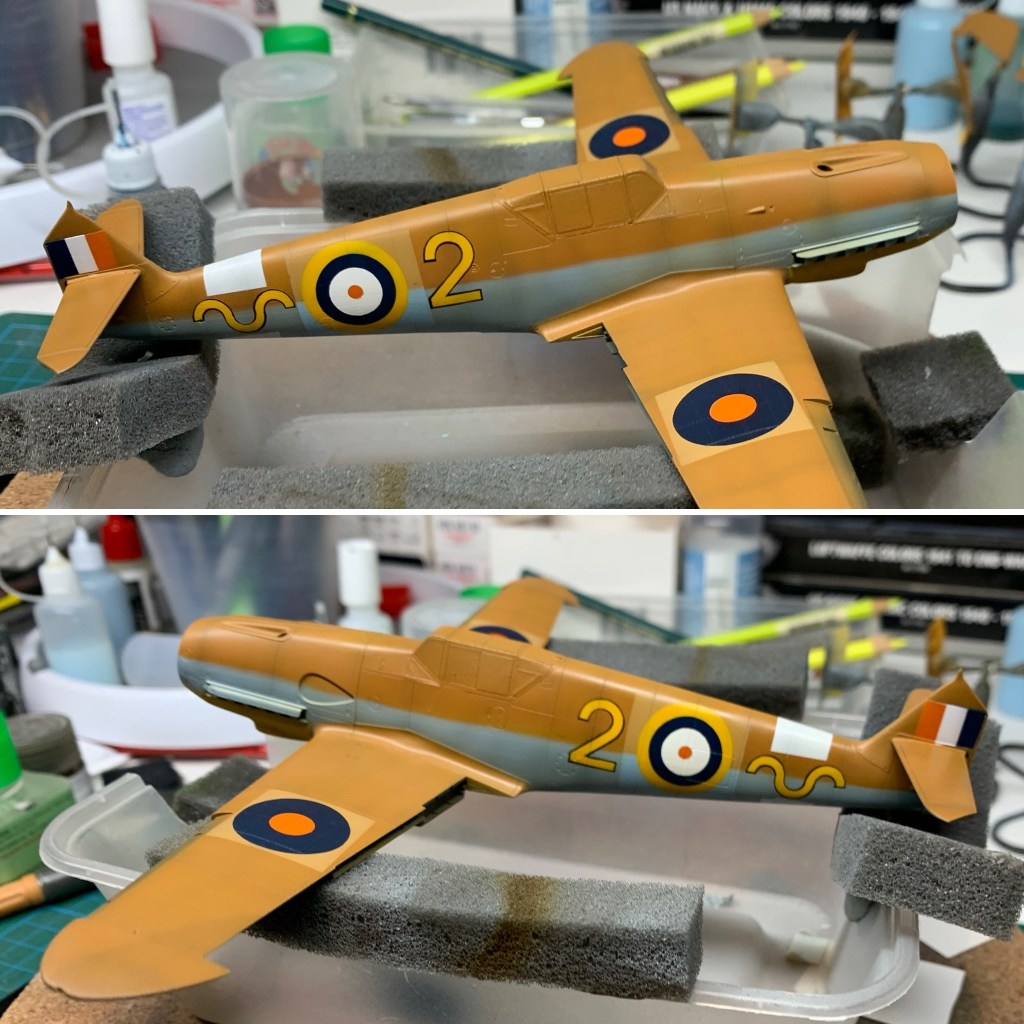

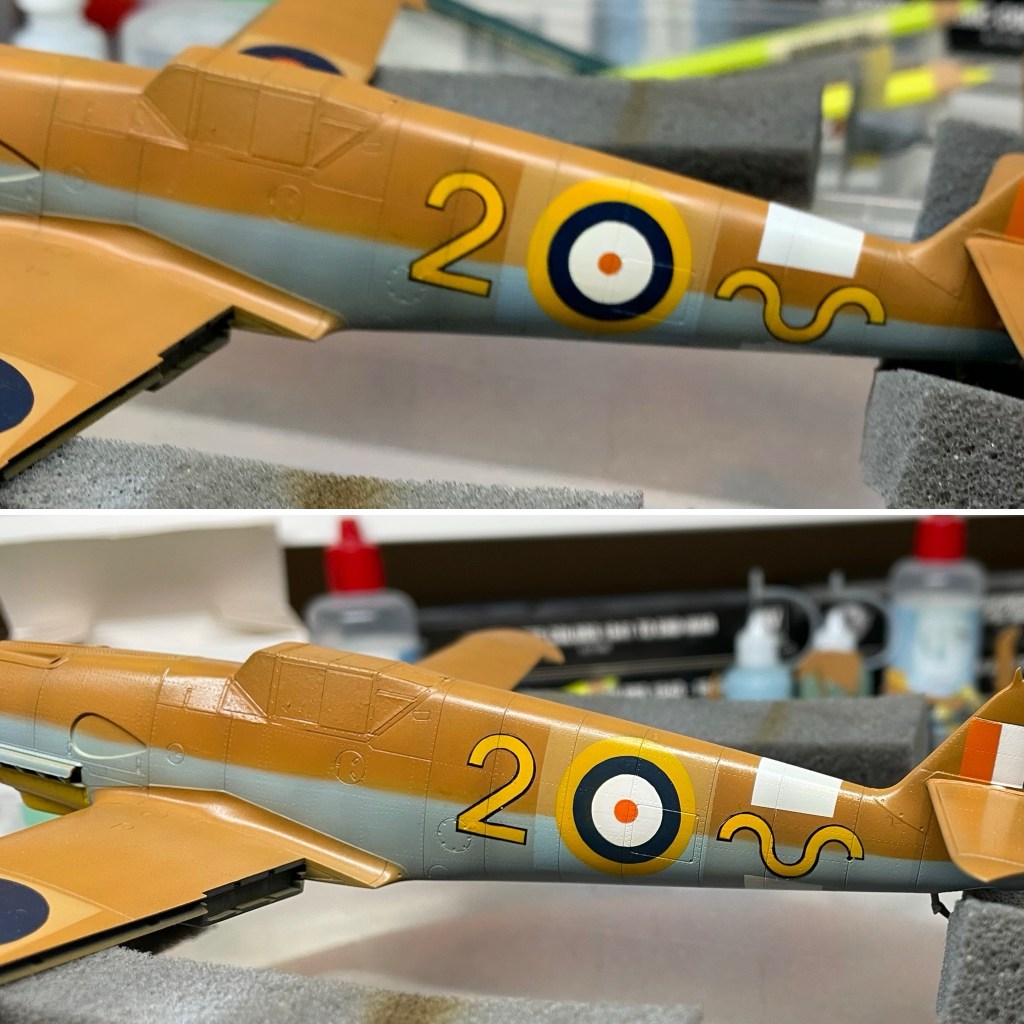


The markings on this one came out very well, I thought. I was glad I took on the challenge of painting the “2” and the “worm” despite the trickiness.
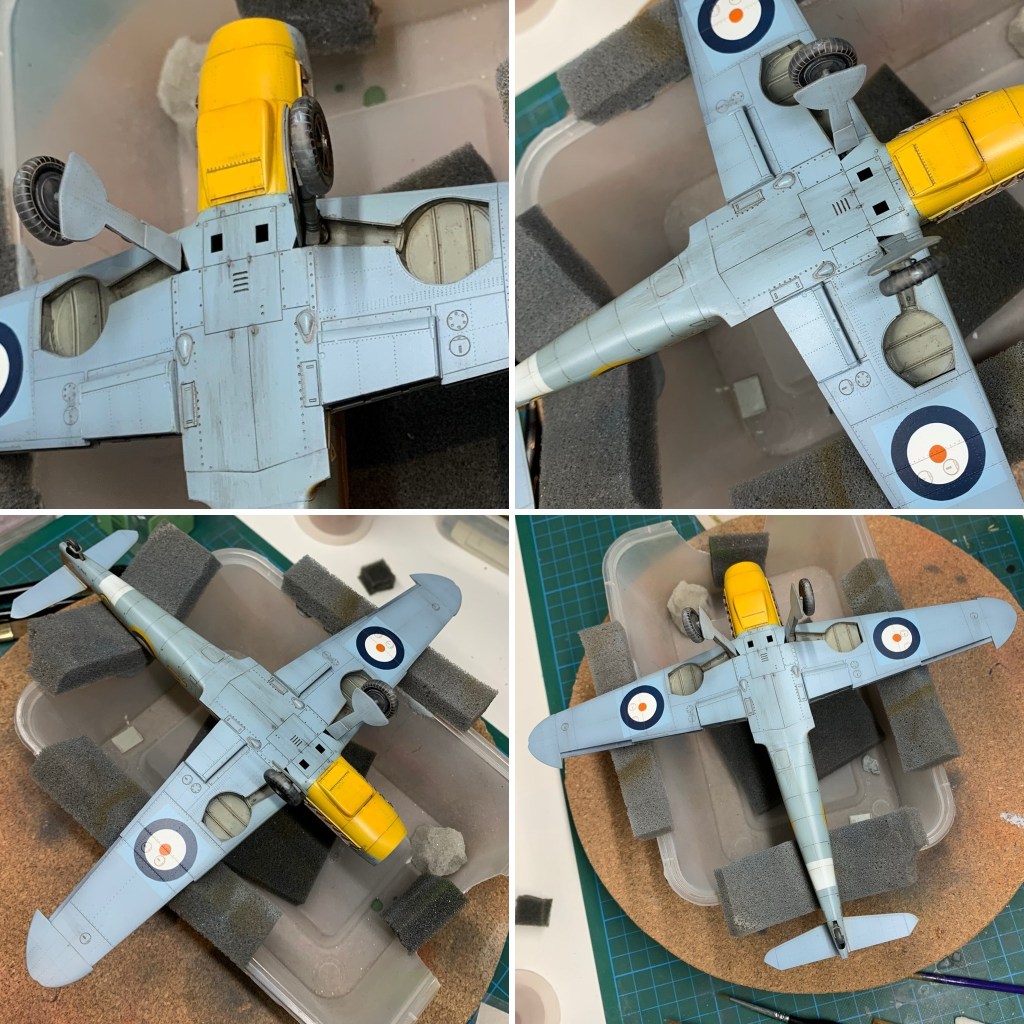
Weathering

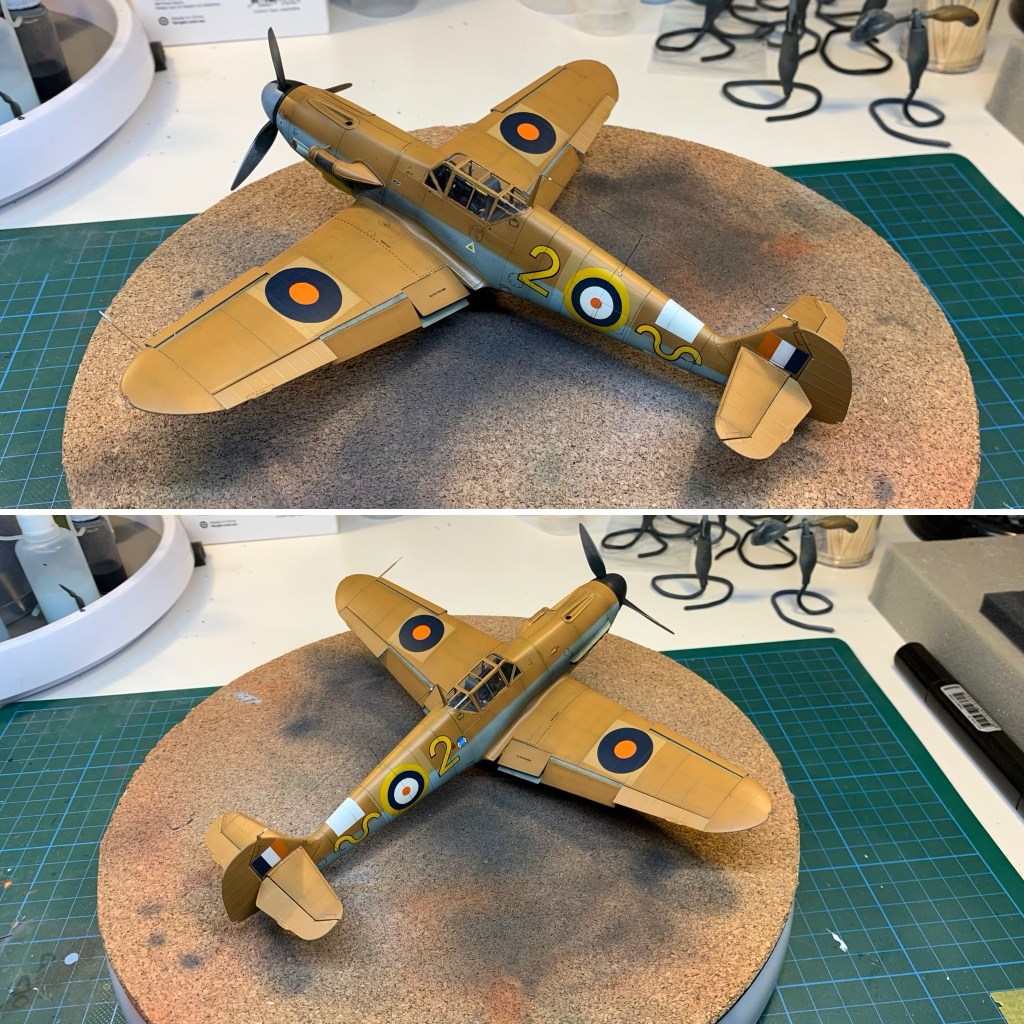
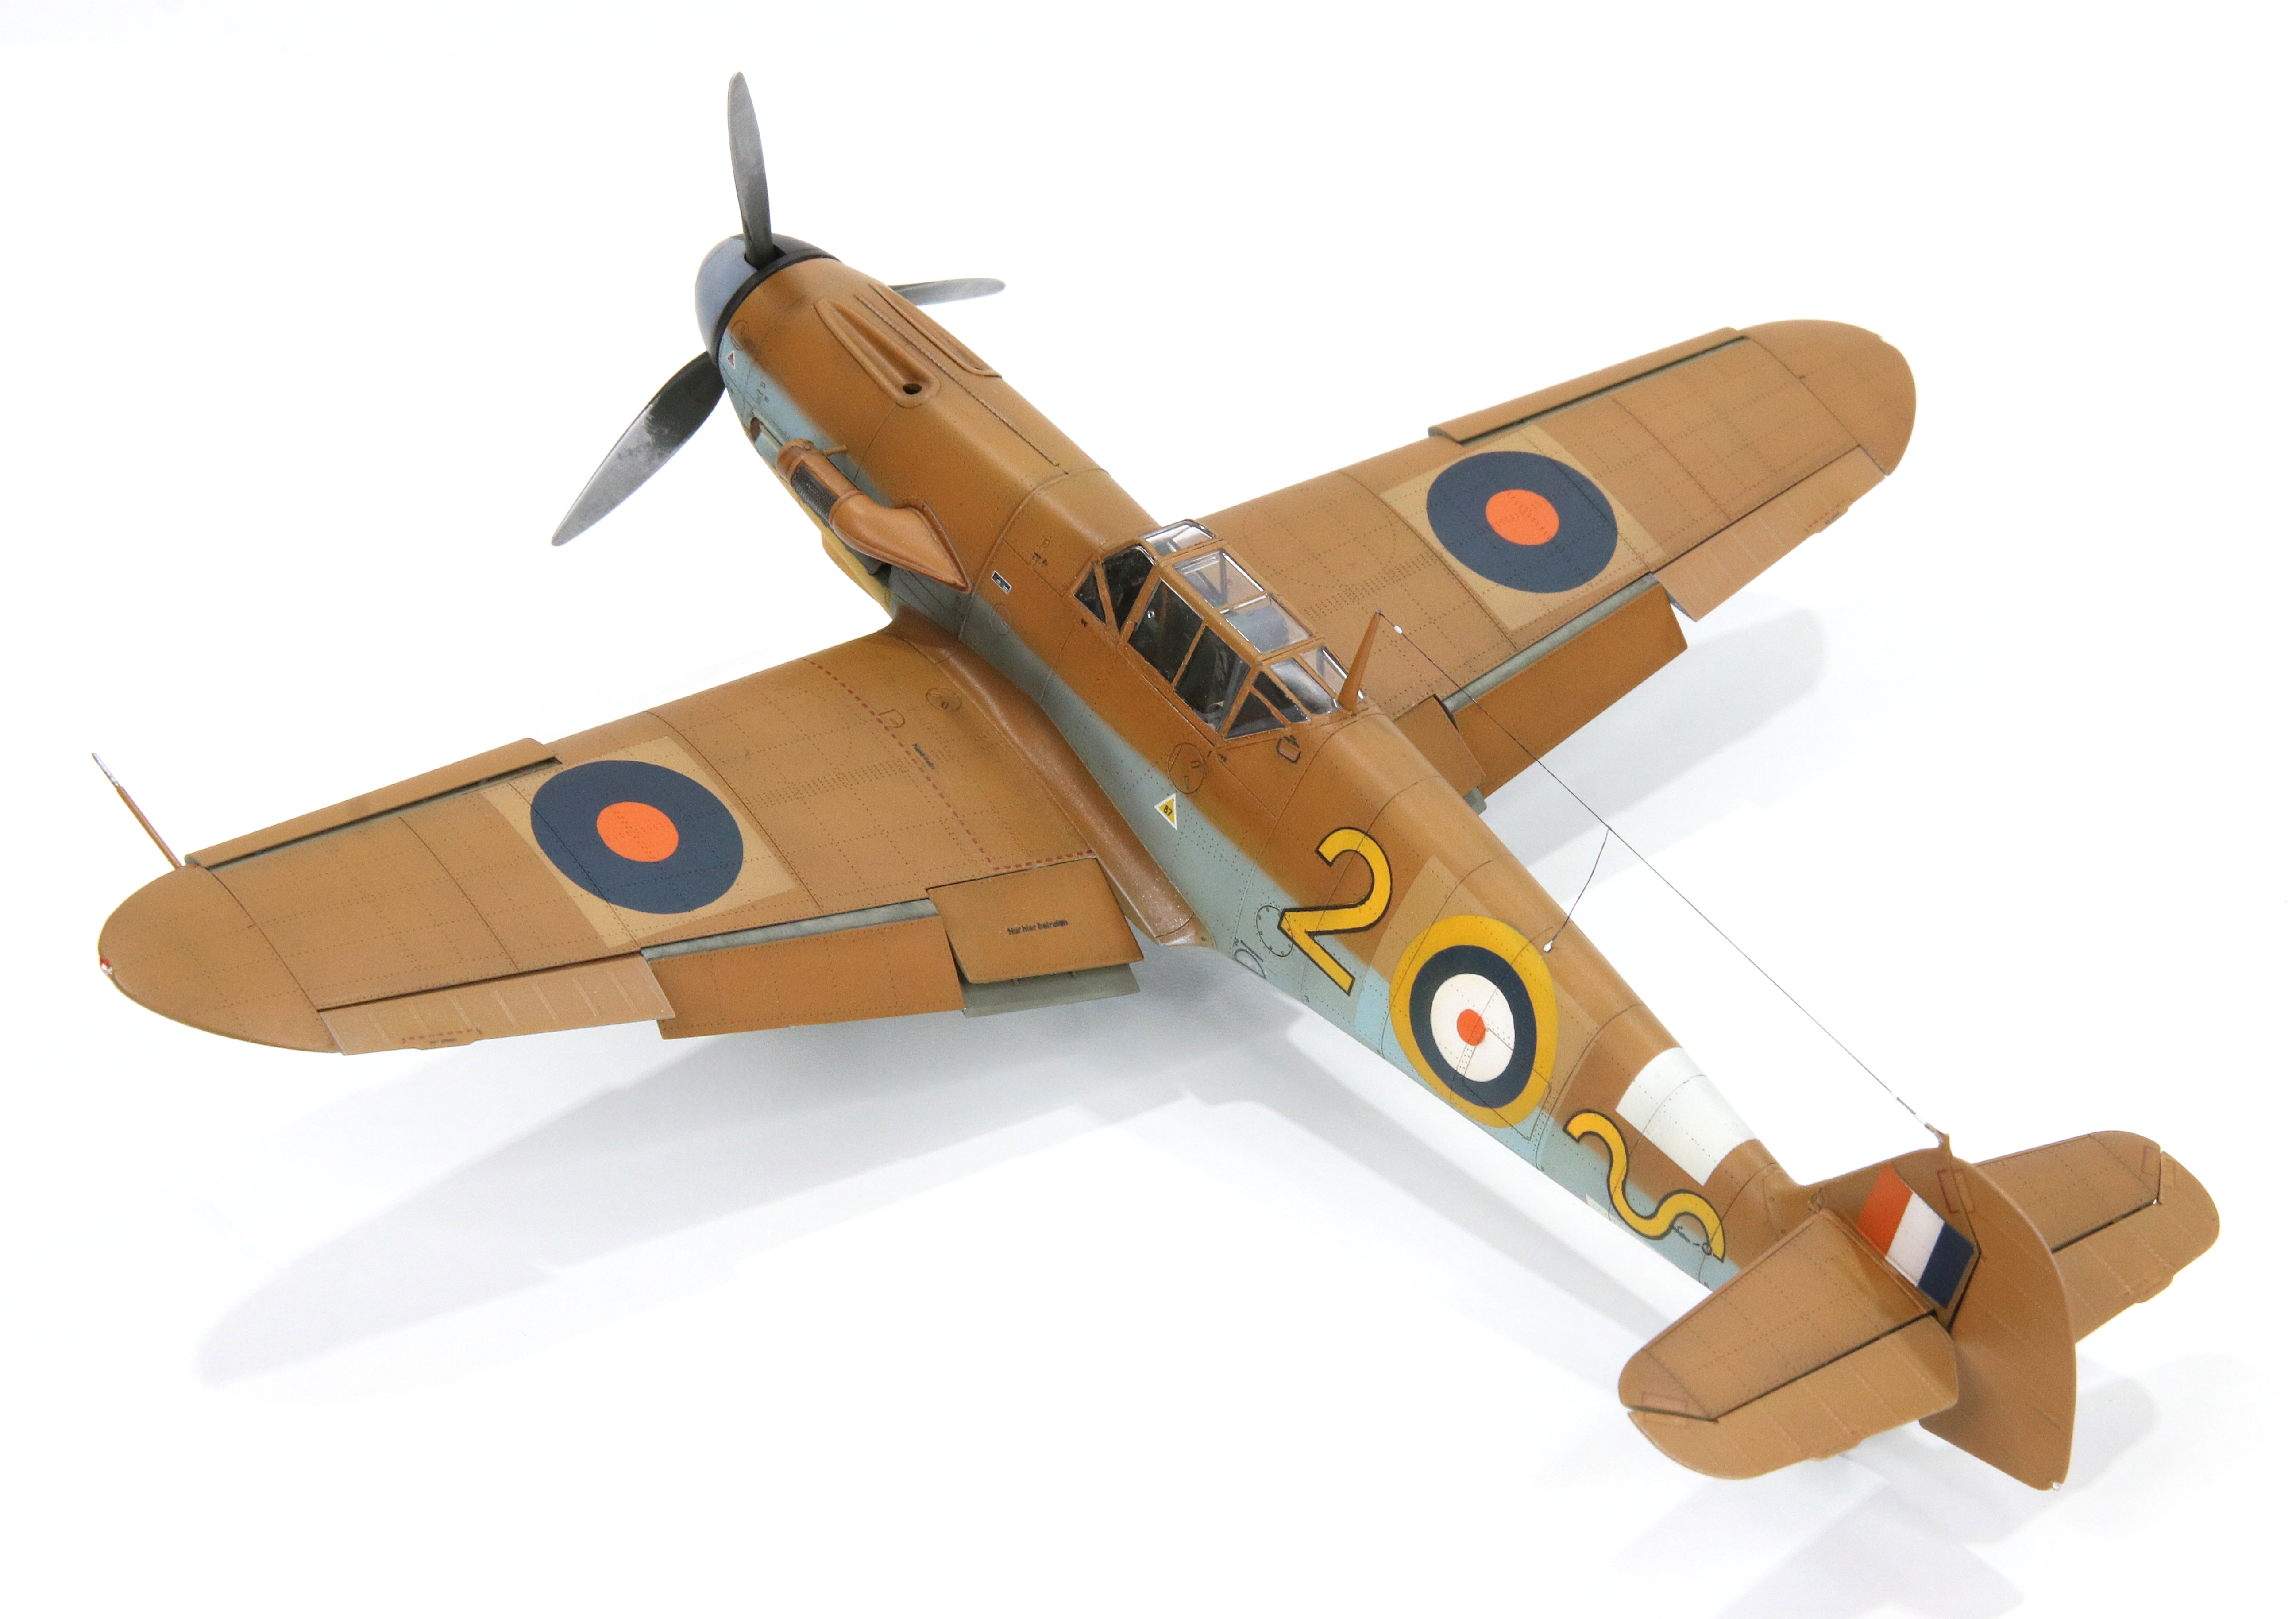
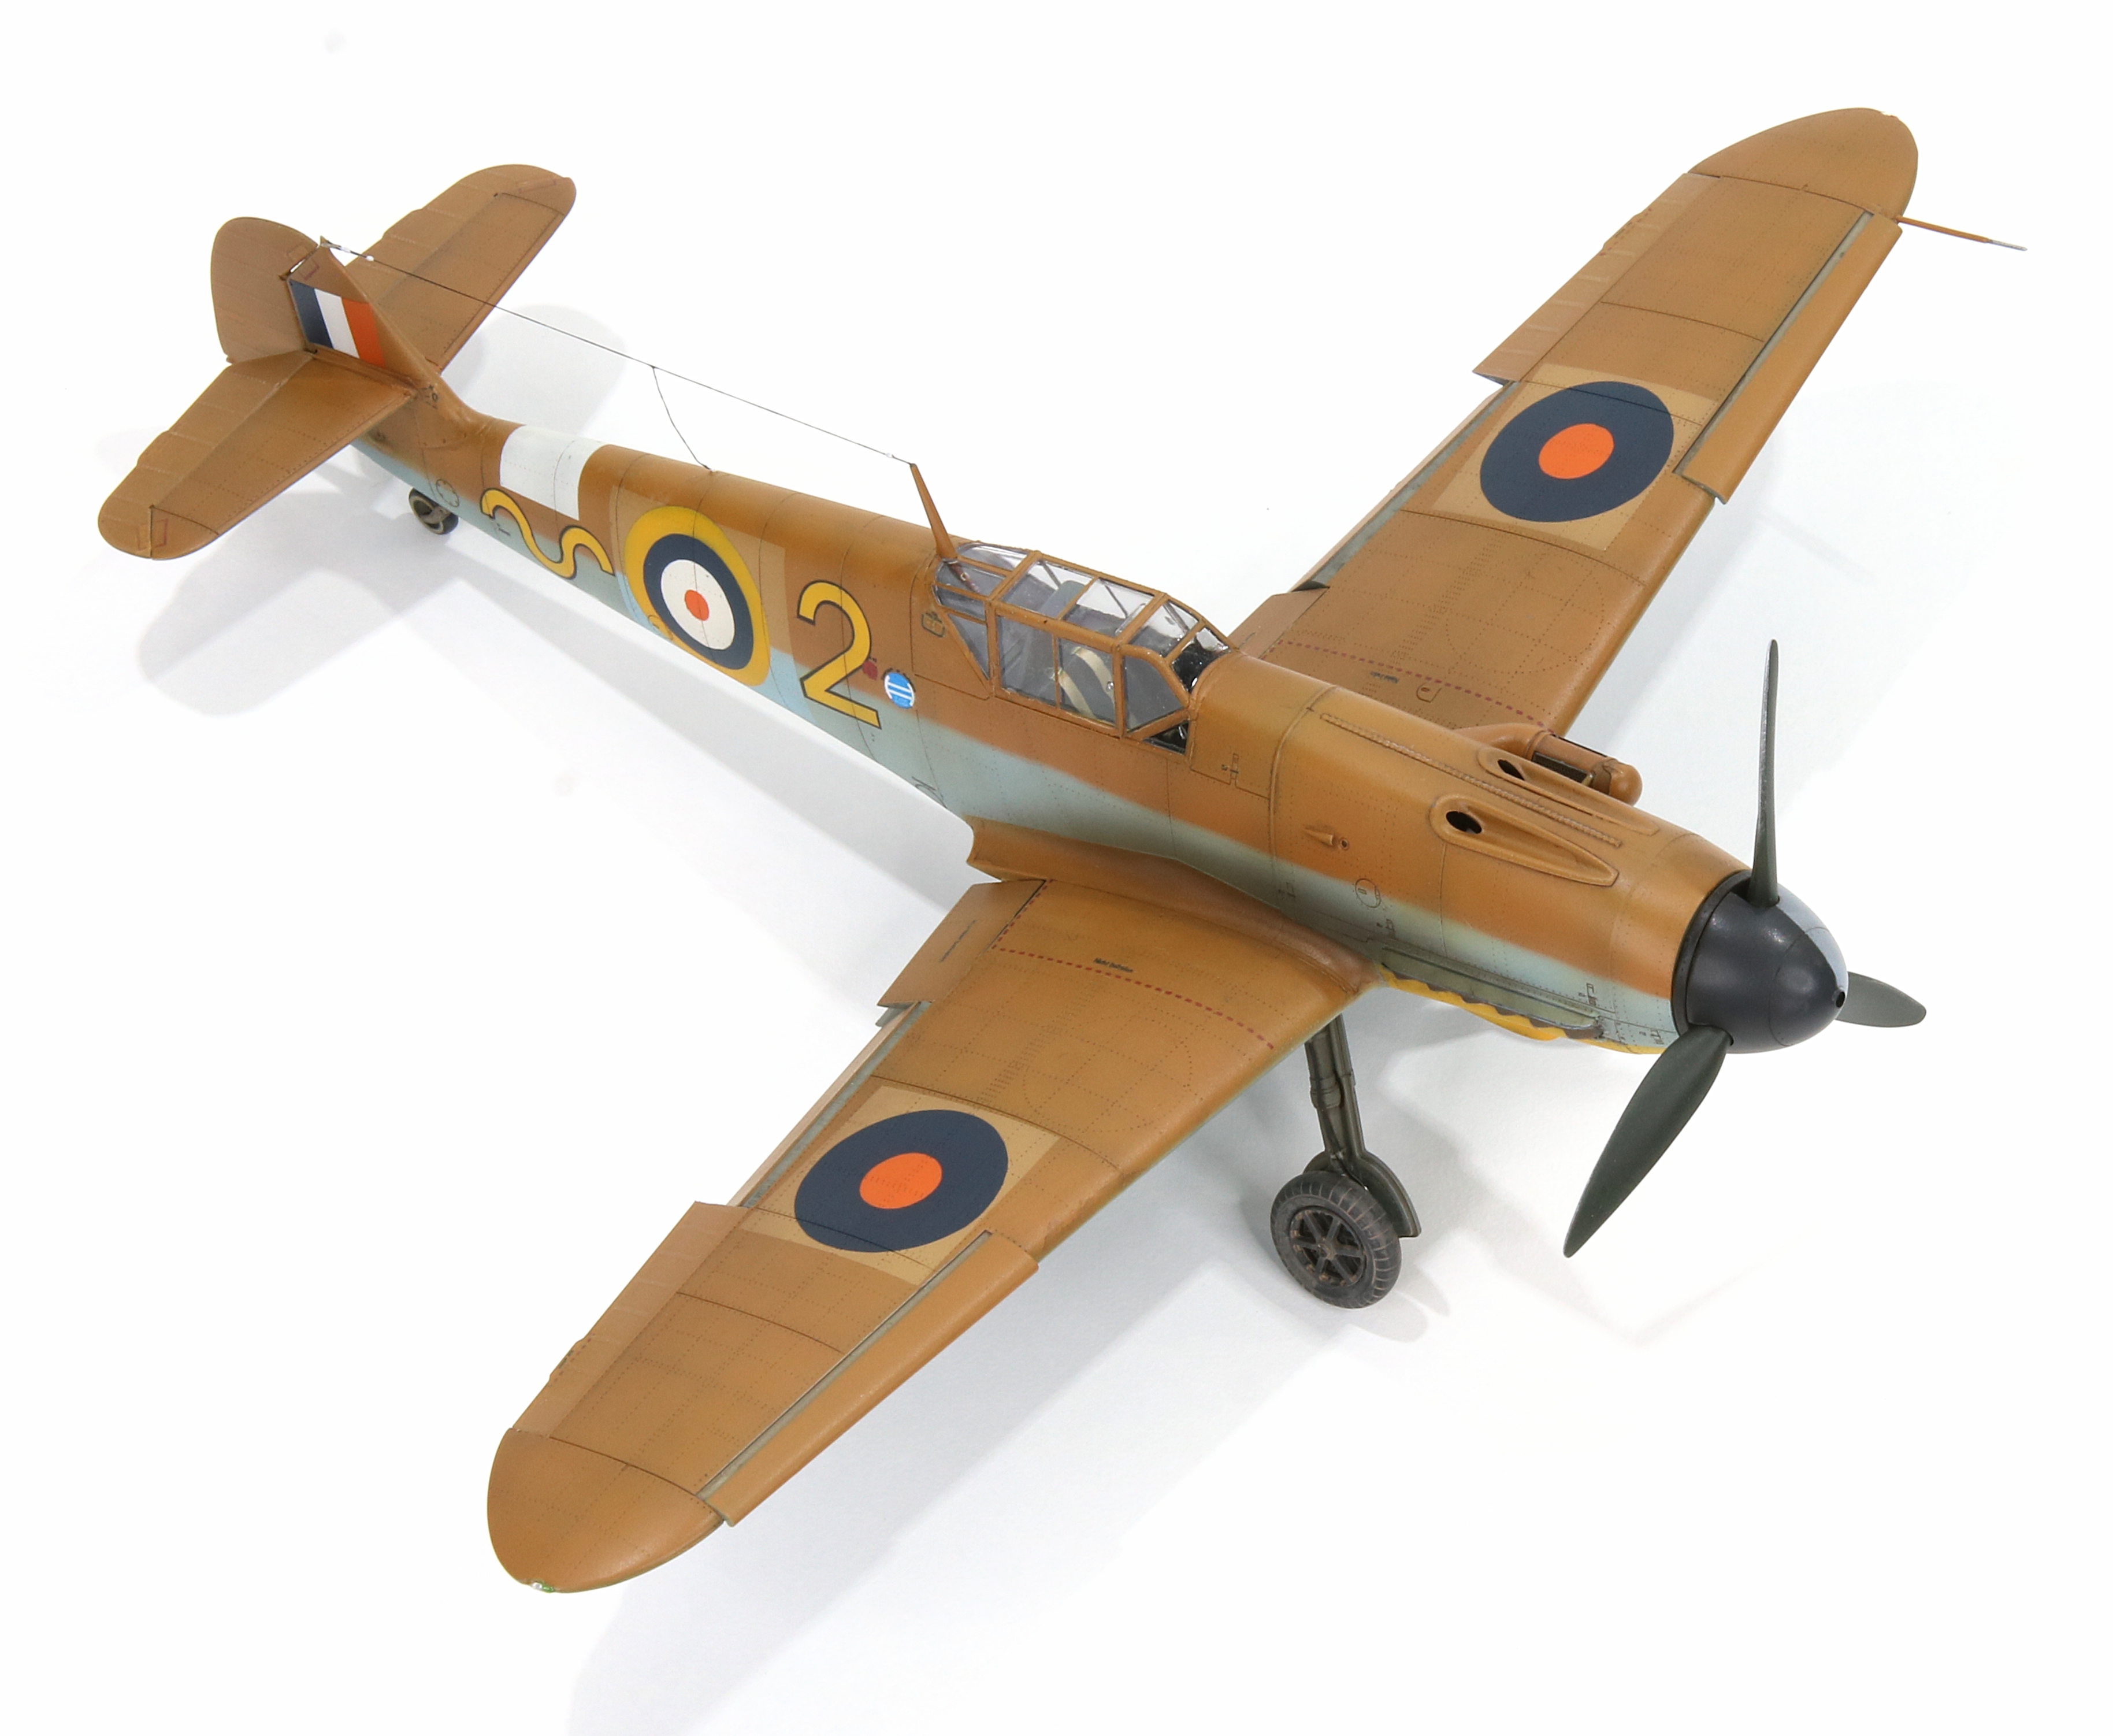
I assumed that the weathering would be fairly light inasmuch was the No.1 Squadron SAAF ground crew would have cleaned it up somewhat during the process of making it airworthy. I know from experience however that the desert makes everything dusty, and this dust when combined with machine fluids makes for a dirty paste. Correspondingly, I added an overall grime wash to create an appearance of “used desert machine” without going very far with chipped paint of other signs of wear and tear because the photos don’t really support that.
Click on any of the images below to scroll through the gallery.


Lightly weathered but final finish coat not yet applied. I went for the appearance of used-but-not-battered.
Finish


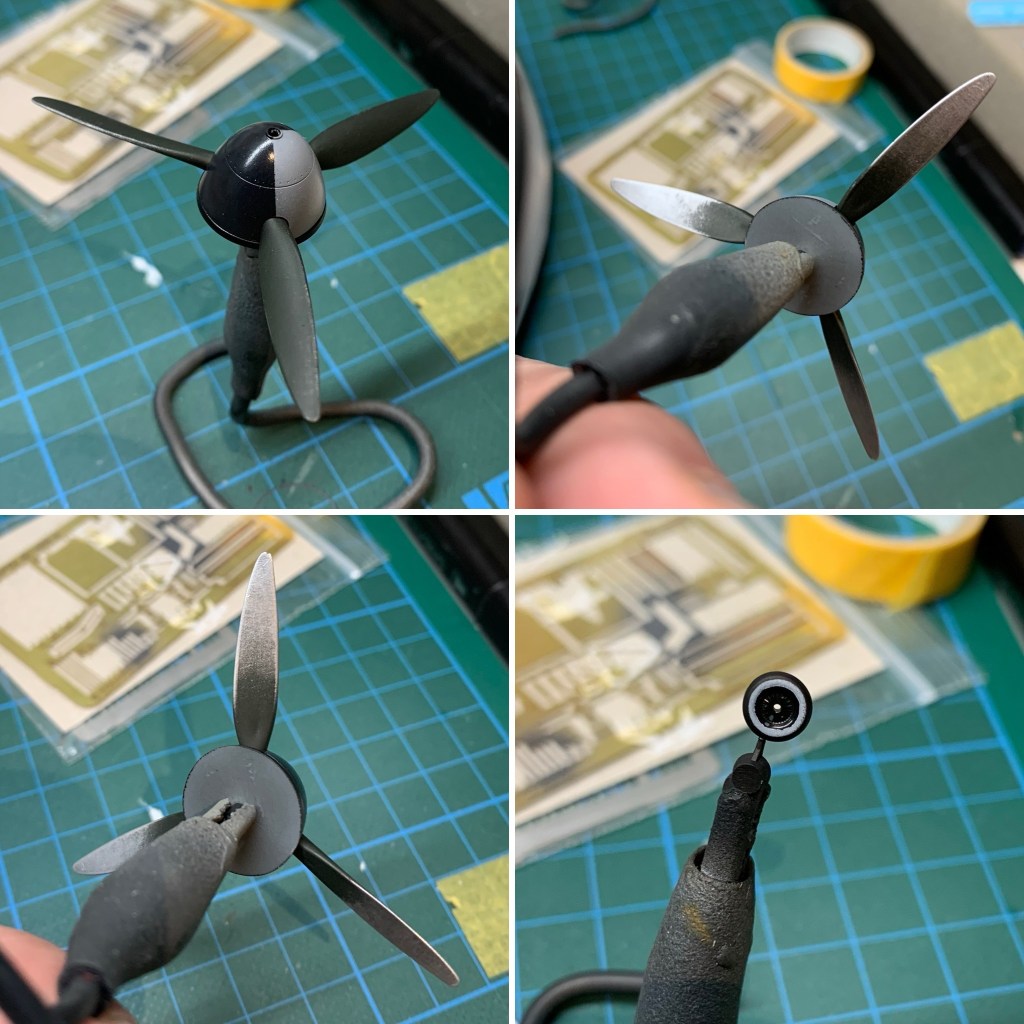
Amazingly, I likely spent more time deliberating on how to paint the spinner than any other part of the model. Clearly there was a lighter-painted segment but what colour? After deliberating far too long I eventually settled on black with a very dirty white segment but even now I’m not convinced. I did weather the blades heavily; the photos clearly show that almost all of the paint was worn away from the rear while the front was more or less untouched.
The undercarriage and bits and pieces went on very well with no lost parts or fingerprints applied.
Click on any of the images below to scroll through the gallery.


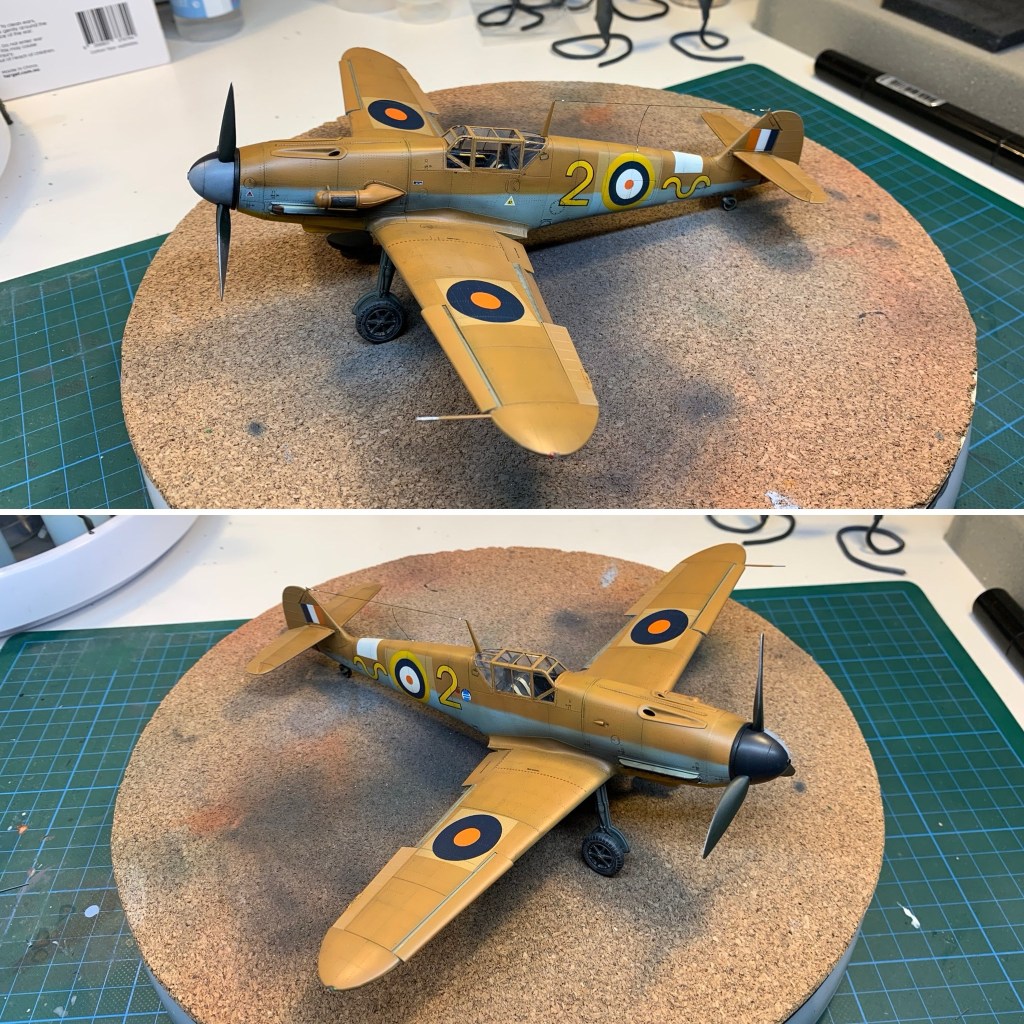
To say this one was a pleasure would be an understatement. Enough said.
I took a couple of pics to compare my interpretation with the original; I think it’s pretty close.
Gallery


References and Sources
- SAAF WW2 Heritage – Tinus Le Roux’s absolutely priceless site. I wish there were more like it preserving the day to day experiences of those extraordinary men and women of that time and place.
- The South African Air Force in Scale
- The SAAF Forum
- The South African Airforce in World War Two
If you are interested in following the build as it unfolded, as well as the research that led to the choice of markings, the full build diary is logged in the Britmodeller Aircraft WIP Section.
I really hope you enjoyed this article!
Making-History is a labour of love for me, but it’s becoming more expensive and time consuming. I’m loath to put advertising on it, so if you feel inclined please consider making a donation to help cover site hosting costs as well as the time it takes to produce its content. All donations get a receipt with my thanks.
Mark.
Make a one-time donation
Make a monthly donation
Make a yearly donation
Choose an amount
Or enter a custom amount
Your contribution is very much appreciated and 100% of it will be recycled back into Making-History.
Your contribution is appreciated.
Your contribution is appreciated.
DonateDonate monthlyDonate yearlyCopyright ©2024
This article, its text, and photos of the model is my original work and is protected by copyright in its entirety, except where noted. All research sources are listed in the References and Sources section above, including photos from official sources. All other images and quoted content were sourced from the internet and are used here under protection of fair-use. Any copyrighted content will be happily removed and/or credited forthwith upon request by its rightful owner.


Leave a comment