1/48 Scale Eduard Roland C.IIa

Construction

I bought this kit at a model contest in Guelph , Ontario because it was such a good deal rather than through any interest in WW1 models. When I got home and opened the box however, I was very impressed with both the quality of the molding and the photo-etch that accompanied it. A week or so later at the model club meeting, I happened to mention that I bought this kit and one of our members said they had an old book at home that had some really interesting profiles of the “Walfisch”. At the next meeting he brought the book in and when I saw one of the profiles in particular, this one immediately jumped up the priority list so that I could have a go at the paint scheme.
The kit comes in a tan colored plastic on four crisply moulded sprues. Also included is a fairly large piece of photo-etch that contains parts mostly to detail the cockpit. The cockpit is actually where most of the builder’s time will be spent on this model; the photo-etch pieces allow for a truly detailed and presumably accurate model to be produced. I started by spraying the inside a light brown as the base for a wood effect. When the light brown was dry, I dry brushed several colors of varying hew and then sealed with the coat of future. When that was dry, and following the instructions very carefully, I installed all the various bits and pieces [photo-etch and plastic].
With the interior finished I joined the fuselage halves together being particularly careful to align the two pieces together correctly. Because of the scheme I was painting, I had decided that I would attach only the lower wings and under-carriage to the fuselage before I started with the paint. I also wanted to pose the elevators and rudder offset from neutral. To accomplish this I first removed the control surfaces and then filed out the molded hinge details. I made small replacements from plastic stock and glued them into the elevators and rudder with CA clue. These would be painted separately along with the upper wings. The lower wing joint required some filling which took about an hour to accomplish and the horizontal stabilizers and tail fin only required a little CA glue to blend them in preparation for the paint.
Paint

The aircraft I wanted to depict was painted with a fish scale pattern over most of its fuselage. The base colour was light blue for which I used ModelMaster Acrylic RLM 76. When the 76 was well cured, I began the rather tedious masking process. I needed a hatched pattern for the scales which I thought would be fairly easy to reproduce, but had not yet decided how I was going to shade the scales once that was done.

I cut thin strips of Tamiya marking tape at about 1/16 of an inch wide and simply started to apply them in a crossed pattern. I began at one end of the model on the port side and worked my way to the end, wrapping over to the starboard side as required. When I got to the front, I turned it over and worked my way back again to the rear of the model. After about two hours, the model looked like this:

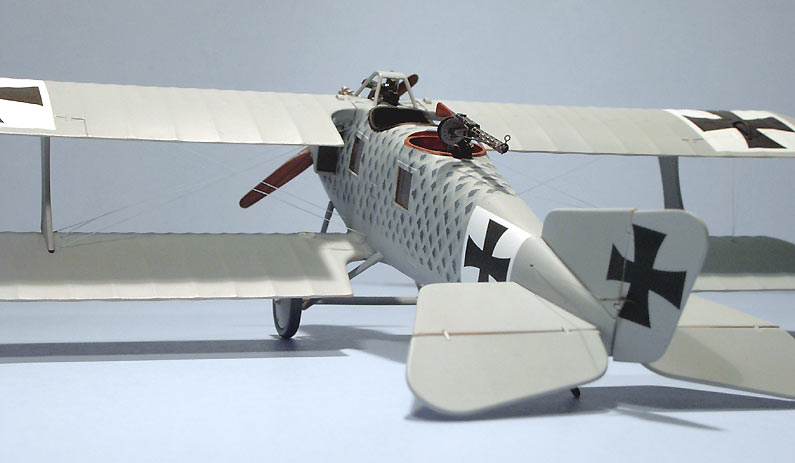
I used RLM 65 for the scale colour, sprayed at a low pressure and very fine setting as I was concerned about the paint bleeding under the tape if I blasted it. Once the 65 was dry, I spent some time experimenting with techniques to apply the shading. First, I tried using the airbrush with a shaped card mask, but it was very difficult to control, and the effect was not as I thought it would be, and I didn’t feel it replicated what the real thing would look like. After studying a photo of a scaled airplane, I then tried dry brushing in the corner of each scale. I used Intermediate Blue and lightly brushed it in the corner of each scale. I liked the result much better, as I am sure the real one was brush painted with hard(ish) edges. Below you can see the result.

I did need to do a little touching up, in places where the paint had bled under the tape and in a couple of scales I had missed. Once that was done however, I breathed a small sigh of relief and sealed it all up with Future.
Decals

After all the painting, the decals were a piece of cake! The Eduard decals went down very smoothly, with trouble at all. I only needed to use MicroSet and the entire model was decaled in about 45 minutes. Sharp eyed readers will notice I didn’t add markings for the mouth or eye as present on the profile. I don’t remember why not all these years later, but I suspect it was because I forgot!
Final Construction and Rigging

I assembled the two machine guns next. I prepared the photo-etch by heating it to red heat with a lighter to blue the steel. I like this way of treating the PE as it replicates the colour of the real guns beautifully and I don’t have to risk losing any detail in painting them. Both guns were a mini-kit in themselves and produced great looking replicas of the real things. When they were done, I installed the upper wings. Before painting I had checked for fit and tried to make sure that when I attached them with paint on, there wouldn’t be an unseemly gap. On the real thing there would have been a noticeable line where the wings were joined on and my result was acceptable to me. The wings went on with very little fuss, I attached the supports to the lower wings first and then just slipped the wings on. I also finished off the undercarriage and attached the control surfaces to the horizontal stabilizers and the fin. As much as I was trying to put it off, the moment of having to rig the model was fast approaching!
I used stretched clear sprue for the rigging. I thought this would best replicate the wire, though to be honest I’m not sure now. I’ll chalk it up to my rigging inexperience! I had previously drilled all the holes for the rigging and now it was a matter of working patiently to install all the required lengths. I measured out each piece with a set dividers and then cut to length. Glued in one end with white glue, let it set and then glued in the other end. When the glue was well set, I snapped the line taught with the smoke from a burnt stick. Remarkably, for me, I only had one piece snap on me with excess heat! The whole task took about four hours, spread over two successive nights of work.
With the rigging complete, I attached the rear gun and the model was complete. I did practically no weathering as the chances of this aircraft lasting long enough at the front to get weathered were slim.
As it turned out, I enjoyed this project very much. I wouldn’t say that I’m now converted to rigged things, but it did make a very pleasant change and an interesting challenge. The kit is very well produced, includes some quite stunning detail and is reasonably simple to put together.


References
http://www.pilots-n-planes-ww1.com
“Fly Past 6 – A selection of International Aircraft from Profile”
ISBN 0 85383 195 5 Published by Profile Publications Limited, Berkshire, UK.
Copyright: As usual, I make no claim of original work in this article except for the photos of the models and text describing their construction and painting. Except where noted otherwise, I sourced all images and photos from the internet and are used under fair-use. Any copyrighted material will be removed or credited forthwith upon request by its owner.


Leave a comment