 John Alfred Weese’s story resonated with me for commemoration here simply based on the ordinary, unremarkable and yet totally remarkable way he died. One of the countless many who gave their lives anonymously and of whom not much is now known. If anything defines the purpose of this website, it’s John Weese’s story.
According to the after-action report filed by his commanding officer, 1st Lt. Valmore Beaudrault, Weese reported that his aircraft had been struck by flak during a patrol mission over the Cherbourg assault area on June 10, 1944. A short time later Weese reported that he was at 7,000ft and that his engine was out. He stated that he thought he could put his aircraft down behind friendly lines in the shallow water a little offshore Juno Beach. Beaudrault reported that nothing more was heard from Wesse.
2nd Lt. John Weese lost his life as a result of the subsequent crash landing in the water, his body being recovered the same day. His aircraft was pulled ashore above the high tide mark the following day by personnel from No2 RAF Beach Squadron. It was later reported that his injuries from the ditching were likely not fatal and it can be surmised that tragically, he perhaps drowned before he could exit his aircraft.


The photos above show Weese’s aircraft on the beach at St Aubin sur Mer near Juno Beach. 2nd Lt. John A. Weese was initially buried at the small cemetery in Bernieres sur Mer. After the war he was repatriated and now lies in Bethlehem Cemetery, Ann Arbor, Michigan.
Then and now; the picture below seems to sum up, at least for me, what John Weese died for; a now peaceful, free, seaside town in rural France…

365th Fighter Group, 386th Fighter Squadron, USAAF
 Constituted as 365th Fighter Group on 27 April 1943. Activated on 15 May 1943. Trained with P-47’s. Moved to RAF Gosfield England in December 1943. Assigned to Ninth Air Force. It was several weeks before the 365th received a full complement of 75 P-47D Thunderbolts and mid-February 1944 before they were placed on operational status. Their first mission, flown on 22 February, was a bomber support sweep of short duration over enemy-held territory.
Early missions were flown in support of Eighth Air Force B-17 and B-24 bomber operations and on one of these on 2 March, the 365th had its first encounter with enemy fighters in the Bastogne area resulting in the loss of one Thunderbolt and claims of six of the enemy shot down. Oberstleutnant Egon Mayer. one of the most successful Luftwaffe aces flying in the West with 102 victories, fell in this battle.
On 5 March, with only nine missions to its credit the group moved south to RAF Beaulieu in Hampshire. The group was stood down three days after arrival so that it could undertake a two-week intensive course in ground attack and fighter-bombing. After training, the 365th flew dive-bombing missions to attack such targets as bridges, aerodromes, rail facilities, gun positions, and V-weapon sites prior to the invasion of the Continent.
On D-Day, its duties were attacking gun emplacements and communications facilities behind the bridgehead. Two P-47s were lost. On the following day when 12 separate squadron-sized missions were flown five aircraft failed to return.

The 365th was one of the most successful P-47 groups of the Ninth Air Force when it came to air combat, and a total of 29 enemy aircraft were credited as shot down during the four months the group operated from Beaulieu. On 25 June, the 365th had one of its best days when eight enemy fighter-bombers were destroyed. On 2 July, Lieutenant Colonel Robert L. Coffey, Jr., the Air Executive, became the Ninth Air Force’s third Thunderbolt ace. As with other P-47 groups, losses were modest until ground attack became a regular task in June. All told, 24 P-47s were ‘missing in action’ during their stay at Beaulieu, one of which was John Weese’s.
Below is a remarkable video documenting some of the Group’s activity shortly after D-Day. The event’s depicted are two days before 2nd Lt. Weese’s death.
The 365th Group began its move to the Continent on 21 June, the first squadron taking up residence at Azeville, France (A-71) on 26 June, the last moving out of Beaulieu on 28 June and the rear party on 2 July providing tactical air support in support of U.S. First Army. On the continent, the group moved rapidly from one airfield to another, eventually winding up near Fritzlar, Germany (Y-86) on VE-Day.
After the end of hostilities, the 365th Fighter Group took part in the disarmament program until June, then returned to the United States in September 1945, being inactivated at Camp Myles Standish, near Taunton, Massachusetts on 22 September 1945.
Source: Wikipedia
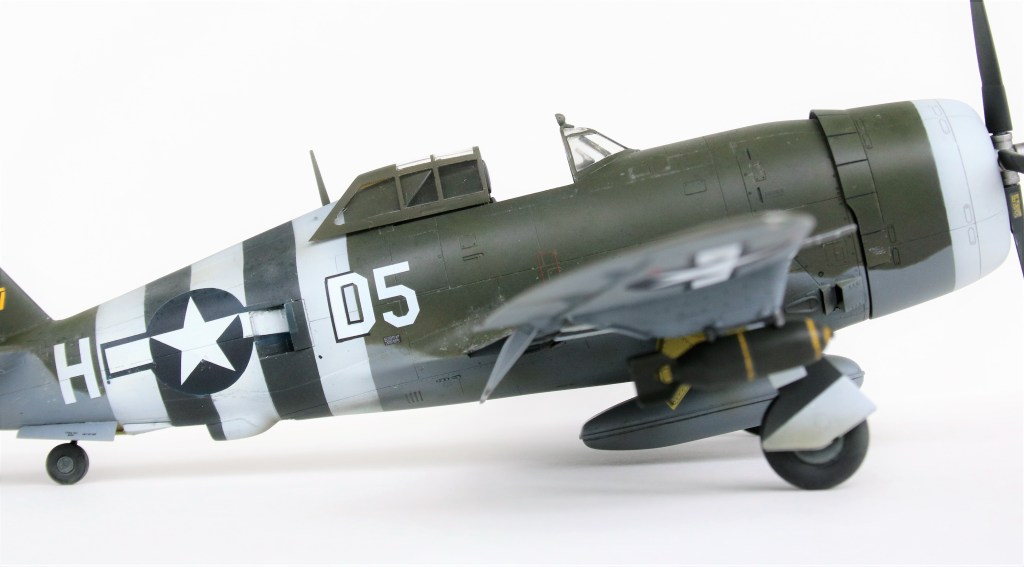
Tamiya 1/48 Scale P-47D Razorback

Construction

If you followed along on the In Progress page, you’ll know that the first stages of construction were completed in a hotel while we were evacuated from the Opal Tower in Sydney Olympic Park (Google if you’re interested). I took the construction as far as I could without paint and then waited to get home.


The cockpit came up quite well once I was able to paint it – I’m not generally much interested in cockpits and detailing them so this one was a pleasant surprise in how it turned out. Well, to me at least.
Construction in general went well after that; it is, after all a Tamiya and fit was really very good throughout. I consider construction to be my weakness in modelling and this kit made me look good. I make sure to take my time in putting the major components together; I like sanding/filling even less than construction, so I took my time and worked carefully.

Painting and Markings

I had, essentially, three photos to work from in deciding the markings. None of the photos were clear enough to know much more than the squadron code was D5*H, the S/N was 42-76297 and that there were some white markings – a list of some sort? – on the forward fuselage as well as some mission or kill markings.

")

The overall paint scheme itself was quite simple, Olive Drab over Medium Grey. I did have a few decisions to make though which I’ll describe we come to them. As I’m shockingly bad a taking pictures as I go, for the most part I’ll have to describe rather than illustrate my methods 😊.
Masking the canopy was completed with the aid of Montex masks. With that done, I tacked the canopy in the closed position. Next, I applied the Zinc Chromate Yellow to the wheel wells, the firewall and all other internals that might be visible once the model was completed. With that done, I painted the rear cockpit area Dull Dark Green having decided this aircraft was almost certainly not one of those which may have had that area painted grey.

I started the airframe itself with the undersides and used my favourite Tamiya acrylics. As mentioned in previous articles, I don’t typically pre-shade, so the base coat goes on neat, as it were. Then I start subtly altering the shade by mixing in varying degrees of lighter or darker greys, as well as a drop of white or black. All these changes in tone are applied randomly and when I get it right I believe it produces and depth of finish which recreates a more realistic finish for a monochrome paint scheme.
Once the undersides were well dried, I masked with bluetack and tape and applied the base coat of Olive Drab for the topsides, and then broke it up using the same method as for the underside. At this point I was quite happy with the result and set the model aside to cure the paint. Next was going to be the D-Day and theatre stripes – so far so good.


I paint the D-Day and theatre stripes after the camo scheme because that’s the way it was done in the field, there’s more options for weathering. The first decision I made was that the D-Day stripes would have been applied to the real aircraft with the flaps up. As this airframe came out of the factory in its camo paint scheme, and the flaps were painted separably in the factory, this meant the flaps were Olive Drab except for the stripes and not NMF as they might have been.
Of course, painting white on top of dark green does make for many light coats and that’s what I did. I didn’t go for a solid white – I again applied the same technique to the white to get an inconsistent weathered look to it though I did make sure that the theatre markings on the fin and horizontal stabilisers were stronger as they would have been painted at maintenance depot level and would have been applied “properly” rather than the squadron level application of the D-Day stripes. After the white was dry, I masked and painted the black stripes, once again varying the tone in the same way as described previously.


After applying a clear gloss coat the model was ready for decals. Still so far so good.
First up, as usual, I applied the national insignia and almost immediately was unhappy. Tamiya make great models but awful decals; these were no exception and were thick and did not want to conform to the complex fuselage shape around the vents. To make matters worse, the white wasn’t opaque enough to cover the D-Day stripes without bleed-through. I pressed on but was equally unhappy about the squadron codes. I did a crappy job of applying the S/N on the fin, they were uneven and badly spaced out. I hit everything with multiple soakings of Microsol/set but to no avail, they had to come off. Making this worse was that the squadron code and S/N decals were a gift, selflessly donated by Hyperscaler Mark D. Joyce from California in response to a request for help finding the Barracuda Decals decal sheet that featured other 365th F/G aircraft.
Removing the decals required some paint touch-ups and in fact I was unable to get the S/N off at all so simply painted over them. Once the touch ups (and re-touch ups…) were complete, I reapplied the gloss coat and set about using Montex masks for the insignia instead of decals. This actually went quite well and I was mostly happy with how they turned out. I used some different decals for the squadron codes that were opaquer, and things were looking good.

I spent an evening applying the stencils and the markings unique to this aircraft. I did a much better job of the S/N, too. This aircraft had some markings on the forward fuselage that were clear enough on the photos to see in general that they were there, but not nearly clear enough to show what they were.

I decided that I would represent these with kill markings though I am sure they were more likely ground attack/top cover mission markings (I was unable to source these, however), and using random white decals I applied decals representing the “list” with a very light dry-brush to obscure the words.
Next morning, I saw that one or two of the stencil decals had silvered so I removed those. Otherwise all looked good, so I applied sealing coat of clear gloss then a flat coat in preparation for the weathering. So far, [mostly] so good.
I planned to use a salt filter to begin the weathering process on the top sides. I sprayed the model with water and applied the salt and set the model aside to dry.

Next, I sprayed a heavily diluted filter of light grey… And completely screwed up the finish. Bugger.
To cut an already long story short, the dilute filter coat wasn’t nearly dilute enough and left the model with a distinctly leopard-spot-like filter, rather than the subtle variation of tone I was going for. I had to mostly repaint in and around the markings and stripes to repair the damage to the Olive Drab finish. I did my best to replicate the quality of the original paint job and got it quite close, but by now there’d been so many repairs, touch ups and repairs that I was losing track of what I had done deliberately and what had been done to me!

Weathering

Now, on its third or fourth repaint I was a little gun-shy about doing anything! However, needs must so I pressed on. I like weathering with my airbrush. I applied the exhaust staining, various streaks and grime patches with Tamiya Smoke. I flattened it down with a drop of Nato Black for some other streaks and staining around the flaps and the D-Day stripes which I based on images of contemporary aircraft such as the one below.

Finally, I used a bit of Dark Earth for the wheels and scuff marking and staining on the upper wing surfaces.

With that done, I applied a little chipping with a silver pencil and called it done.
Conclusion

Boy, did I make hard work of this one. For sure, this wasn’t a particularly difficult model to take on, either in the construction or the paint but a series of mistakes and some experimentation that didn’t come off made me work hard at it!
On the other hand, I’m actually quite happy with how it finally came out. I think it’s likely a bit over-weathered and some of the markings are much more representation rather than replication.
Please take a look at the gallery of pics below and me know what you think (eagle-eyed viewers will notice the missing pitot tube; it is [now] installed on the model, just not before the pics were taken).


Thanks and References
First thanks go to Mark D. Joyce from Hyperscale for the gift of some 386th F/S decals (which I subsequently ruined through my own ineptitude).
http://www.americanairmuseum.com/unit/312
https://en.wikipedia.org/wiki/356th_Fighter_Group
http://normandyinsightresearch.blogspot.com/p/blog-page_8.html
http://www.americanairmuseum.com/unit/995
I asked a couple of questions on both the Hyperscale and Britmodeller forums and I’m indebted to the correspondents who assisted me with information requested there.
Copyright: As usual, I make no claim of original work in this article except for the photos of the models and text describing their construction and painting. Except where noted otherwise, I sourced all images and photos from the internet and are used under fair-use. Any copyrighted material will be removed or credited forthwith upon request by its owner.


Leave a comment