
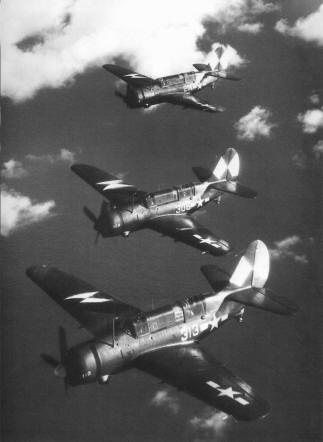
The fourth United States vessel to bear the name Essex was launched 31 July 1942 by Newport News Shipbuilding and Dry Dock Co. by Mrs. Artemus L. Gates, wife of the Assistant Secretary of the Navy for Air; and was commissioned 31 December 1942.
Following her sea trials USS Essex (CV-9) sailed to the Pacific in May 1943. Departing Pearl Harbor, during the remainder of 1943 she was involved in operations Marcus Island (31 August 1943), Wake Island (5-6 October), and launched an attack with TG-50.3 against the Gilbert Islands. The latter operation included her first amphibious assault, the landing on Tarawa (18-23 November). After refueling at sea, as flagship of TG-50.3 attacked Kwajalein (4 December).

1944 brought more of the same; her second amphibious assault was delivered as part of TG-58.2 against the Marshalls (29 January – 2 February 1944). Next, Essex with the rest of TG-58.2 now joined with TG-58.1 and 58.3 and launched an attack an against Truk (17/18 February) during which eight Japanese ships were sunk. En route to the Marianas to sever Japanese supply lines, the carrier force was detected and received a prolonged aerial attack which it successfully repelled. In February, she was part of the attack upon Saipan, Tinian and Guam (23 February).
After her only wartime refit, she joined carriers Wasp (CV-18) and San Jacinto (CVL-30) in TG-12.1 to strike Marcus Island (19-20 May) and Wake (23 May). She deployed with TF-58 to support the occupation of the Marianas (12 June – 10 August); sortied with TG-38.3 to lead an attack against the Palau Islands (6-8 September), and Mindanao (9-10 September) with enemy shipping as the main target, and remained in the area to support landings on Peleliu.

For the remainder of 1944 she continued her front line action, participating in strikes against Okinawa (10 October), and Formosa (12-14 October), covered the Leyte landings, and taking part in the battle for Leyte Gulf (24-25 October). At the conclusion of the battle, she continued the search for enemy fleet units until 30 October when she returned to Ulithi, Caroline Islands, for replenishment. She resumed the offensive soon after and delivered attacks on Manila and the northern Philippine Islands during November 1944.
On 25 November, for the first time in her combat career, Essex received injury. A kamikaze hit the port edge of her flight deck landing among planes gassed for take off causing extensive damage, killing 15, and wounding 44. The remarkable photos below were taken on board Essex as the Kamikaze made its attack.


Following quick repairs she joined 3rd Fleet off Luzon supporting the occupation of Mindoro (14/16 December). She rode out the typhoon of 18 December and took part in the search for survivors afterwards.
Now embarking AVG-4 and as part of TG-38.3 she participated in the Lingayen Gulf operations, launched strikes against Formosa, Sakishima, Okinawa, and Luzon. Entering the South China Sea in search of enemy surface forces, the task force hunted enemy shipping and conducted strikes on Formosa, the China coast, Hainan, and Hong Kong. Essex withstood the onslaught of the third typhoon in 4 months (20-21 January 1945) before striking again at Formosa, Miyako Shima and Okinawa (26-27 January).
During the remainder of the war she operated with TF-58, conducting attacks against the Tokyo area (16/17, and 25 February) aiming to neutralize the enemy’s airpower before the landings on Iwo Jima and to cripple the aircraft manufacturing industry. She also sent support missions against Iwo Jima and neighboring islands.
Note: for a truly excellent resource on AVG-4’s exploits from December 1944 until being replaced by AVG-83 in March 1945 check out Air Group 4 – “Casablanca to Tokyo”
However, her major operation in 1945 was 23 March to 23 June in support the conquest of Okinawa. This support included participation in the attack and subsequent sinking of the Japanese battleship Yamato and for these operations a new Air Group was embarked, AVG-83
AVG 83

On March 10, 1945 AVG-83 replaced AVG-4 and embarked on board Essex. The air group comprised four squadrons, VT-83 (TBM-3’s), VB-83 (SB2C-4’s), VF-83 (F6F-5’s), and VBF-83 (F4U1-D’s). As was becoming increasingly common, the bombing and torpedo squadrons embarked only 15 aircraft each to make as much room as possible for fighters to combat the increasing threat of Kamikaze attacks. Between them, VF-83 and VBF-83 added a total of 73 fighters aboard Essex as she departed on a cruise that would last until war’s end.
A little over a week after leaving Ulithi in the Caroline Islands, Essex, with the other fast carriers took part in an attack on the Japanese home Islands. VBF-83 logged its first kills March 18 with VF-83 splashing nine the following day. These attacks were only the beginning however; Essex and the rest of her group were to be key players in a far more important task beginning April 1, 1945 – Operation Iceberg, the invasion of Okinawa.
The campaign began in the last week of March and did not officially end until the last week if June. During this time AVG-83 had the distinction of leading the Task Force in enemy aircraft shot down with a remarkable score of 182 confirmed kills (VF-83 with 122 & VBF-83 with 60). In addition, both VT and VB-83 played a key part in the attack and sinking of the Japanese battleship Yamato. Finally, but most certainly not least, countless support missions, both ground attack and CAP, were flown by all Essex’s squadrons which helped the 10th Army on the ground secure the Islands at the end of June 1945.
Each squadron was tasked with different mission priorities. VB-83’s Helldivers and VT-83’s Avengers were given shipping strikes, anti-submarine patrols, ground troop support and various special mission functions. VF-83’s Hellcats were, along with the other fighter squadrons, charged with the safety of the fleet flying constant CAP missions, supported by VBF-83’s Corsairs when they weren’t flying support missions for the ground personnel.
AVG-83 – Codes and Markings.
Specification SR-2C dated January 5, 1943 initiated the Tri-Colour scheme for USN aircraft operating in the Pacific. This scheme remained in effect until the fall of 1944, when all over Glossy Sea Blue became the designated scheme for all Pacific carrier aircraft.
Essex class carriers carried 103 aircraft of all types. By spring 1945, they were numbered in an orderly system that, with few exceptions, listed as follows:
Fighter Squadrons – VF and VBF: 100’s
Bomber Squadrons – VB: 200’s
Torpedo Squadrons – VT: 300’s
Replacement aircraft usually arrived with a temporary number on the cowling that was the last three digits of the Bu. No., this was quickly replaced with the assigned code for the squadron.
In a Confidential Letter No. 2CTL-45, dated January 27 1945, the USN Air Force, Pacific Fleet, instituted The Geometric Symbols (“G” Symbols) system as a way to have all carrier based aircraft easily identifiable to their carrier. All carriers were assigned a G-Symbol which was painted on all aircraft on each side of the tail fin, on the upper side of the starboard wing, and lower side of the port wing. AVG-83 received the “Hourglass” or “Bowtie” assigned to USS Essex.

Other temporary markings were sometimes applied. The best known example of this is for the attacks on the Japanese home islands in February 1945. All assigned aircraft had their forward cowls painted either yellow or white. Although there is circumstantial evidence to suggest the yellow/white cowlings made a reappearance, one VF-18 pilot, CDR J. Ted Crosby has no recollection of them ever being reapplied to VF-18 aircraft.
In July 1945, the Navy changed again and instituted a system of Letter Codes. Each carrier was to replace their G-Symbol with an assigned single or double letter code to be painted in the same locations as the G-Symbol. Essex’s new code was the single letter “F”. This order was almost universally implemented, though some exceptions occurred and indeed some aircraft ended the war still displaying their G-Symbol.

AVG-83 Aircraft
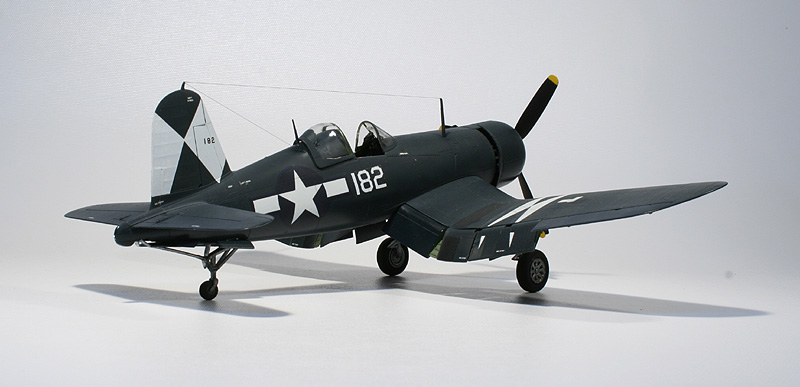
Grumman F6F-5 Hellcat

Easy to fly, easy to maintain, well armed, tough and easy to build – could a better specification of a carrier borne fighter be written? Grumman’s F6F Hellcat achieved the highest kill ration there will ever likely to be for a combat aircraft at 19:1 and produced 307 American Aces during World War 2.
Designed in late 1941 to replace Grumman’s outclassed F4F Wildcat, some of the design specifications were influenced by the A6Ms that were captured during the early months of the war, especially its excellent maneuverability. As a result of this experience of combat against higher-performance machines the Hellcat’s specification required the most powerful engine available. The prototype X6F-1 was provided with a 1700hp Wright R-2600 engine, but a month later – on 26 June1942 – it was re-engined with a 2000hp Pratt and Whitney R-2800. The US Navy was so confident in the design that it was ordered into production before the prototype flew.
A total of 2,545 Hellcats were delivered in 1943, in 1944 no fewer than 6,139, and in 1945 a further 3,578 – total production was 12,272 units. The Hellcat was eventually credited with destroying more than 6,000 Japanese aircraft – 4,947 of these by F6Fs of the USN carrier squadrons (209 of the others by land-based Marine Corps F6Fs, and the remainder by Hellcats of other Allied countries).
1/48 Hasegawa F6F-5 Hellcat

Construction.
This one was built basically OOB with some minor scratch built additions to the cockpit. I began with the cockpit, painted with Model Master Interior Green. On this one I used masking tape for the seat belts. I painted the instrument consol in my usual way. Started with black, which I then dry brush with RLM74. When that’s dry I use a silver pencil to pick out the details. I then paint the individual instruments with a very fine brush – usually using a photo of the real thing as my guide. Finally, I drop in some neat Future to each instrument dial to simulate the glass. After final assembly of the cockpit components, I put in a light wash to help give it that “lived in” look.
Construction then continues per the standard Hasegawa steps. I didn’t deviate too much from the instructions, just leaving off all the breakable bits until I couldn’t avoid adding them. As I recall, the only place I needed filler was the wing roots. I used the Testors Green putty, which I applied with my #11 blade and then immediately wiped with a Q-Tip moistened with nail polish remover. Masking was a snap, on this one I used Tamiya tape for the canopy and Parafilm M for the windshield.
Paint & Decals.

Essex’s VF-83 Hellcats were all -5’s painted in GSB. I had a particular plane in mind which appears on page 69 of Barret Tillman’s “Hellcat Aces of WW2”. This particular aircraft was one of a very few to carry nose art. It was flown by three Ensigns, Donald McPherson, Bill Kingston, Jr, and Lyttleton Ward, the latter shooting down 4 enemy aircraft on May 4, 1945, and becoming an ace in the process.
GSB is a fairly simple scheme to paint! I used Model Master acrylic sprayed through my Badger 200 and left it to dry. When it was well cured (which doesn’t take long with MM acrylics) I masked of the G-Symbols on the tail and wings with Tamiya tape. This took some time to get right, but when I was happy I sprayed MM Insignia White in several light coats. I removed the masking as soon as I felt it safe to do so because I was concerned about lifting the GSB underneath. The only drawback with acrylics being that they don’t stick to the plastic as well as enamels. This time all was okay and when the white was cured I sealed the paint with Metalizer Sealer. I use this because, although it’s smelly, it gives a very hard, quick drying and smooth gloss coat in preparation for decaling.
I used kit decals for the nation insignia, kill markings and stencils, the latter of which I applied sparingly as there never seems to be as many visible in photos than kit manufacturers supply. Codes were easy, I use dry transfers onto clear decal sheet for these. My real problem was the skull and cross bones and the phrase “Death n’ Destruction”. I solved the wording with more dry transfers made for the model railroad hobbyists but the graphics stumped me for a little while. I eventually settled for cutting out the skull from white decal sheet and painting the mouth and eyes by hand. I also hand painted the crossed bones. I was fairly happy with the result, though it is quite a bit larger in scale than the real aircraft’s.

Once decaling was complete, I sealed the entire model with an overspray of very diluted light aircraft grey. I do this to begin the weathering and to homogenize the markings with the paint. On this plane, it was depicted as it was three months into its tour, so I felt a moderate level of paint fading would have occurred, so I faded the upper surfaces lightly. I was careful to try and only fade those areas that would have received direct sunlight with the wings folded. With the fading done, I sealed it all with several light coats of dullcoat, bringing the finish down to semi sheen.
With most of the work done, I brought it back to the bench to add on the fiddly bits, and realized I’d lost the tail wheel. Digging in the spares box I found a suitable wheel and then scratch built the rest of the structure out of styrene sheet and tube. It came out okay, but I think I should have made the strut a little longer. I added the undercarriage, antenna, etc. I decided to use hypodermic needles for the gun barrels. Working from photos I used two different sizes, placed the small inside the large and cut to length. I also burnt the needles in a candle flame to try and blue them up a little, came out okay.
Weathering and Conclusion.

Weathering was done entirely with pastels except for some panel line highlighting through the white portions of the markings. I used pastels to dirty up the fuel tank (I still don’t think I got it dirty enough) and for the exhaust staining. I worked from photos and I must say I was surprised at the level of staining on these airplanes. I think I got it fairly close, but again, if anything I think I may have underdone it. In photos I see little evidence of paint chipping so I kept mine down to a bare minimum.
With most of the work done, all that was required was to add the antenna wire. Of course, I had to replace the broken post on the tail fin first, which I did with sheet styrene. I used stretched sprue for the antenna wire which was positioned without [too] much trouble.


Chance Vought F4U-1D Corsair

The F4U-1D could be described as a classic case of triumph snatched from the jaws of disaster. Designed by Beisel and Sikorsky, the F4U is regarded by many as one of the greatest combat aircraft in history, and was in production for a longer period of time than any US fighter other than the F4 Phantom. As conceived it was intended to mount the most powerful engine, and biggest propeller, of any fighter in existence, and the prototype was the first US combat aircraft to exceed 400mph. This was the reason for the bent wing, to mount the large prop the main undercarriage had to be very long to give adequate ground clearance for the propeller. However, this meant the ‘gear would be too long to fold into the wings. The solution was to use an inverted gull wing to achieve ground clearance for the prop and keep the main undercarriage legs from having to be too long.
There were still problems though. The extraordinarily long nose inflicted poor visibility for the pilot when landing and take off. The undercarriage, though shortened, occasionally broke and the Corsair had a strong tendency to bounce on landing. All these faults were greatly exaggerated when the aircraft was operating from carriers. As a result the US Navy at first rejected it for shipboard operation. Nonetheless the F4U was adopted by the Marine Corps and quickly demonstrated its effectiveness.
The US Navy finally adopted the F4U as a shipboard fighter-bomber in November 1944, and by early 1945 large numbers were operating from the fast carriers of the Pacific Fleet – although the longer-established and very capable Grumman F6F Hellcat remained somewhat more numerous aboard the carriers right up to the war’s end.
The F4U-1D is basically a follow on to the very successful F4U-1A version. There are some interesting differences between the two though. For one thing, the -1D was the first type to be used regularly from aircraft carriers. Externally, they can be told apart by the twin racks between the gear legs. These racks could hold either drop tanks or bombs. The -1D was also able to carry underwing rockets that the -1A could not. Most -1Ds had no extra framing in the canopy.
1/48 Tamiya F4U-1D Corsair
Construction
I cannot say why (because I don’t know), but this was the least enjoyable build for me. Construction was straight forward with no real problems, though the wings are awkward to do well if not displayed folded. I did the cockpit in the usual way, it is very well done and looks quite convincing when complete. Just for a change, I used the supplied decal for the instrument panel, using lots of Micro Sol to get it to melt down well. When it was dry, I dropped in a little Future to simulate the glass.
The only work to do to make this a 1-D is to remove a small air scoop on the forward cowl. The aircraft I was representing had both antenna posts so the positioning hole was cut for the dorsal one before joining the fuselage halves. The kit is so well designed that apart from acknowledging the fact, there is very little to say about construction.
Paint & Decals

As is the case with Essex’s VF-83 Hellcats, the VBF-83 Corsairs were all 1-D’s painted in GSB. Again, I had a particular aircraft in mind that Scott Taylor had sent me some scans of that had a strange markings on the wings, however more on that later. After masking the canopy with Tamiya tape, I used MM gloss acrylic for the GSB, the idea being that a gloss coat should require less gloss coat in preparation for decaling. This theory worked to a large extent, though I did experience some silvering with the smaller stencil decals.
Painting went very well, I used the Badger 200 single action to lay down several light coats to build up an even, solid finish. I left it to cure for a couple of days before sealing with Metalizer sealer. I then masked the G-Symbols and painted them. I sealed the GSB before masking to try and ensure no paint would lift and this seemed to work very well. I had no lifting at all, and the tape seemed to adhere better to the hard glossy surface of the Metalizer sealer than it would have to bare paint. After the white was dry I sealed that and left the kit to cure for a day or two.
With the kit fully cured, it was time to start decaling. I made the code numbers with dry transfers on clear decal sheet and applied them after I’d placed the national insignia in the appropriate locations. I used the kit deals for these. As is my usual practice, I only applied the stencil decals sparingly and after the first couple silvered, I used a little Future under the rest and experienced no more problems.
A note of explanation is now required. The pictures of my subject showed the national insignia on the port wing to have some gaps in it, with what looked like the corresponding “pieces” on the starboard wing. My guess is that a couple of the maintenance panels had been swapped from one wing to the other which would explain the unusual markings. I am unsure as to the copyright status of the pictures I have and so am unable to include them in this piece, you’ll have to take my word for it that the markings in the picture to the left are a reasonably accurate reproduction!
With all the markings applied, all that was left was the fade coat, applied as described elsewhere and a final seal of Dullcoat. I brought the finish down to a semi gloss to simulate some degree of sun bleaching as I had for the other models.
Weathering and Conclusion
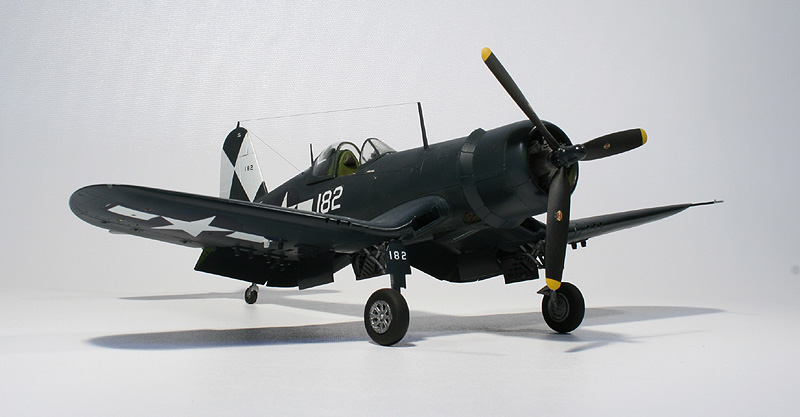
Onto the final stages. I added the previously painted flaps, ariel posts, the undercarriage which I had painted with Tamiya flat aluminum acrylic, all without much problem. I had painted the gear covers while painting the kit, both sides GSB. Weathering was kept to a minimum as usual, all done with pastel chalks except for a wash of dirty thinner on the undercarriage legs to bring out the detail. With that done, I used stretched sprue for the antenna wire.
In my opinion this is a great kit. As I started of this section by saying, I don’t know why I didn’t particularly enjoy the build but I’m sure it had something to do with this one being the last to be built of the group and a certain amount of burn out occurring.


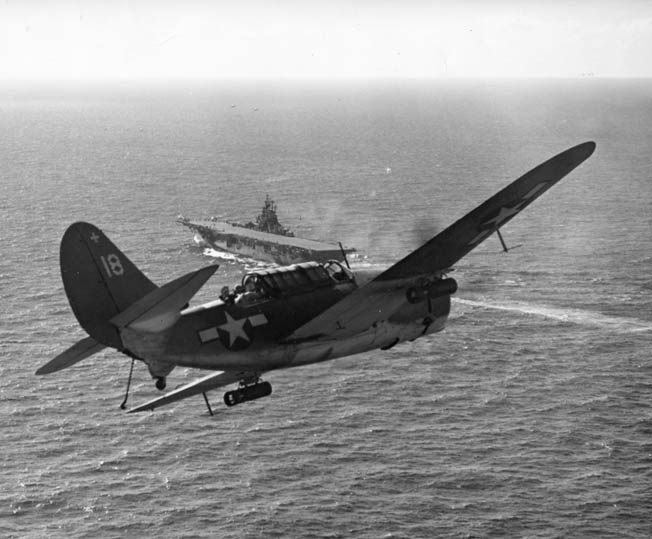
Grumman TBM-3 Avenger

The Avenger was Grumman’s first torpedo aircraft, and its design had much in common with that of the Company’s fighters – as its chunky and robust appearance testifies. The design and engineering team under W.T. Schwendler developed the aircraft very quickly – the order for two prototypes was placed on 8 April 1940 and the first Avengers went into service just over two years later.
The new plane first saw action on 4 June 1942 against the Japanese carrier striking force at the Battle of Midway. The Avenger took part in every carrier-versus-carrier battle and indeed almost all carrier operations from Midway onward, working from every fast carrier and escort carrier of the Pacific Fleet. At Guadalcanal and in subsequent campaigns it was also active from land bases. For almost all of this time it operated as a bomber, and as a search and anti-submarine aircraft, rather than as a torpedo-plane. As a torpedo-plane it was initially hampered by the many serious defects in the American torpedoes. Moreover the losses inflicted on their torpedo squadrons at the Battle of Midway left the USN with little confidence in aerial torpedo attack, confidence which was only regained with the success of the Avengers at the Battle of the Philippine Sea.
On 7 April 1945, during the Okinawa operation, Avengers of Task Force 58, including USS Essex, played the main part in sinking the Yamato, formerly Admiral Yamamoto’s flagship – hitting the huge battleship with ten or more torpedoes.
An Interview With Radioman Jim Purtell, VT-83 aboard USS Essex (CV9), 1945
I had the honour of corresponding with Jim following the publication of my Essex article back in June, 2002. Jim was a Radioman/Gunner with VT-83 on Essex during AG-83’s 1945 tour. During the combat period Jim was awarded four Air Medals and the Distinguished Flying Cross. Below is Jim’s description of some of his experiences during his tour with VT-83. In November, 2002, he will be inducted into the Combat Air Crewmen Roll of Honor. Jim’s comments are reproduced here exactly as he sent them to me.

“On August 8, 1945, our squadron was briefed on an attack of an airfield on Northern Honshu. Our crew was composed of Lt.Dewey LeClair, the pilot. Joe Fitzgerald, the turret gunner, and me, radioman and tunnel gunner.
“In the predawn hours of August 9. 1945 we took off, joined the air group, and headed for the target. Going in I was busy with the radar and it was working perfectly. As we approached the airfield there was considerable antiaircraft fire and I began throwing out what we called window. Strips of aluminum sandwiched between cardboard and about 3 feet long. It was supposed to fool the antiaircraft guns. Whether it did or not I don’t know. We went into our bombing run and dropped the bombs. Lt. LeClair and Joe strafed whatever they could, and then we joined the formation to head back to the ship. In this plane the stinger gun had been removed and a 7 man lift raft had been stowed where the 30 caliber had been. So on this mission my duties were strictly radioman. I monitored the radar, armed the bombs, read off ranges to the pilot, etc. I tried to turn on the radar to pick up the signal from our ship, but the radar was blank. I checked the fuses and cable connections, but had no success. I didn’t feel anything hit the plane, but I suspect we sustained some damage during the attack.
“A short time off the coast the engine quit. Lt. LeClair told us that we were going to ditch. I felt the plane start to turn and watched the ball indicator indicate a slow turn to the left. The pilot was turning to head into the wind. I can’t remember if I reminded Lt. LeClair to lower the flaps or whether he did it automatically. Of course, our landing gear remained up. Was very busy making sure all loose equipment was as secure as I could make it. I had an altimeter in my compartment and Fitzgerald kept asking me from the turret how high we were. I answered him a couple of times, but then told him I was too busy. I don’t know why, but I remember throwing the destruction switch on the IFF equipment. (identification, friend or foe). Now I was making sure that my safety belts were on and tight. I had a friend that had been killed in the same kind of a ditching a short time before. He died from head injuries in the crash. He was a close friend and I thought a lot about his death. I came to the conclusion that he released his safety belts too soon and was thrown forward against the base of the turret. I was determined that I would not release my safety belts until the sea was actually coming into my compartment.
“Lt. LeClair made a perfect landing. Even less of a shock than landing on the carrier. Our tail struck the water first then the body of the plane and the nose. In a water landing with a full crew the procedure is as follows: The pilot gets out on the right wing, and the turret gunner has an escape hatch and he gets out on the left wing. Behind the turret there is a compartment with a 2 man life raft. The pilot and the turret gunner launch the raft. The radioman has a door to his compartment that has an emergency lever to release the door and he gets out that way.
“After the plane stopped moving I waited a short time and the water began to come in I released my belts and pulled the emergency lever. Nothing happened. The door was stuck and I couldn’t open it. I decided to crawl up through the plane and try to get out through the greenhouse. As I started to do this Saw all the equipment ahead of me and was afraid I would get hung up on something, and it would be all over for me. I backed into the radioman’s compartment figuring I could climb up into the turret, and get out that way. Once in the compartment I decided to try the door one more time. I placed my back against the left wall and kicked the door with both feet, and it went flying out almost hitting LeClair who was coming to help me. He asked me if I was all right. I said, “Yes.” He said, “Get the hell out before it sinks.” I was glad to obey that order.
“The 2 man life raft was bobbing along on the waves and I went after it. I am not a strong swimmer, and even with the Mae West I was wearing I wanted that raft. Earlier I mentioned that there was a 7 man raft in the compartment, but there was no way for me to get that out by myself. I caught up with the raft and pulled the lever and of course it inflated upside down. We got it right side up and got in. Crowded, but safe for the moment.
“The fighters from our group circled us for a while and then left. We were alone. We checked our 38 pistols and the supplies in the raft. Some cans of water and some empty. After several hours we saw ships a long way off. Then we could see they were getting closer. The question in all of our minds, I’m sure, were they friends or foe. Then as they got closer we could see the colors of the stars and stripes. A wonderful sight to us. The ships were a destroyer squadron. the one that picked us out of sea was the USS. WEDDERBURN 684.
“We were aboard the WEDDERBURN for 2 or 3 days and the crew were most generous and friendly. When one of them heard me say that I missed my smoking pipe, within minutes, I had a new pipe and tobacco.
“When we were transferred back to the Essex, on the line bringing us to the deck, there was another line going back to the destroyer with a large container of ice cream. Sort of makes a person realize their true worth. A large container of ice cream for one flyer. Not a bad deal if you ask me.”

I also asked Jim about his mission on board 301, the TBM I had modeled…
“The mission I flew in TBM 301 was on March 24, 1945. It was my third combat mission. On this mission it was just Lt. LeClair and myself. We were to bomb beach installations on Okinawa in preparations for the landings of troops. We bombed and strafed anything that looked like a decent target. The sea appeared empty, and when I went back on another mission in a different plane on April 1, 1945, I was amazed to see the armada of ships in the invasion fleet. We did not fly in assigned aircraft. Most of my missions were in TBM 419. I flew 10 missions in that. Only 1 in 301 and 2 in the 409. The rest were a mixed lot.”
Finally, I asked Jim about the condition of the aircraft and a specific question regarding the colour of the leading edges of the wings…
“The planes on the carrier were kept in excellent conditions. I can’t recall a single dirty or damaged plane except for temporary combat damage. I do recall small pools of water from storms on the deck in the radioman’s compartment that would splash up at you if you hit an air pocket. I usually asked a metal smith to drill a small hole so the water could leak out, and that solved the problem. Now planes at Jacksonville, Florida used for training purposes were a different story. They were dirty, shaky, and often damaged. Of course, at that time we didn’t know the difference. However, once aboard a carrier, we had the best. I loved those planes in spite of the fact that the Battle of Midway gave torpedo bombers a bad reputation. Some like to call them the flying coffin.
“About the color of the leading edge of the wings on the TBM’s. I have black and white photos. Those and my memory tell me nothing. I do have a color photo, given to me by a friend, of the TBM used at the inauguration of George Bush (the elder) and later used at the Manchester, NH air show. The photo is a close up of that TBM flying over Manchester and the leading edges of the wings look dark to me.
“There is also a photo of a fully restored TBM in Australia owned by a Randy McFarland. The colors and designs look as I remember them except for a yellow band around the nose. I doubt that is authentic. Randy McFarland flies that
plane in air shows.”
Jim’s last comment; I’ll leave as he left it…
“I often think of 409 at the bottom of the Pacific with some of my personal gear aboard. After all this time there is probably nothing left.”
Jim Purtell
July 12, 2002
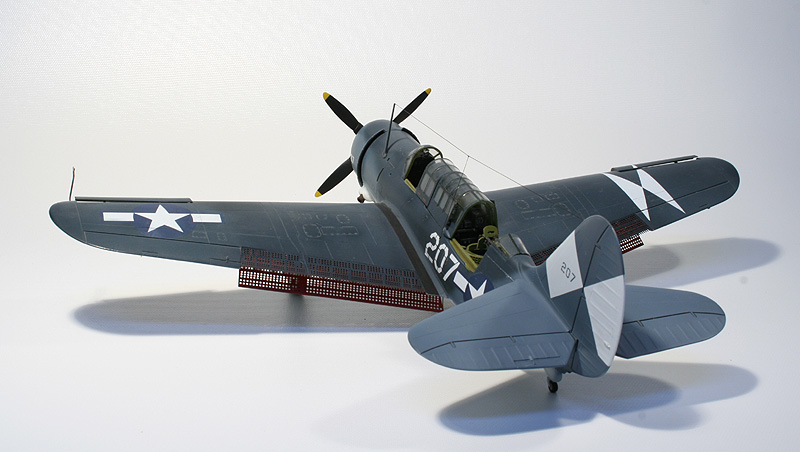
1/48 Accurate Miniatures TBM-3 Avenger

Construction
The first AM kit I built was the F3F-4, which had perhaps the best instructions book I’ve ever come across in a model kit. The instructions for the TBM were an earlier evolution! However, as usual the construction begins with the cockpit. I followed my customary technique described above using MM acrylics. The level of detail in this kit is outstanding and I tried to do it justice. The sheer complexity of the kit meant I spent far longer on this interior than is usual for me with I would guess almost half the total construction time spent on the interior. The only major trouble I ran into was the turret assembly. I followed the written instructions very carefully, but it took me a couple of attempts to glue the two halves together satisfactorily. The instructions do say to wait until the glue is fully set on the assembly before doing this, I think my impatience got the better of me the first time.

I decided to display the kit with dropped flaps. To accomplish this I followed the suggestion in the instructions to scribe the flap panel line with a knife and work them free. Fairly straight forward. Next I made the filler pieces using the kit supplied template and inserted them in the assembled wings. When I had finished this I looked at the interior, particularly the underside of the upper wing surface and realized I could not leave it bare and smooth. I made some stringers out of sheet styrene and glued them to the interior to match the stringers on the flaps. I also drilled out the filler pieces to make them look more realistic. Of course the casual viewer will not be able to see all this work unless the model is picked up, but at least I know it’s there!
Other points of note in the construction phase were that I misaligned the bomb bay in the fuselage half and ended up with a large gap to fill at the rear end, which I filled with sheet styrene. In addition to this faux pas I set the horizontal stabilizers at the wrong angle and had to go back later and remove and reset one. What else did I screw up? oh yes, the bomb bay doors, but more on that later… I used some filler on the wing roots, which I finished using the nail polish remover technique described above. Finally, as usual I masked the canopies, this time using Eduard EZ Masks. I bought these as an experiment because all that glass was going to be tedious to mask with tape. I found them a delight to use, each piece fitted perfectly where it was supposed to go, the instructions being very clear and simple. I would highly recommend this set at least, though I have read that other sets may not fit so well.
Paint & Decals
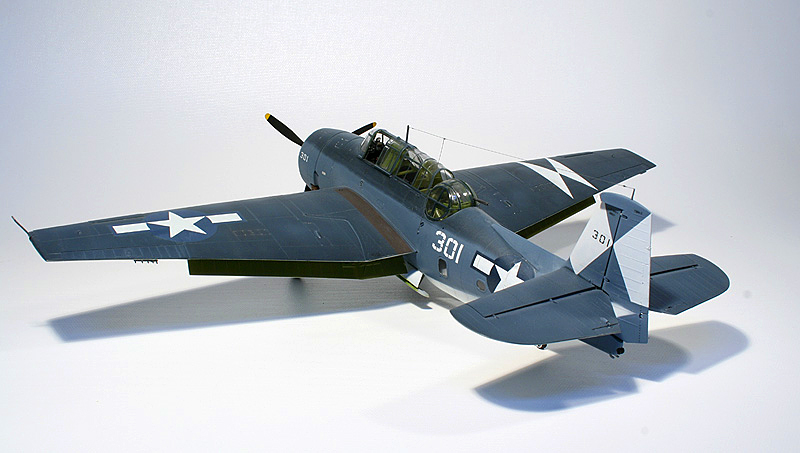
Essex’s VF-83 Avengers were TBM-3’s painted in the Tri Colour scheme. Painting followed the basic steps described below in the Helldiver section, up to the free hand application of the dark blue. Try as I might, I could not get a result I was happy with. After several attempts at touching up to achieve a satisfactory result, I gave up and resorted to masking with blue tack. The technique is simple, I roll up a piece of blue tack to a sausage long enough to reach from one end of the model to the other. I find a “sausage” of about 5mm in diameter works best. I pressed the blue tack down hard enough to make sure it won’t come off, but making sure that the edge is still rolled over leaving a slight overhang. This overhang is important, because this is enables the edge to feather. Still using the Badger 200, I then spray perpendicular to the blue tack at relatively low pressure at fine adjustment and complete as many passes as required to get good coverage without wrecking the feathering. This worked for me well here, and I also used it to touch up an area between the white and Int. Blue. During all this time I found some of the masks on the more curved sections of glass began to lift, so watch out for this if you decide to give them a try.
When I was finally happy with the paint job, I sealed with Testors Metalizer Sealer to prep for the decals and let that cure for a day, though it really only needs about an hour or so. Later, much later (and too late to change it), I learned that TBM’s wing leading edges had a wrap around of Int. Blue, back about a foot onto the upper surface of the wing. I may yet, but probably won’t, go back and fix this error on mine, so if you plan to do a TBM remember the Int. Blue leading edges, the kit instructions fail to mention this. From the same source I also learned the pillar between the pilot and observers’ station should have been painted dark blue, not interior green. With the gloss coat dry, it was time to move on to the decals.
I had again intended to use an Aeromaster sheet, #48-292 Carrier Based Avengers. These worked quite well, though I had the same problem with the G-Symbols on the fin as I had with the Helldiver. However, after multiple applications of Micro Sol and some minor surgery they melted down well and looked good. The nation insignia were the right size for the kit, unlike the kit supplied ones, and I experienced few problems. One are of concern though were the stencils, as is my habit I planned to apply only a few based on photos, unfortunately of the ones I did apply, many silvered. Some I was able to repair, others I was not, so I eventually removed them. At the conclusion of the decaling stage I again sealed, blended and faded it all with the diluted gray and put the model aside to fully dry. When dry, I applied dullcoat and put the model aside again to fully cure. I have to be very methodical with this drying time as I am impatient by nature and would likely pick up the model too soon and fingerprint all over it.
Weathering and Conclusion

With most of the work done, all that remained were the undercarriage, antenna, turret, other bits and pieces, and the bomb bay doors. Most of these tasks were completed with little trouble, even the turret which I was quite apprehensive about. The bomb bay doors were another story. For some reason I completely misunderstood the instructions and had merely folded them instead of cutting them to display them open. It took me a very long time to realize this and I could not figure out why the actuating arms would not fit as shown in the instruction diagram. Eventually, by studying photos of the real thing, I realized my mistake and cut the doors apart. With this done everything else fell into place and the doors, their arms and the fit into the bomb bay itself all worked well.
Weathering was, as usual, done with pastels with a little dark gray wash to highlight panel lines around the white areas and some very minor paint chipping with a silver pencil around the engine and gun access panels. Paid particular attention to exhaust staining, using several shades of pastel to try and achieve a realistic look. I think I succeeded, though it is perhaps a little over done.


Curtis SB2C-4 Helldiver
The Helldiver was ordered into large-scale production in 1940, the prototype making its first flight on 18 December of that year. SB2Cs went into action for the first time on 11 November 1943 in a heavy raid on the major Japanese base of Rabaul, flying from the new Essex Class carrier Bunker Hill.
This large, heavy, impressive and powerful dive-bomber was intended as an improvement on the SBD Dauntless, which it was to replace. However, during the SB2C’s development it became apparent that there were serious problems with its design. Combat experience, especially at the Battle of the Philippine Sea, revealed that the Dauntless was in fact the superior aircraft. The Helldiver’s handling was poor – in particular it had unsatisfactory low-speed stability, and dangerously poor stalling characteristics. However, it was at this stage impossible to reverse the changeover to the Helldiver, and the Philippine Sea battle was the SBD’s last major action as a carrier aircraft.
The -4 version finally produced an aircraft worthy of the earlier promise. Dive stability had been greatly improved by further perforating the dive flaps, bugs in the (still) overly complex hydraulic system had been worked out, and it’s crews were beginning to have faith in their mount. At the same time however, evolving carrier operational tactics were reducing (and in some cases even eliminating) carrier bomber squadron strengths.
Despite its initial lackluster showing – and its inherent defects – the SB2C served as the sole shipborne dive-bomber of the US Navy from late 1944 until the end of the war, eventually inflicting more damage on enemy shipping and installations that its predecessor, the SBD Dauntless.
1/48 Pro Modeler SB2C-4 Helldiver

Construction
Construction is broadly the same as for the previous models. Built basically OOB with some minor scratch built additions to the cockpit. Notable differences include the use of the included PE parts and the level of quality of the kit far exceeded my expectations. I did use a little filler I’m sure, but I honestly don’t remember where. I was given a heads up regarding the wing roots, but with care I found that they worked well for me.


The interior was painted with Gunze Interior Green, which is a slightly darker shade than MM. I was during this stage that I did make a couple of mistakes however. I had intended right from the start to display the model with lowered flaps. However, I failed to cut the supports of the wing and settled with only dropping the PE portion. Since these photos were taken, I’ve raised the flaps to the upper position.
The other error was in not installing the life raft in the rear cockpit until it was too late to make it fit. I just settled for that as I didn’t realize this until the model was painted. Initial construction finished with masking the canopy with a mixture of Tamiya tape and Parafilm M.
Paint & Decals

Essex’s VF-83 Helldivers were -4’s painted in the Tri Colour scheme, with a couple of replacement aircraft joining in late July painted in GSB. Again, I had a particular plane in mind which appears on page 68 of Barret Tillman’s “Helldiver Units of WW2”. Aeromaster makes a decal sheet for this particular aircraft, which I had bought and intended to use.
I began with the white underside, using the Badger 200, and gave it several coats of MM Acrylic Insignia White. I also painted the prop cowl white, though it could also have been Intermediate Blue, with no photo available of this particular plane I just made a judgment call based on my feeling the white looked better! When this was cured, I switched to my Badger 155 double action and applied the Intermediate Blue, this time MM Enamel, freehand. I prefer enamels when spraying freehand as I find I get greater control and a finer demarcation line between colours. When the intermediate blue was dry, I applied the dark blue (FS35042), again using MM enamel sprayed through the Badger 155. There were some inevitable over sprays and mistakes to correct, but overall this attempt at the tri colour scheme went well for me and I was pleased with the result. Once the paint was fully cured, I think I left it alone to cure for at least 3 days, I applied the gloss coat, again using Metalizer Sealer.
Decaling for me always begins with the national insignia. This one was no exception and I used the Aeromaster supplied ones. They went down well, I used Micro Sol only and experienced no problems with wrinkling or silvering. The trickiest part of the decaling process was using the vertical stabilizer decals. They were slightly oversize and needed some persuasion to melt down into the rudder hinge area and over the rudder tab mechanism. I eventually cut the decals to help them get over these surface irregularities and touched up with paint when they were dry. All the other decals went down with little trouble. I applied very few stencils as the photo of the subject aircraft showed very few to be present, though I am fully aware of other shots of (newer?) aircraft covered with all the stencils applied at the production plant. The only other thing worth mentioning about the decaling process was that I had to paint the G-Symbol on the wings as Aeromaster had not included them in the sheet. This was accomplished with little trouble and finally it was ready for the sealing coat and weathering.
As usual, I sealed with a couple of coats of heavily diluted light gray to fade down the paintwork, again making sure to fade down the areas in direct sunlight with the wings folded a little more. Dullcoat was next, bringing the sheen down to a semi-gloss finish. When I next picked up the model a couple of days later I discovered, quite by accident, a technique for weathering that looks (to me) quite realistic. In holding the kit by the wings, I noticed that my skin oils would vary the level of sheen on the finish and by literally rubbing my thumb and fingers over different areas of the plane I could vary the reflective qualities quite dramatically, to show heavily trafficked areas on the wings for example. This is not so visible in the photographs, but give it a try, if you don’t like the result, it’s easy to fix.
Weathering and Conclusion

As is normal for me, weathering is done with pastels. I applied a few paint chips around the gun hatches on the wings and the engine cowls, but kept it to a minimum. Using various shades of pastel I highlighted and scuffed areas of the plane according to traffic and exposure to the elements. I added all the small and breakable bits, used stretched sprue for the antenna wire and attached it with white glue.
I really enjoyed this kit. It was the first of the four Essex aircraft and it was during its construction I got the idea to complete the Air Group. I highly recommend it to any but the most inexperienced modeler.


Final Notes
According to my original notes and comments, this project began in December 2001 and was completed in late May of 2002. All of the models are my own work and each took approximately 40 hours over six weeks to finish. I estimate around 40 hours were spent in research and another 10 or so in writing giving a total of approximately 170 hours from start to finish.
My research was entirely from secondary sources and so plenty of opportunity exists for inaccuracy. However, I think it’s pretty close and I continue to be grateful for any input to improve this article. If you wish to offer any corrections or additions please feel free to Contact Me or comment below.
Lastly, with the wealth of information on the web and the sheer volume of often repetitious and/or duplicated material, I found it impossible to write a description of each of the aircraft’s development and history without relying on already posted material. I am sure that some, or even many of the sentences I’ve used can be found elsewhere. If you wrote it first, please accept my thanks.
Sources, References and Further Reading:
Norman Polmar, “Aggressors, Carrier Power Vs. Fighting Ship”
Barret Tillman, “Helldiver Units of World War 2”
Barret Tillman, “TBF/TBM Avenger Units of World War 2”
Barret Tillman, “Hellcat Aces of World War 2”
Bill Gunston, “Combat Aircraft of World War II”
http://www.angelfire.com
http://www.sinclair.edu/sec/his103/103d01.htm
http://www.airgroup4.com/index.htm
http://pacific.hyperlink.cz/airunits/usn_vb.htm
http://www.usni.org/
http://www.multied.com/Navy/Essex.html
http://ussessex.bravepages.com/pilots_one.html
http://www.chinfo.navy.mil/navpalib/ships/carriers/histories/cv09-essex/cv09-essex.html
http://www.history.navy.mil/photos/sh-usn/usnsh-e/cv9.htm
http://www.ussessexcv9.org/
Acknowledgements and Thanks:
The following individuals went out of their way to help me find information or provided guidance during the course of this project. I’d like to express to them my thanks for their contribution.
Steve Hill, Erik Whipple, Steve Mesner, Lynn Ritger, Scott Taylor, Kevin Ingraham
Copyright
Except where noted otherwise, I sourced all images and photos from the internet and are all used under fair-use. The section on Essex’s and AVG-83’s history were again sourced from the internet and though I adapted the text for this article there was also some copy/paste.
I make no claim of original work in this article except for the photos of the models and text describing their construction and painting. The interview with Jim Purtell is reproduced exactly as he emailed it to me and is published under his original permission; I am aware that in large part it has also appeared elsewhere.
Any copyrighted material will be remove or credited forthwith upon request by its legitimate owner.


Leave a comment