
Dragon 1/48 Scale Injected Plastic Kit

Long! That’s the first word that comes to mind when I think of this one. From start to end, this was a little over four month build – about two or three times as long as I normally take. I decided to tackle the Dragon kit for a couple of reasons; the first that the kit looked interesting and secondly, because I wanted to have a go at a free-handed paint scheme.
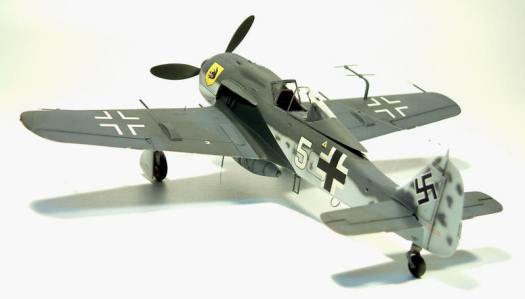
The kit itself is decently molded, with a parts breakdown that presented no real problems. Also included are a couple of frets of photo-etched detail parts for the cockpit and canopy. The decal sheet provides for both the box art featured aircraft (Gunter Migge’s White 9), but also provides decals for any other White coded aircraft.
Construction

As you might expect, I begin with the cockpit. Dragon includes PE parts for the instrument panel and side consoles. Aside form these details, the kit cockpit is fairly basic and went together with not much difficulty.
As the cockpit assembly is installed into the assembled fuselage halves, I worked on this next. The assembly is straight forward if the instructions are followed. The cowling requires a little more attention, but as already noted, no real problems are encountered. I installed the cockpit tub next and then offered up the wing assembly to find a large wing root gap. I used some sprue to spread the lower fuselage to make a clean fit at the wing roots.


I completed the assembly as per the instructions, though I left off the undercarriage and other small breakable pieces in preparation for the painting. I cleaned up the radar antenna pieces, the propeller pieces and other sundry parts like the undercarriage assemblies so that I could paint them at the same time as the airframe.
Paint and Decals

I decided to use Tamiya Acrylics mixed to the correct colour for the paints on this one. But first, I panted the entire airframe and most of the components with Floquil Old Silver in preparation for the weathering stage later.
I mixed up the RLM76 first, and applied it to the lower airframe, the fuselage sides and other appropriate areas using my Aztec 470. When that was dry, I mixed up the 74 and 75 according to the Tamiya mixing ratios and applied them appropriately. At this point in the project I decided to make an anonymous aircraft rather than Gunther Migge’s “White 9”. With that settled, I allowed myself a little artistic license and I applied some simple mottling on the fuselage sides as well as on the fin and rudder.


Once the camouflage had cured completely, I masked and sprayed the black markings on the forward fuselage and once again set it aside to dry. Very little touch up was required, unusually for me, and once I had let the model dry again for a couple of days in preparation for the gloss coat which I completed with Pollyscale Gloss Acrylic Flat.
The kit supplied decals were of typical Dragon quality, well printed but a little on the thick side. The kit sheet comes with fuselage codes of 0 through 9 and with enough Werk Number decals to be able to make any number. I have recently become a convert to Mr. Mark Decal Softener as my decal solution of choice and I used it to good effect on these. As an aside, I have developed a technique with this product that has finally given me silver free stencil decals. I literally place the decal on a small puddle of the Mr. Mark solution and let it suck the decal down – works every time. Consequently, decaling has become a joy for me again and this model was no exception.


With the decaling complete, I applied a wash to the control surfaces and access panels only, and then sealed it all up with another coat of the gloss. Before applying the flat coat, I used some very heavily thinned light gray applied to the center of the panels and other high wear areas to break up the monotone quality to the paint finish and add interest to the model. When I was happy with all that, I sealed it all up with a couple of coats of Pollyscale Flat.
Weathering and Final Assembly

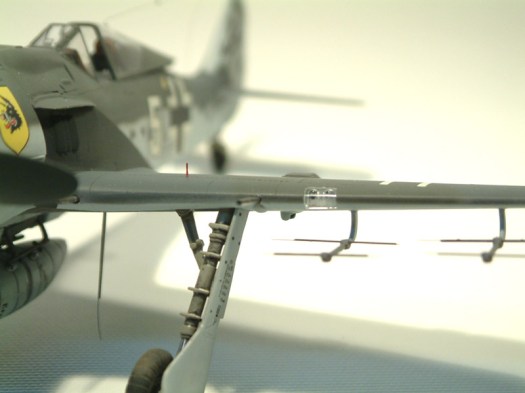
Adding the bits and pieces is always the most nerve wracking part of a project for me. In this case, it was even worse as the details included the radar antenna array. I made myself work slowly and carefully I began with the previously painted and weathered undercarriage. Once I had the model on its wheels, I added the small antennas on the underside rear fuselage, the fuel tank and the pilot access step.
With the underside complete, I worked on completing the canopy and windshield parts and then added the radar antenna array. It went surprisingly well! I applied a little more Pollyscale Flat to ensure there were no shiny spots from the CA glue I used to attach most of the parts at this stage.
Once I saw the very nearly complete model, I must admit I didn’t want to weather it at all – so I really didn’t.
Last, I drilled through the canopy and threaded some invisible thread through and attached it to the framing under the solid part at the rear of the canopy. With that glued and strong, I placed the canopy in the open position on the fuselage and then attached the other end to the post on the fin. With that done and nicely taught, the model was finished.
Gallery


References and Credits
Web Sources:
http://www.axishistory.com/index.php?id=1155
http://www.choiquehobbies.com.ar/revista/notas/nj/nje.htm
http://www.gyges.dk/Wilde%20&%20Zahme%20Sau.htm
http://www.fortunecity.com/campus/books/932/wscwd.htm


Leave a comment