
- Number 453 Squadron RAAF, Kuala Lumpur, December 1941
- P/O Robert William Drury’s Brewster Buffalo
- Tamiya’s 1/48 Brewster B339 Buffalo
- Gallery
- References and Sources
Number 453 Squadron RAAF, Kuala Lumpur, December 1941

“On 19 December 1941 Singapore Air Headquarters ordered a withdrawal of the two remaining Brewster Buffalo Squadrons in Malaya in the face of the overwhelming Japanese forces; Number 21 Squadron was withdrawn to Singapore itself while Number 453 Squadron was ordered to Kuala Lumpur.
SIGNAL IMMEDIATE
TO: OC SEMBAWANG = 453 SQN = AOC = 21 SQN FROM: AHQFE
AOC/22 19/12/41
4016/ADC 21 SQN AFTER IPOH TO RETURN COMPLETE WITH EQUIPMENT DIRECT SEMBAWANG TO BE REORGANISED.ALL OPERATIONALLY SERVICEABLE AIRCRAFT TO BE HANDED OVER TO 453. NUMBERS TO BE FORWARDED TO THIS HQS. 453 AFTER IPOH TO PROCEED DIRECT TO K.L. 453 TO COLLECT FROM SEMBAWANG FOUR AIRCRAFT HELD IN RESERVE.
FOR 21 THESE AIRCRAFT TO FLY TO K.L. AIRCRAFT LEAVE FIRST LIGHT 20TH WEATHER PERMITTING. OC SEMBAWANG TO BRING 453 SQUADRON UP TO SIXTEEN MACHINES. TOTAL STRENGTH OF 453 IN ACCORDANCE WITH THESE ORDERS WOULD BE 13 AIRCRAFT IMMEDIATELY.
PERSONNEL DEALT WITH UNDER SEPARATE SIGNAL

Establishing their new base on the evening of 19 December at the site of the Kuala Lumpur Flying Club at Sungei Besi, 453’s five Buffaloes were reinforced the next afternoon by six replacements flown up from Singapore. With the dispatch of 21 Squadron’s groundcrew from Ipoh to Singapore, 453 Squadron ground personnel were sent by train from Sembawang to Kuala Lumpur. Their arrival at Sungei Besi enabled 453 to operate again as a unit, transforming the Flying Club site into a forward battle station that could mount operations to again slow the enemy advance southwards.
The first day of operations from Kuala Lumpur was 21 December. From early morning reconnaissance, airfield protection and intercept sorties were launched. Two aircraft, flown by Sergeants Eric Peterson and Ross Leys, were flying airfield defence when they encountered a force of 14 dive-bombers escorted by 15 Zero fighters. Leys attacked the fighters and damaged one before he was shot down. He was attacked by at least three fighters while parachuting down. Peterson attacked the dive-bombers, believed to be Navy Type 96 ‘Claudes’, shot one down, claimed another as a probable, and damaged a third. He returned safely, to see the airfield had been bombed. Fortunately, by widely dispersing the Buffaloes around the airfield, none had been damaged. Three more replacement aircraft were flown in from Sembawang during the afternoon, as stand-by was maintained in waiting for the next assault. All remained quiet for the rest of the day.
453 Squadron was ready again early on the morning of 22 December. Six pilots took off at 0800 on airfield defence, landing at 0950. Twenty minutes later 12 Buffaloes were scrambled, led by Doug Vanderfield. Over 15 Zeros were encountered, escorting an attacking force of bombers flying towards Kuala Lumpur from the north. A widespread dogfight developed— the savage battle for Kuala Lumpur was on.
Pilot Officer Tom Livesey lost his undercarriage on take-off when he hit the sandbagged revetment of a Bofors gun position. He continued flying into combat against the Zeros, and was badly shot up and wounded though managing to crash-land on the airfield. Pilot Officer Bob Drury’s aircraft was damaged during the fight, causing him to crash-land back at Kuala Lumpur. He was seriously injured and died that night. Sergeant George Scrimgeour was shot down in flames. He sustained burns to his hands and face, and while descending by parachute was continually attacked by the enemy— this was becoming a standard Japanese practice. Though he had 25 bullet holes in his parachute canopy, he landed safely. Sergeant Board was also shot down in flames but successfully bailed out. Sergeant Mal Read was killed when he rammed an enemy Zero, which then crashed. Sergeant Viv Collyer was wounded in the right foot, but was able to fly to Sembawang with over 50 bullet holes in his badly damaged Buffalo for repairs. Sergeant Harry Griffiths, though wounded in the hands, was able to land his bullet-riddled machine back at Kuala Lumpur. The other five pilots were also able to return, although some aircraft were now operationally unserviceable.
In this engagement, seven enemy aircraft were claimed destroyed, but from reports received by Military Operations at Kuala Lumpur, wreckage revealed eleven enemy aircraft were destroyed. The urgency of battle precluded pilots from observing the effects of their fire: they would fire a burst at a target and, in the melee, move their aircraft on to the next available enemy.
Two hours after this scramble, another approach of enemy aircraft was detected. Only one aircraft, flown by Sergeant Eric Peterson, was able to get airborne before a force of Zeros strafed the field from a lightning low-level attack. Peterson was shot down as his Buffalo was clawing for height; he was killed when his plane spun into the ground and burst into flames. Stand-by was maintained by the four serviceable Buffaloes, and reconnaissance sorties throughout the afternoon revealed no further enemy activity near Kuala Lumpur. They were now down to three flyable Buffaloes and the lost aircraft could no longer be replaced. The running battle had come to a stop.
The following day No.453 Squadron was ordered to withdraw to Sembawang. Seven aircraft could be made flyable during the morning and flown south. Tom Livesey set off by car to take the wounded— George Scrimgeour, Ross Leys and Harry Griffiths— to Singapore. A small maintenance party was left at Kuala Lumpur to man a forward operating base, and the remainder of 453’s personnel departed that evening. On Christmas Eve, they arrived safely in Singapore. In these closing days before Christmas, 453 had been the only allied squadron operating in Malaya. Even their tenacity had now given way to the might of the Japanese onslaught, and they lost their foothold on the peninsula. Their last ditch stand, chased down from Ipoh and Kuala Lumpur, would now be fought from Singapore.”
Excerpted from: “DEFEAT TO VICTORY No.453 Squadron RAAF” by JOHN BENNETT. https://www.radschool.org.au/Books/Defeat-to-Victory-No-453-Squadron-RAAF.pdf
P/O Robert William Drury’s Brewster Buffalo
P/O Robert William Drury lost his life following combat with Japanese aircraft on 22 December 1941. He managed to nurse his stricken Buffalo back to its base in Kuala Lumpur but sustained ultimately fatal injuries when he crash landed. He died later that night.

Robert Drury is commemorated at the Australian War Memorial’s Roll of Honour, as is Ronald Oelrich.

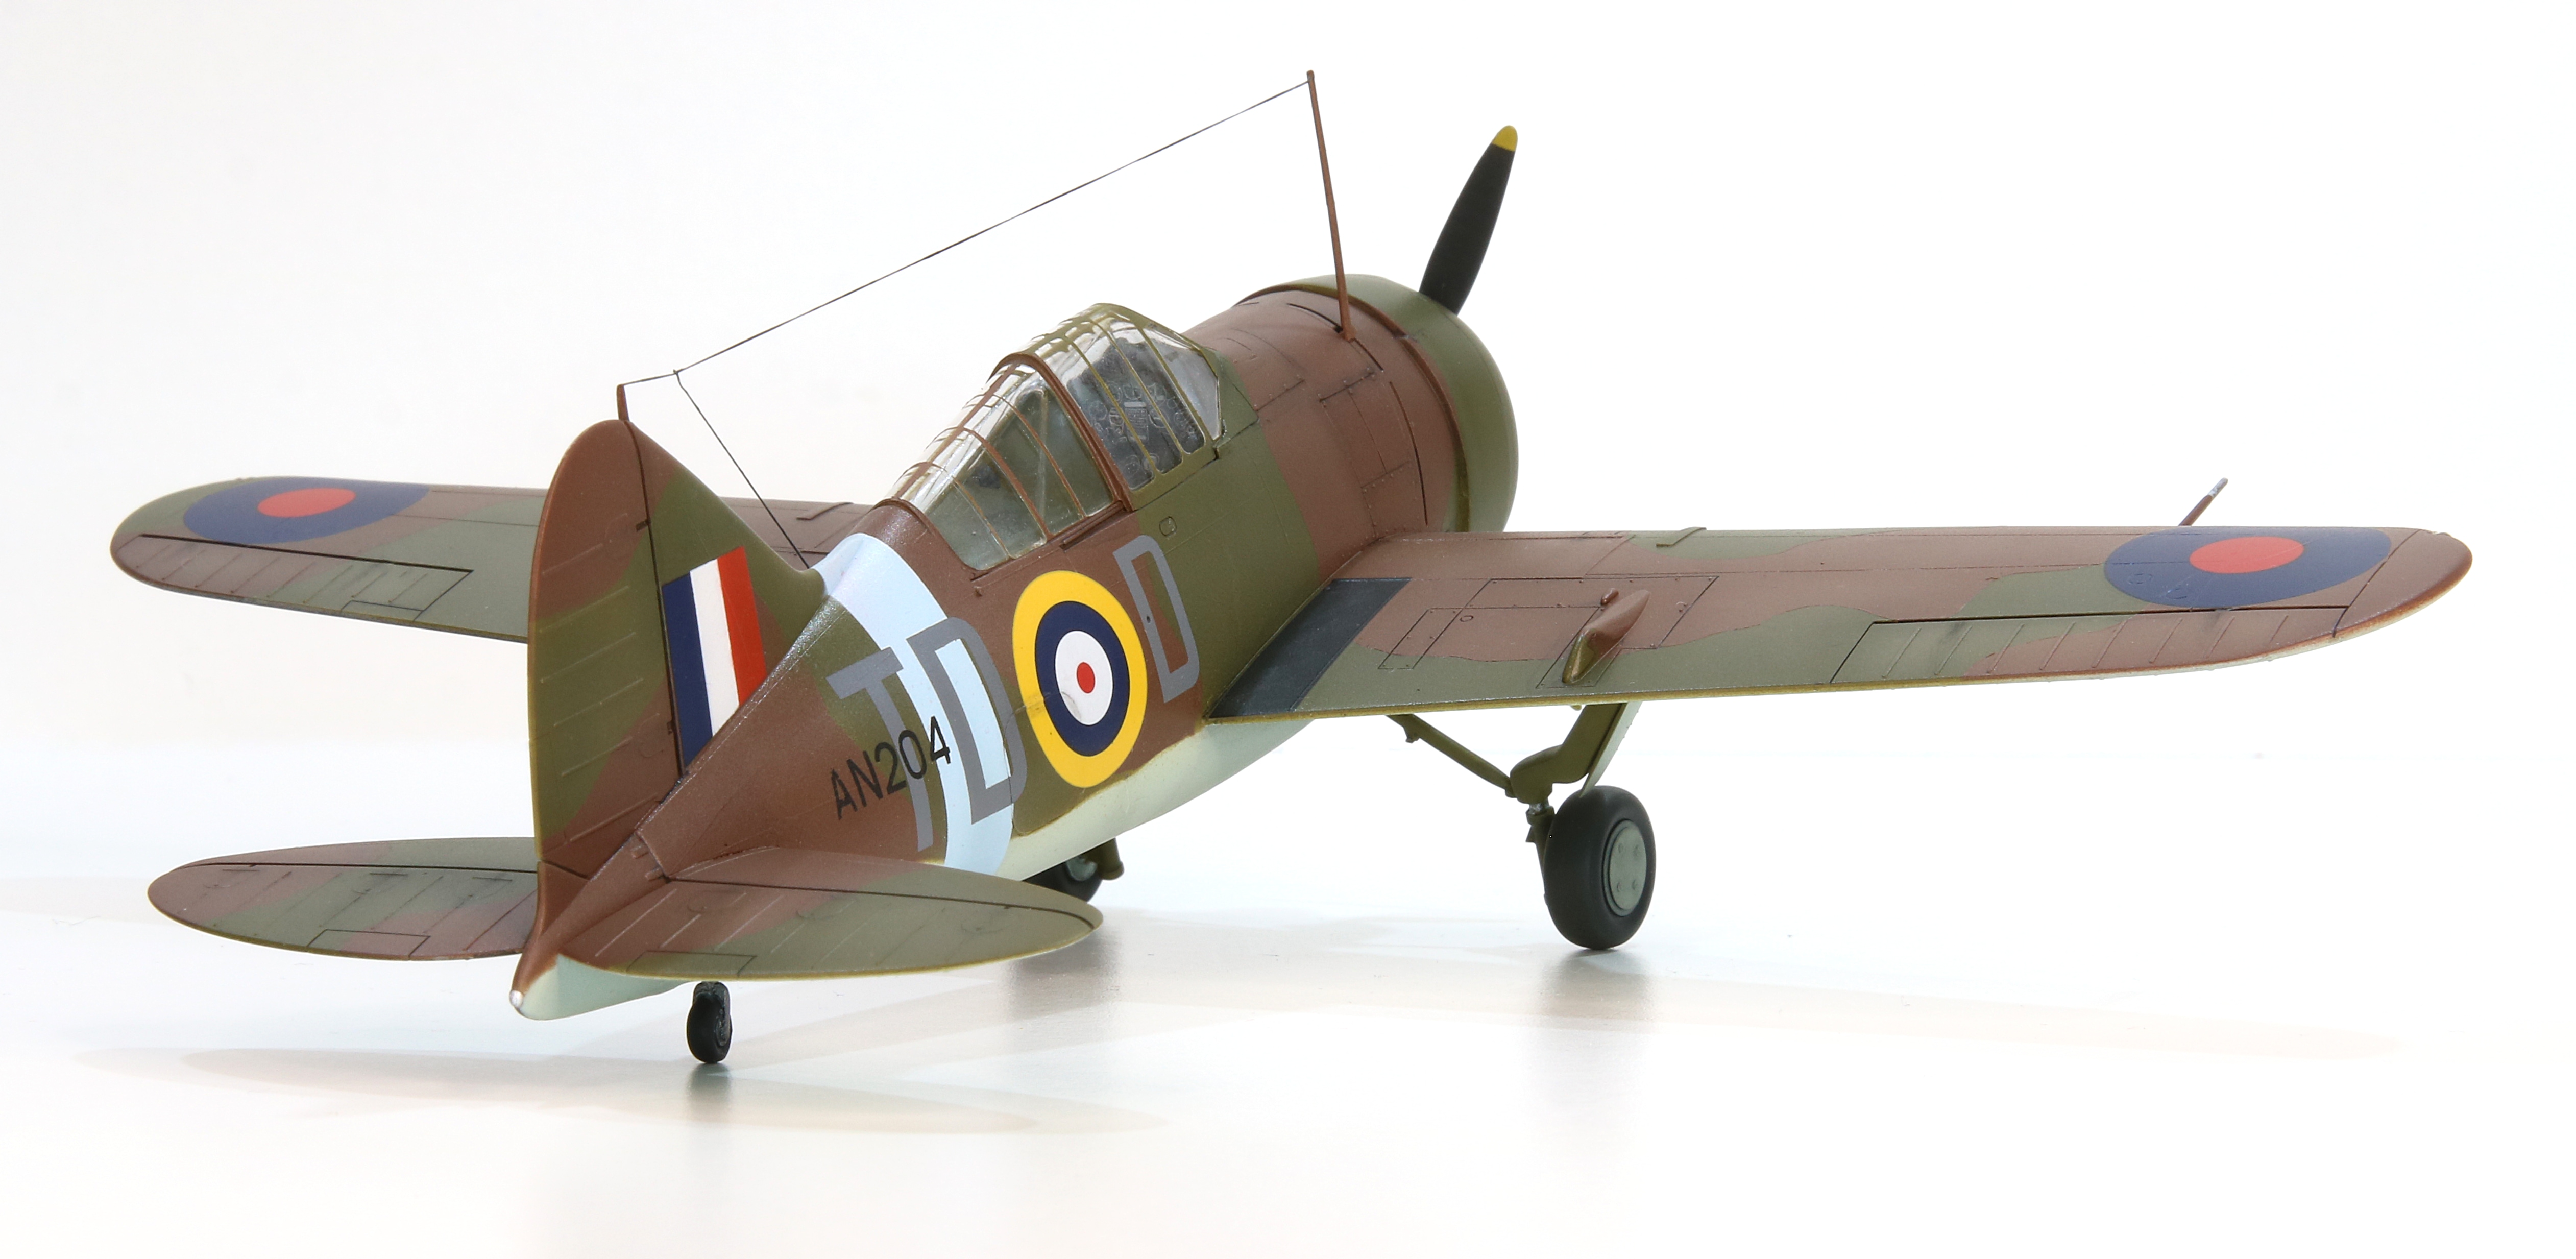
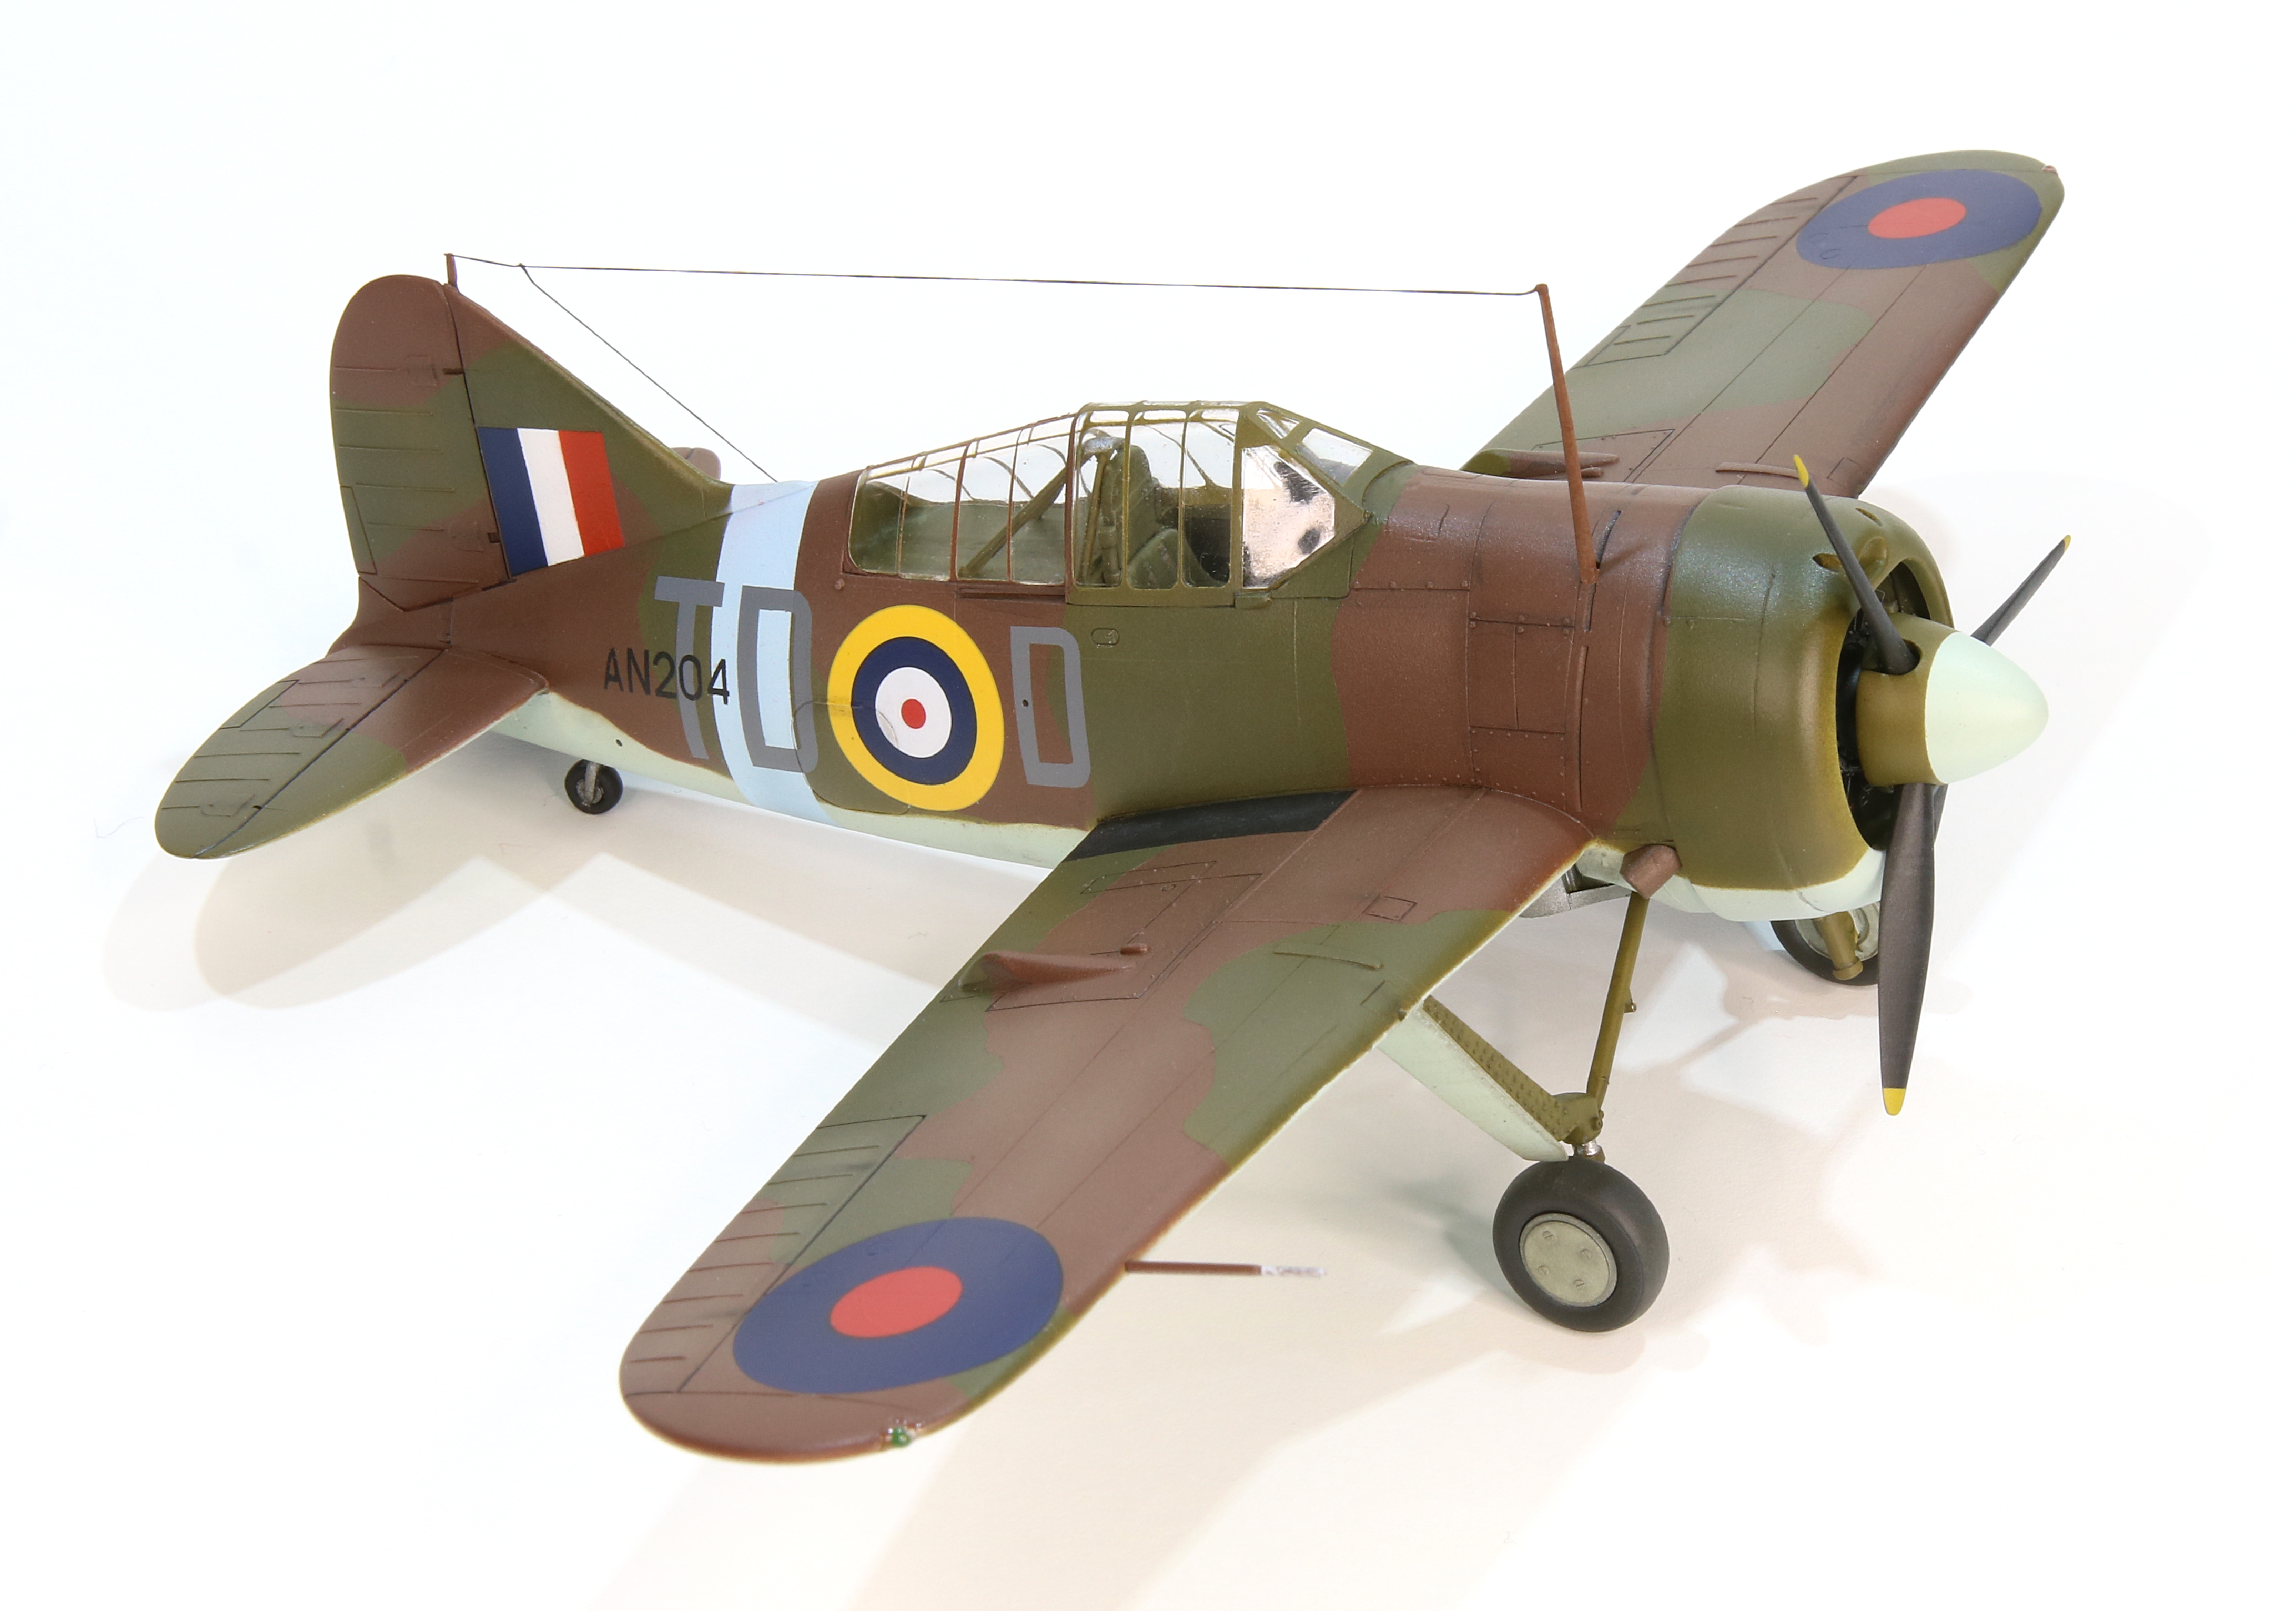
Tamiya’s 1/48 Brewster B339 Buffalo

Tamiya’s 1/48 Brewster Buffalo is an older kit updated with some new parts to enable the modeller to produce an RAAF Singapore defender. The older parts are the fuselage and the cowling and have fine, raised panel lines whereas the newer parts have recessed lines. The kit is typical Tamiya; it fits, its assembly makes sense, it looks pretty good when done.
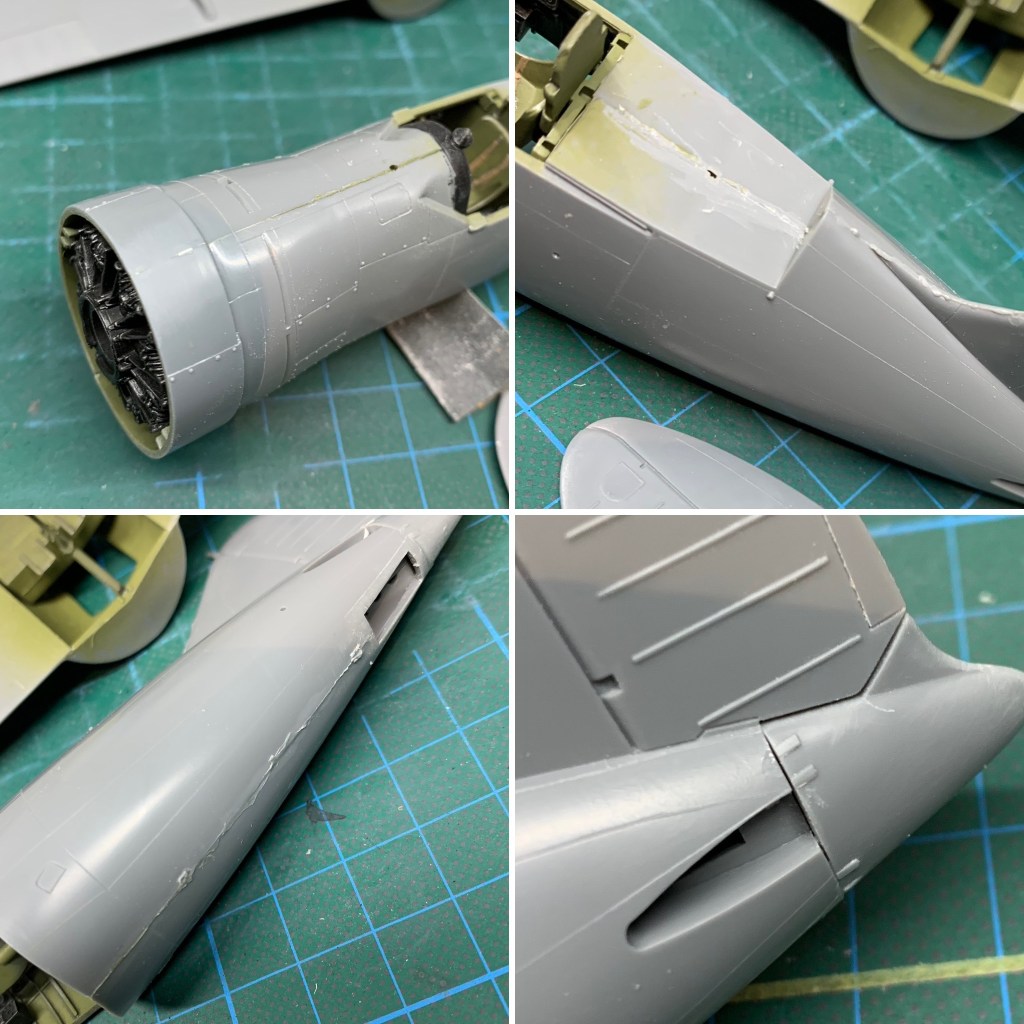
Build
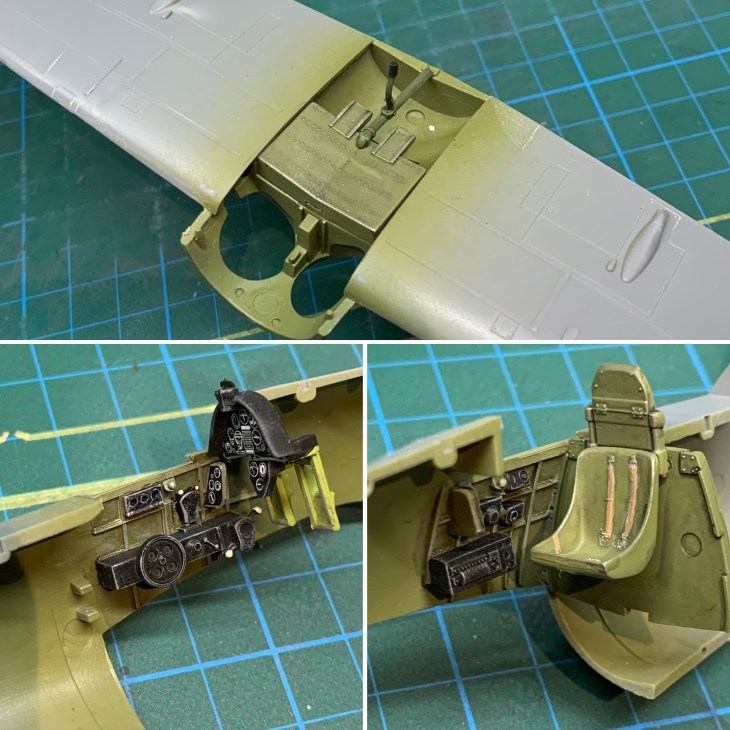
As usual, work begins in the cockpit. Assembly is easy, and the finished result looks convincing enough underneath the greenhouse canopy. Are used my own mix for the interior green and detailed as appropriate. As it turned out, the big canopy provides more visibility than I thought it would, and I’m glad that I took a little time in making the cockpit look fairly convincing.
I only ran into one minor issue during assembly being the fit of the engine cowling. This was actually largely self inflicted, and I simply needed to create a fillet with plastic card to fill the gap. Otherwise, assembly took a little more than a couple of hours spread over a couple of sessions and I was more or less ready to start applying some paint.
Click on any of the images below to scroll through the gallery.


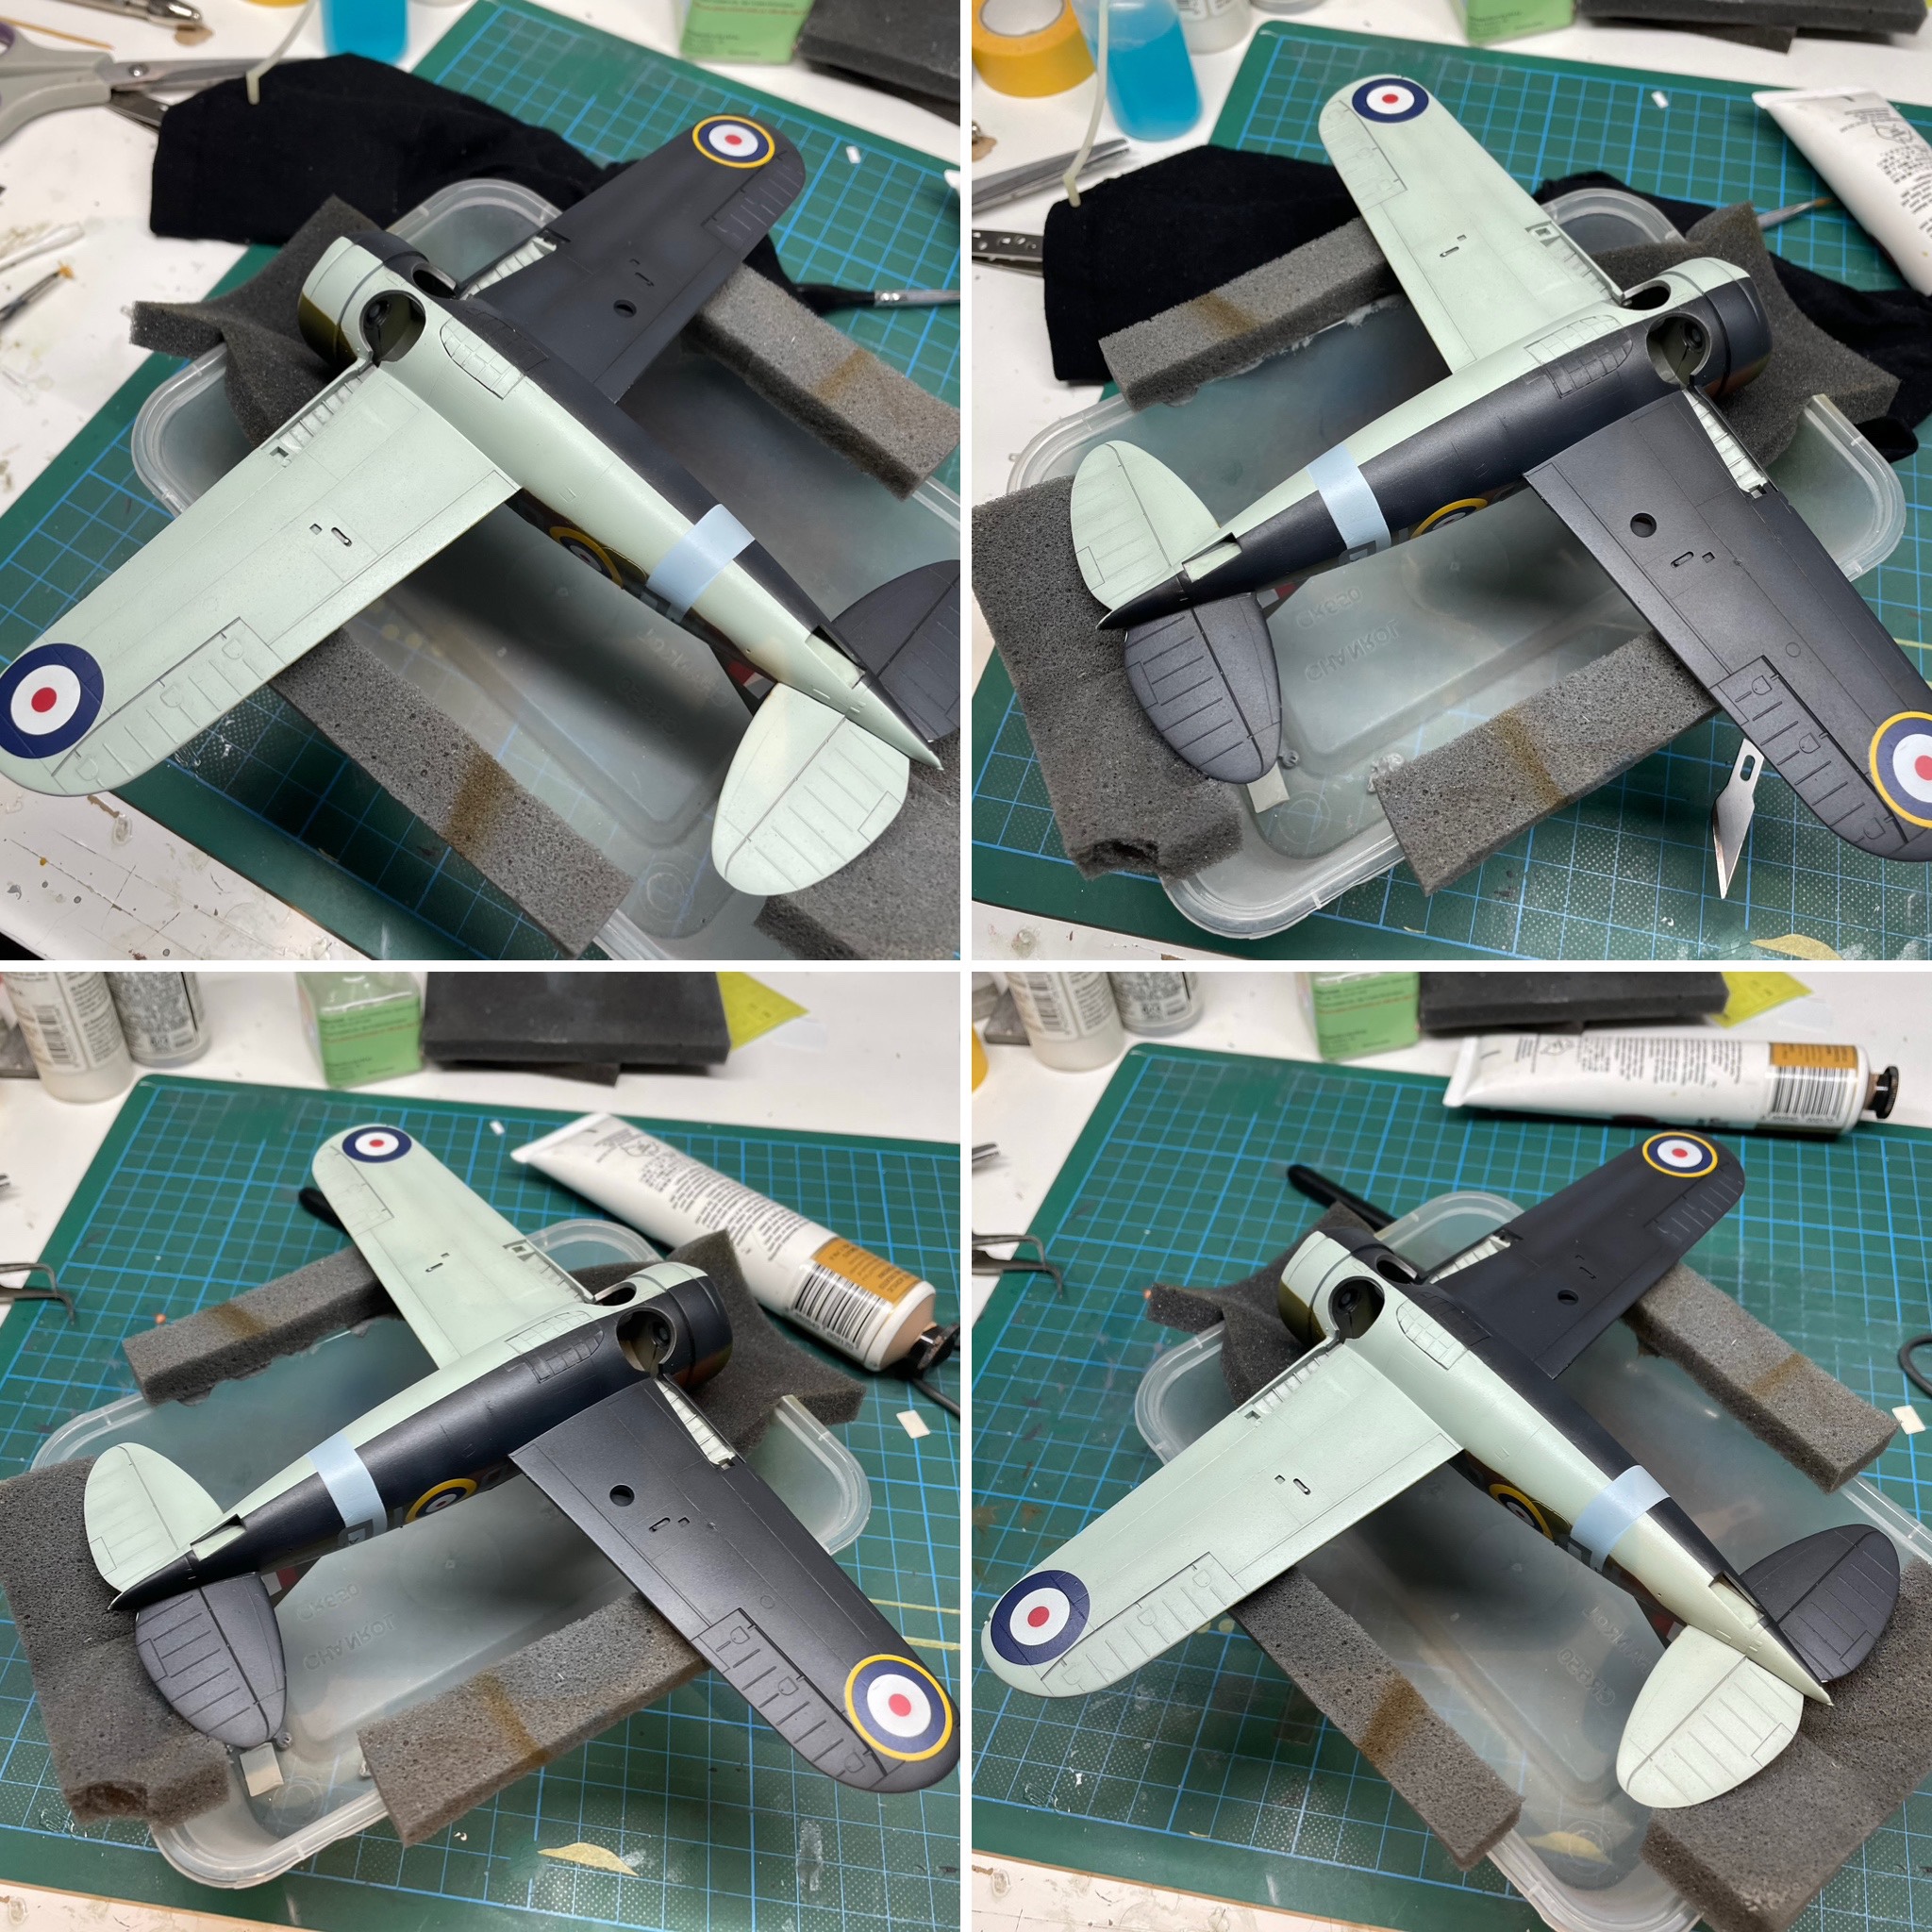
Paint
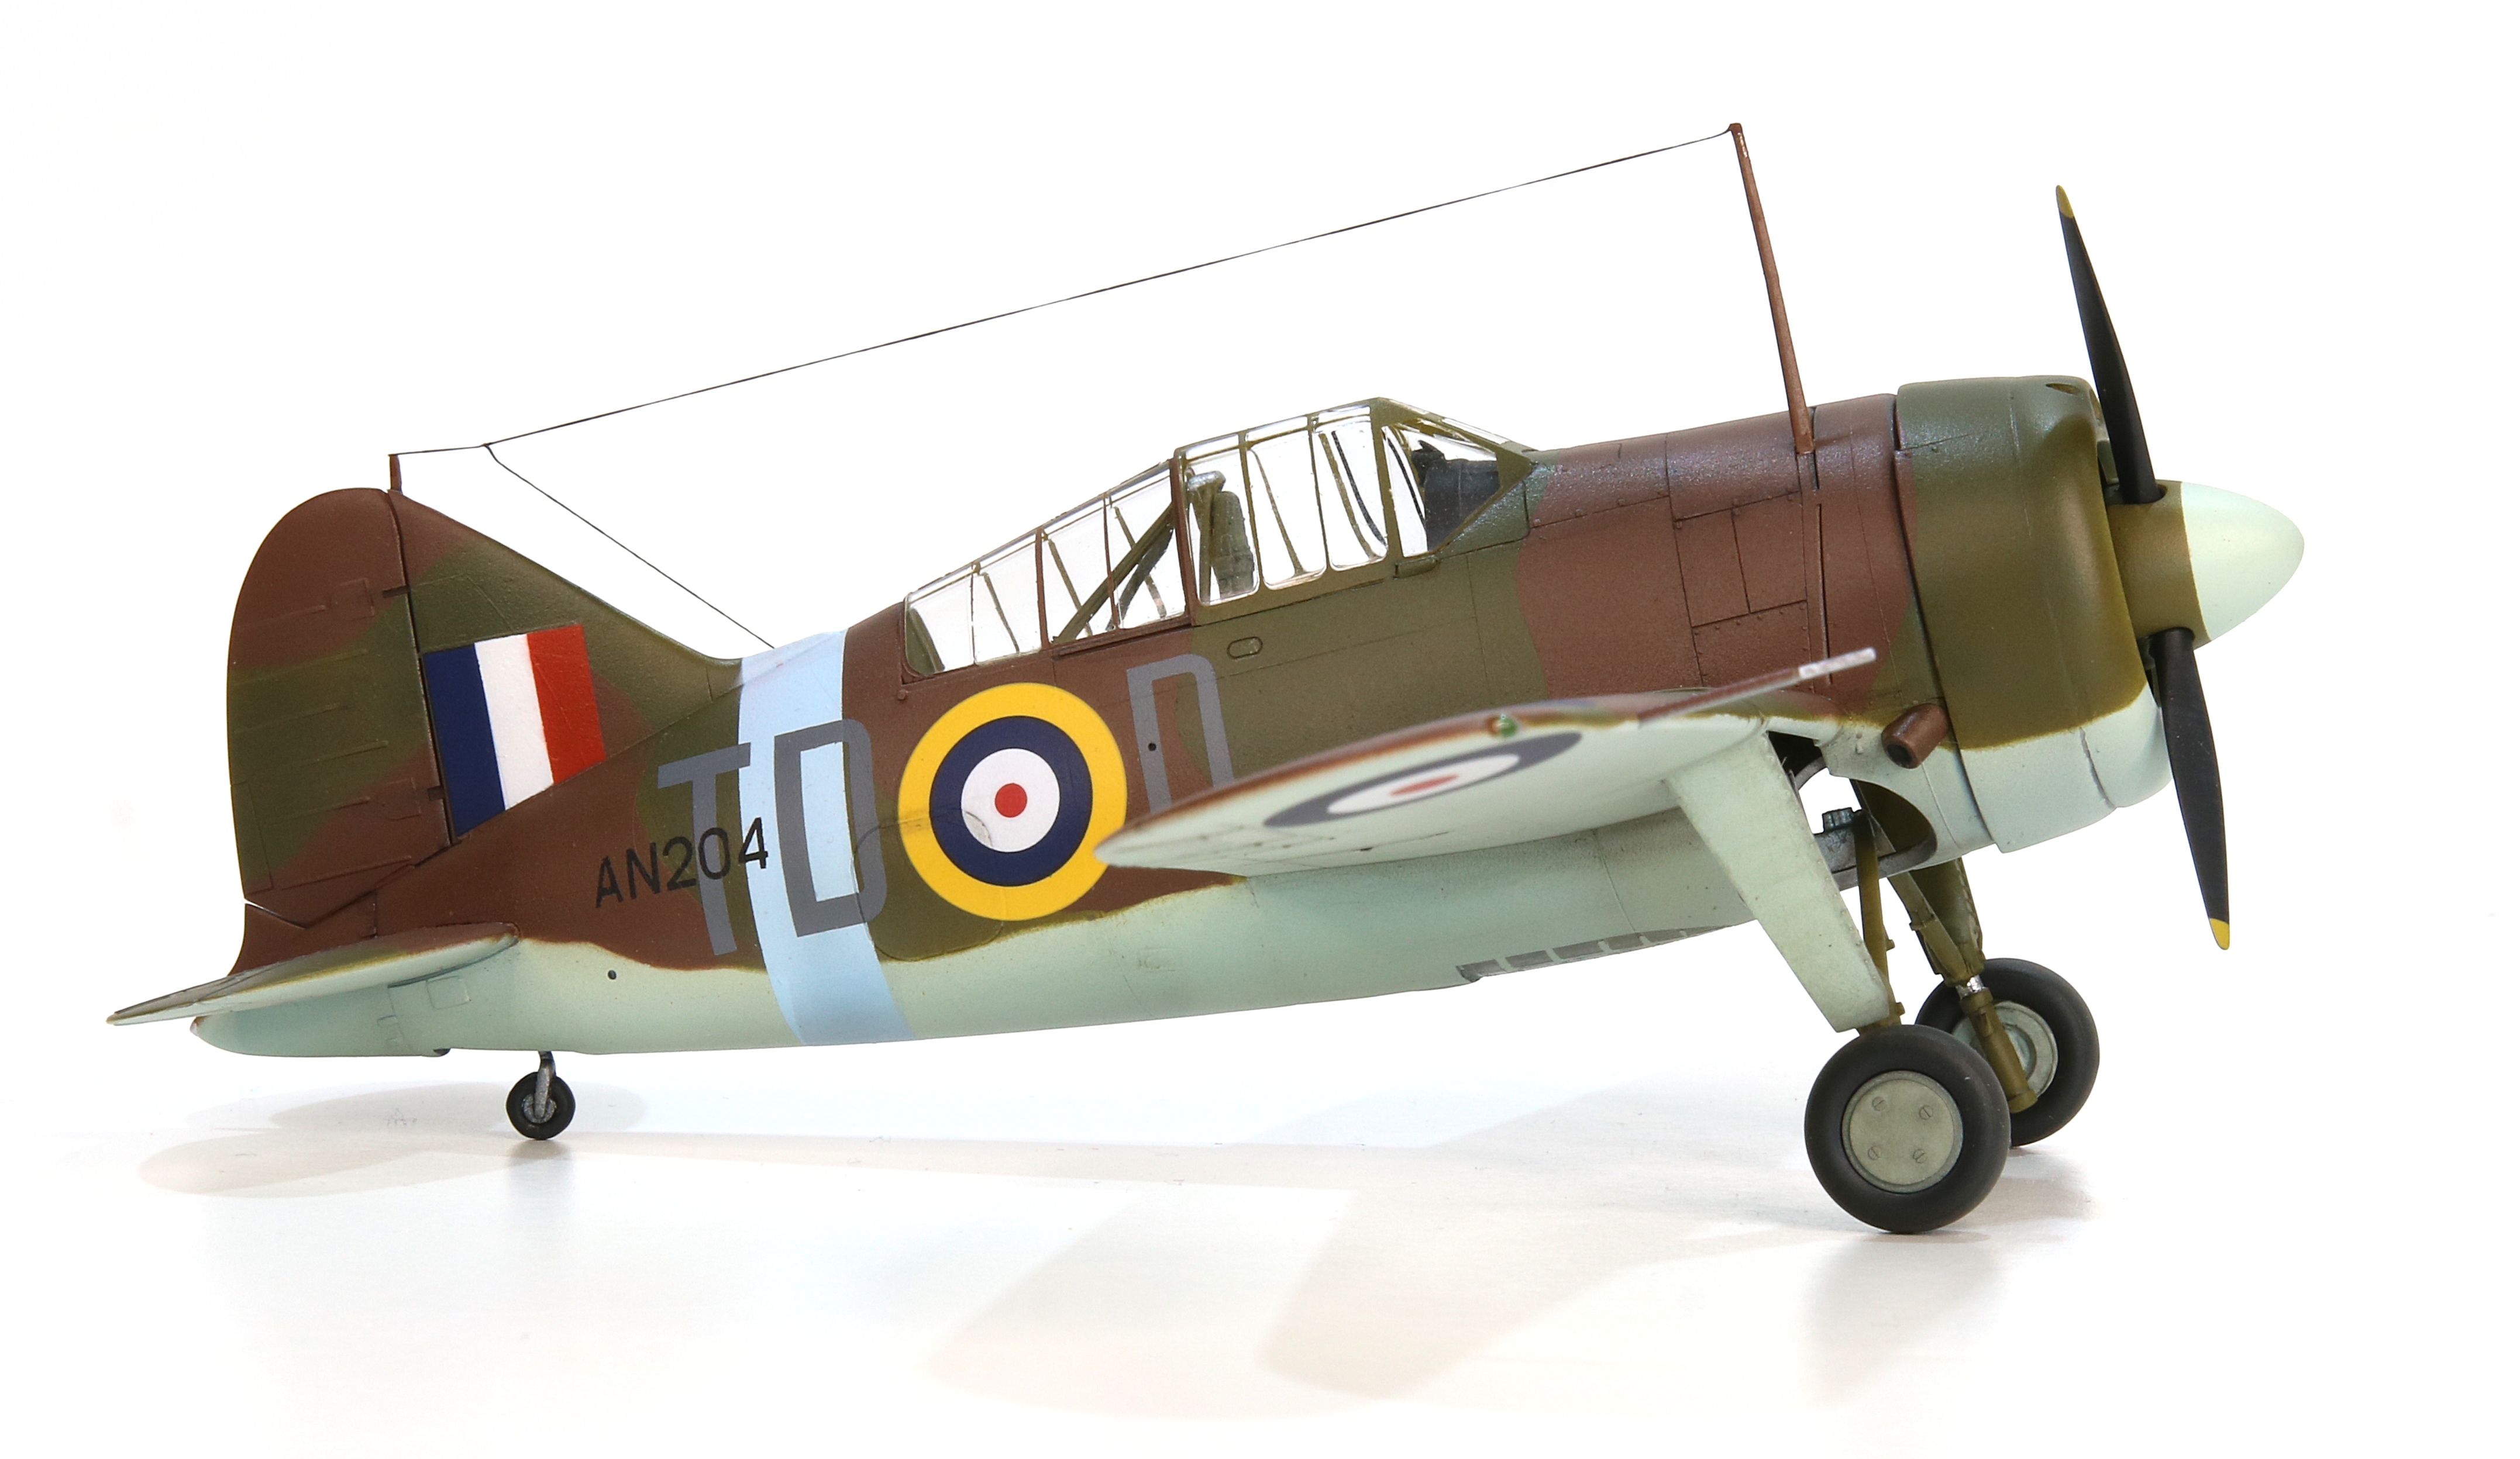
In a general sense, the colours applied to these RAF-ordered Buffaloes are relatively simple to determine; Dark Green and Dark Earth over Sky Type S. However, the devil is always in the details, and in this case, the devil is in how Brewster interpreted the RAF’s colours.
Conveniently, or inconveniently depending on your perspective, there are no records remaining of the exact hue or shade of green, brown, or sky applied by Brewster to these airframes. That does give the modeller some latitude in the shade used, and I used all the latitude I could get.
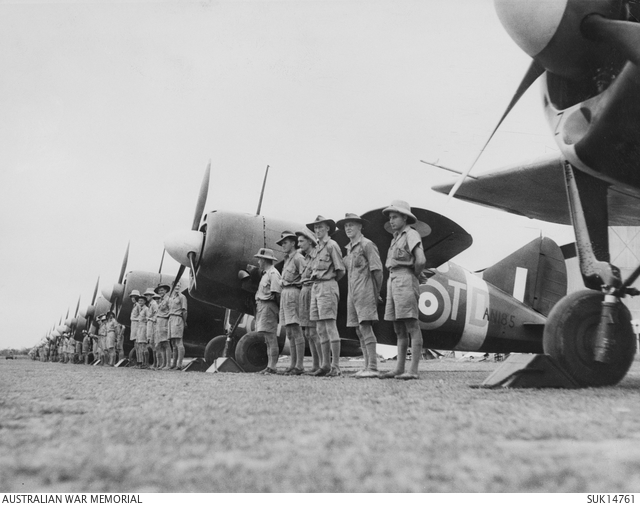
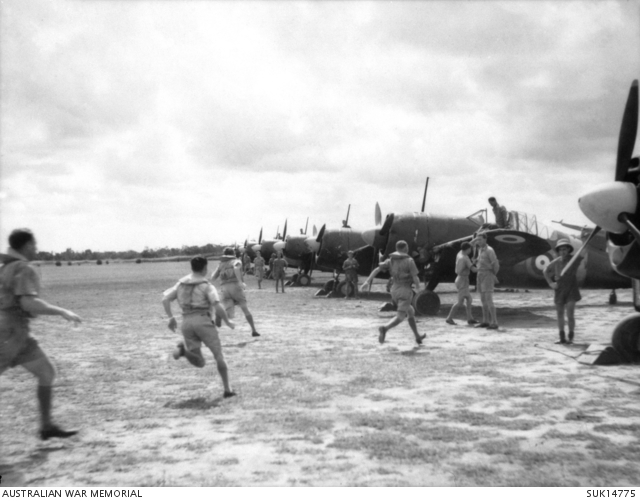
The contemporary photos below are not terribly useful in determining the colours required but they do provide some basic guidance and a sense of the overall look of the airframes.
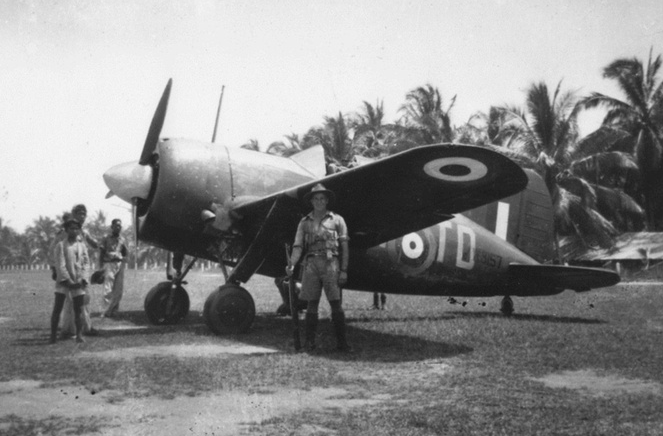
Most of my decision-making was actually focused on things like the colours of the wheel wells, undercarriage, the demarcation between the upper and lower colours, and whether my particular airframe would have had the black recognition paint applied to the port underside.
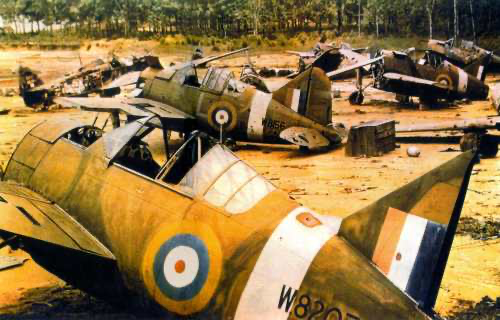
The photos below from Life magazine were very helpful in guiding my decision on some of these minor points. To my eye, they show that the undercarriage was painted interior green, and the wheel wells themselves were painted the underside colour. An alternative interpretation, and a frequent conclusion by others is that the wheel wells were painted in silver lacquer or left natural metal. To me, though, these photos just don’t quite support that.


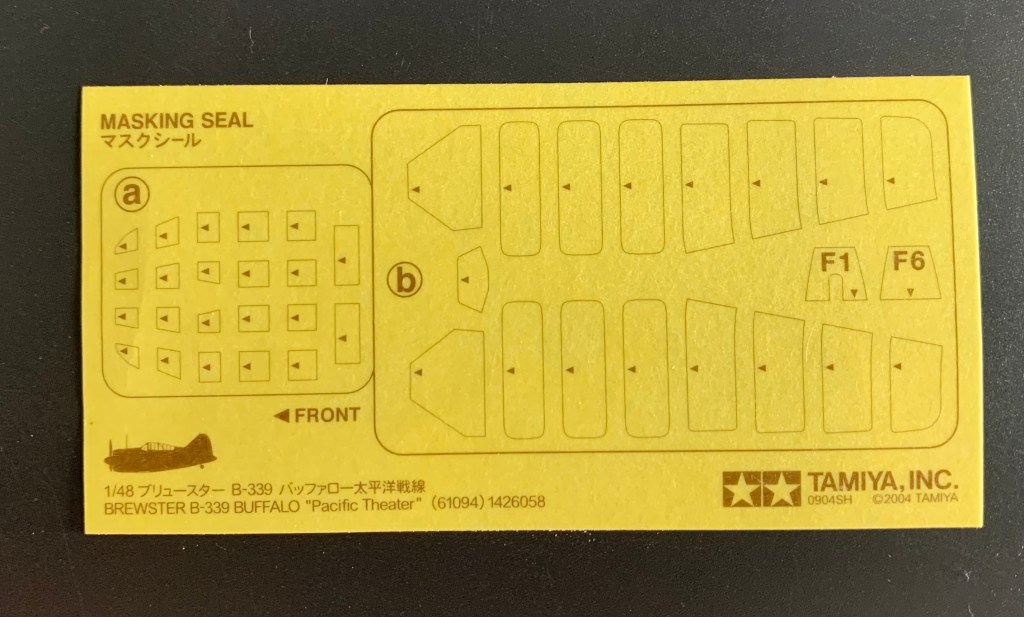
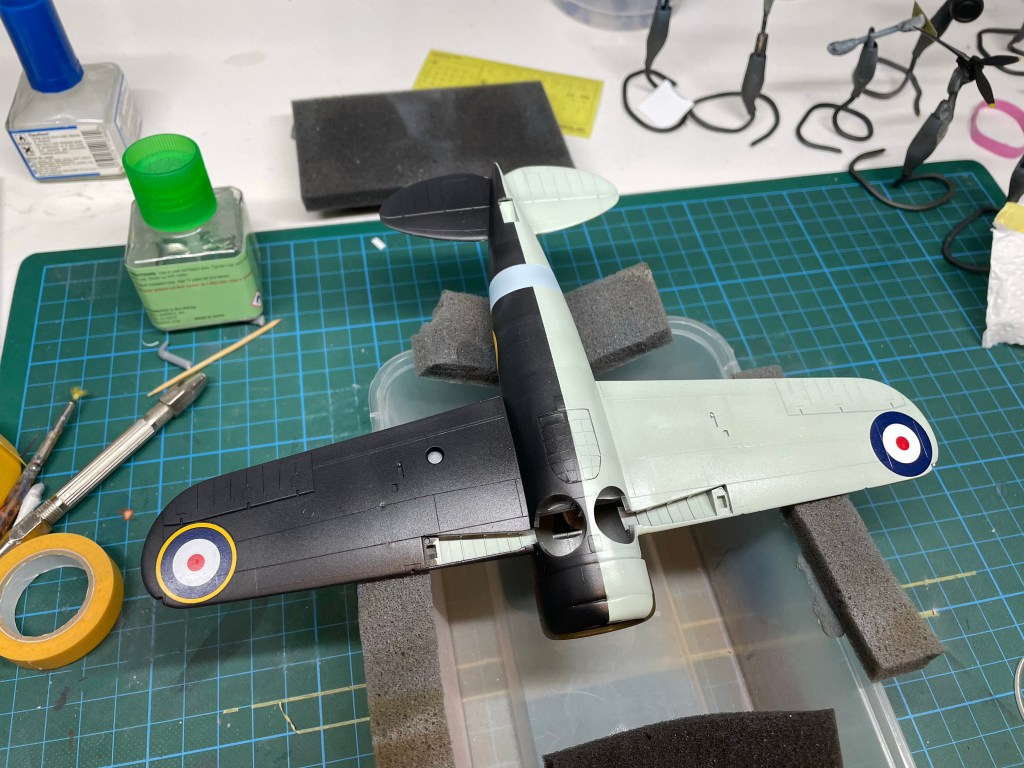
I started the painting process by creating a canopy mask set on my Silhouette cutter to replace the Tamiya masks, which were not cut. I didn’t trust my ability to cut them accurately enough as compared to what I could produce on the Silhouette.
My first paint task was to mix the Sky Type-S for the other side. I mixed up two versions, one more blue than the other and applied them to the tail. I decided on the more green of the two as the Sky Type S but noted that the bluer shade would suit for the theatre band I would later apply on the fuselage.
The final decision I need to make was on the edging; I went with a soft edge between upper and lower colours whereas the camouflage itself clearly had a hard edge. I would paint mine in the same way.
Click on any of the images below to scroll through the gallery.


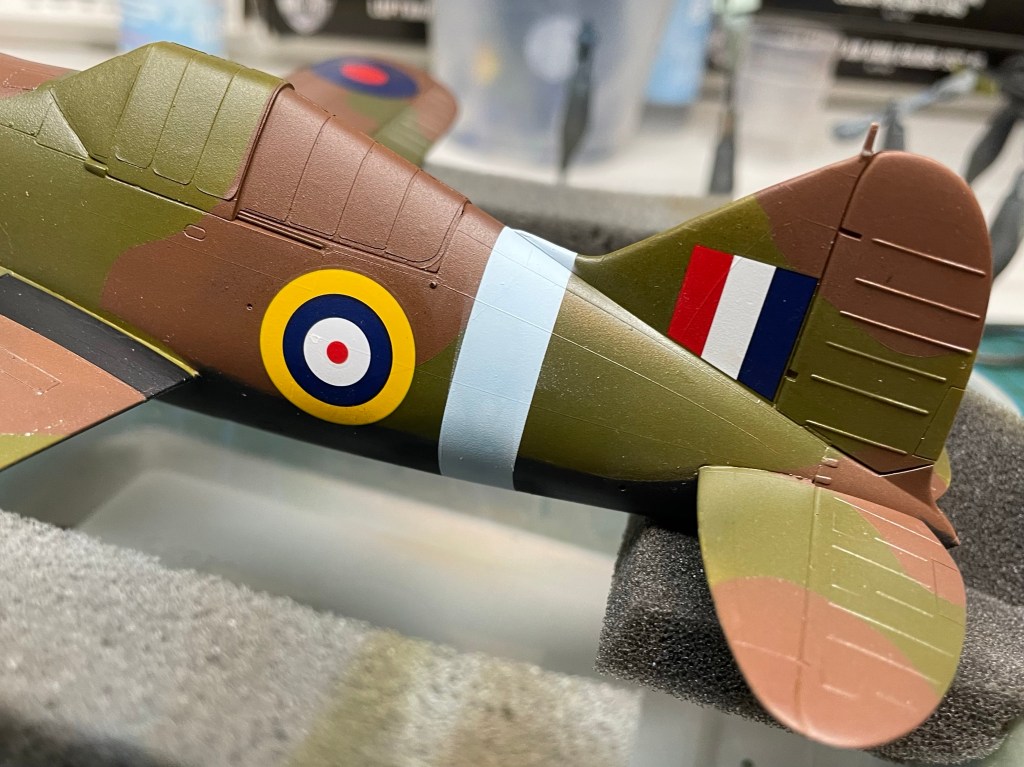
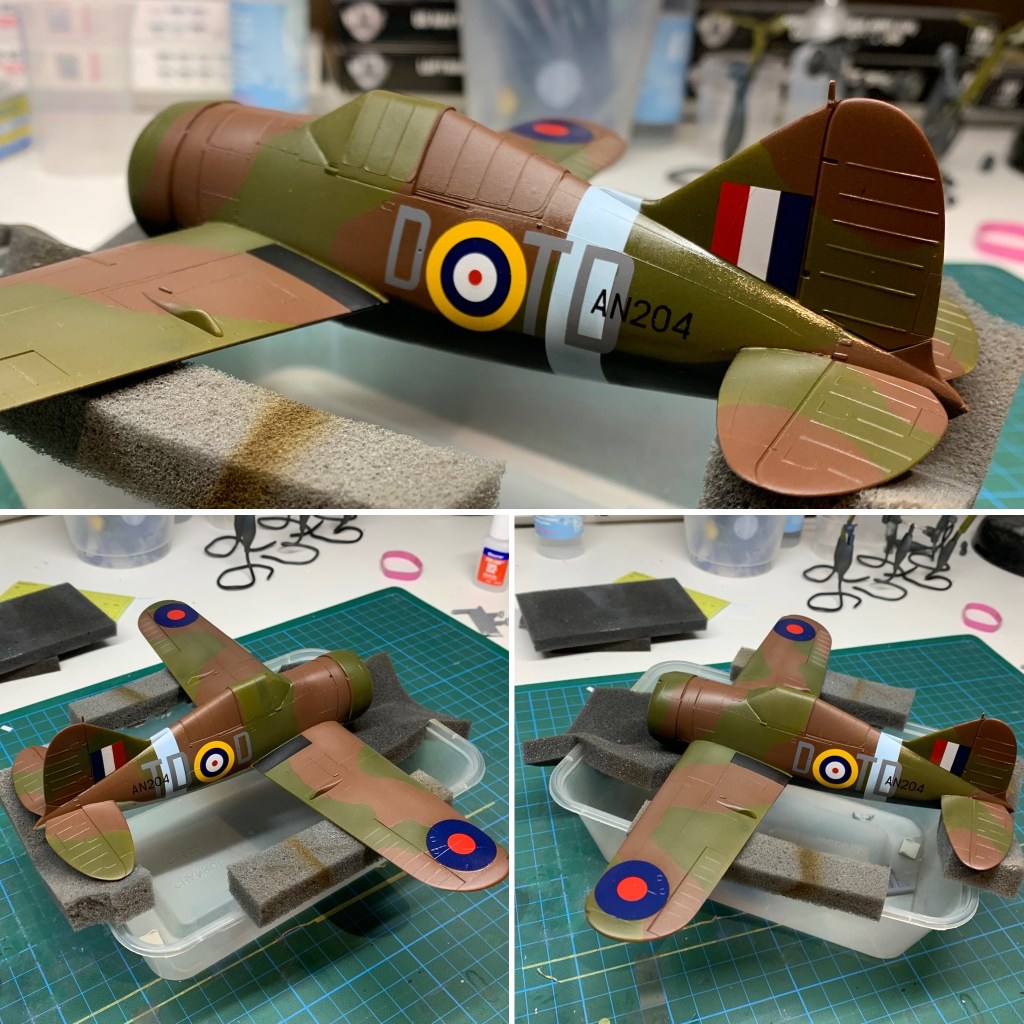
Markings
The contemporary photos further up show quite clearly how the markings were applied to these aircraft. I could not find any record of the squadron coat worn by Drewerys aircraft, though I did know the serial number. In the absence of any evidence to the contrary I chose to code my model with the letter D as it was Drury’s initial.
All of the markings were painted, except the roundels, and one of the few flashes which I had to paint when I damaged the decal with masking tape.
I painted the fuselage band with a light blue to represent a locally applied, marking using paints. The RAAF would have had on hand in theatre. Again, the exact colour is practically impossible to know, and this is my best approximation.
Click on any of the images below to scroll through the gallery.


A final note on Tamiya decals. Tamiya decals get a bad press but they are actually very good if one applies them according to their design. Firstly, they work much better if separated in hot water. But, the single biggest mistake most of us make with Tamiya decals is thinking that Microset/Microsol works on them. It doesn’t, not even a little bit. I use Mr Mark Setter and it melts them in no time. I land them on a drop of MMS and let them sit for a few minutes to get nice and soft. Then, I press them with some damp kitchen towel to help them conform the the surface detail and finish with another coat of MMS.
Weathering
Although these airframes would’ve been used hard in combat through the first three weeks of December, my instinct was that they would not have been too beaten up with chipped paint, etc. Weathered, using my nail common process of a post shade texture, followed by a light wash. I used some powdered chalks for some of the staining from maintenance, but otherwise left the a frames quite clean.
Click on any of the images below to scroll through the gallery.


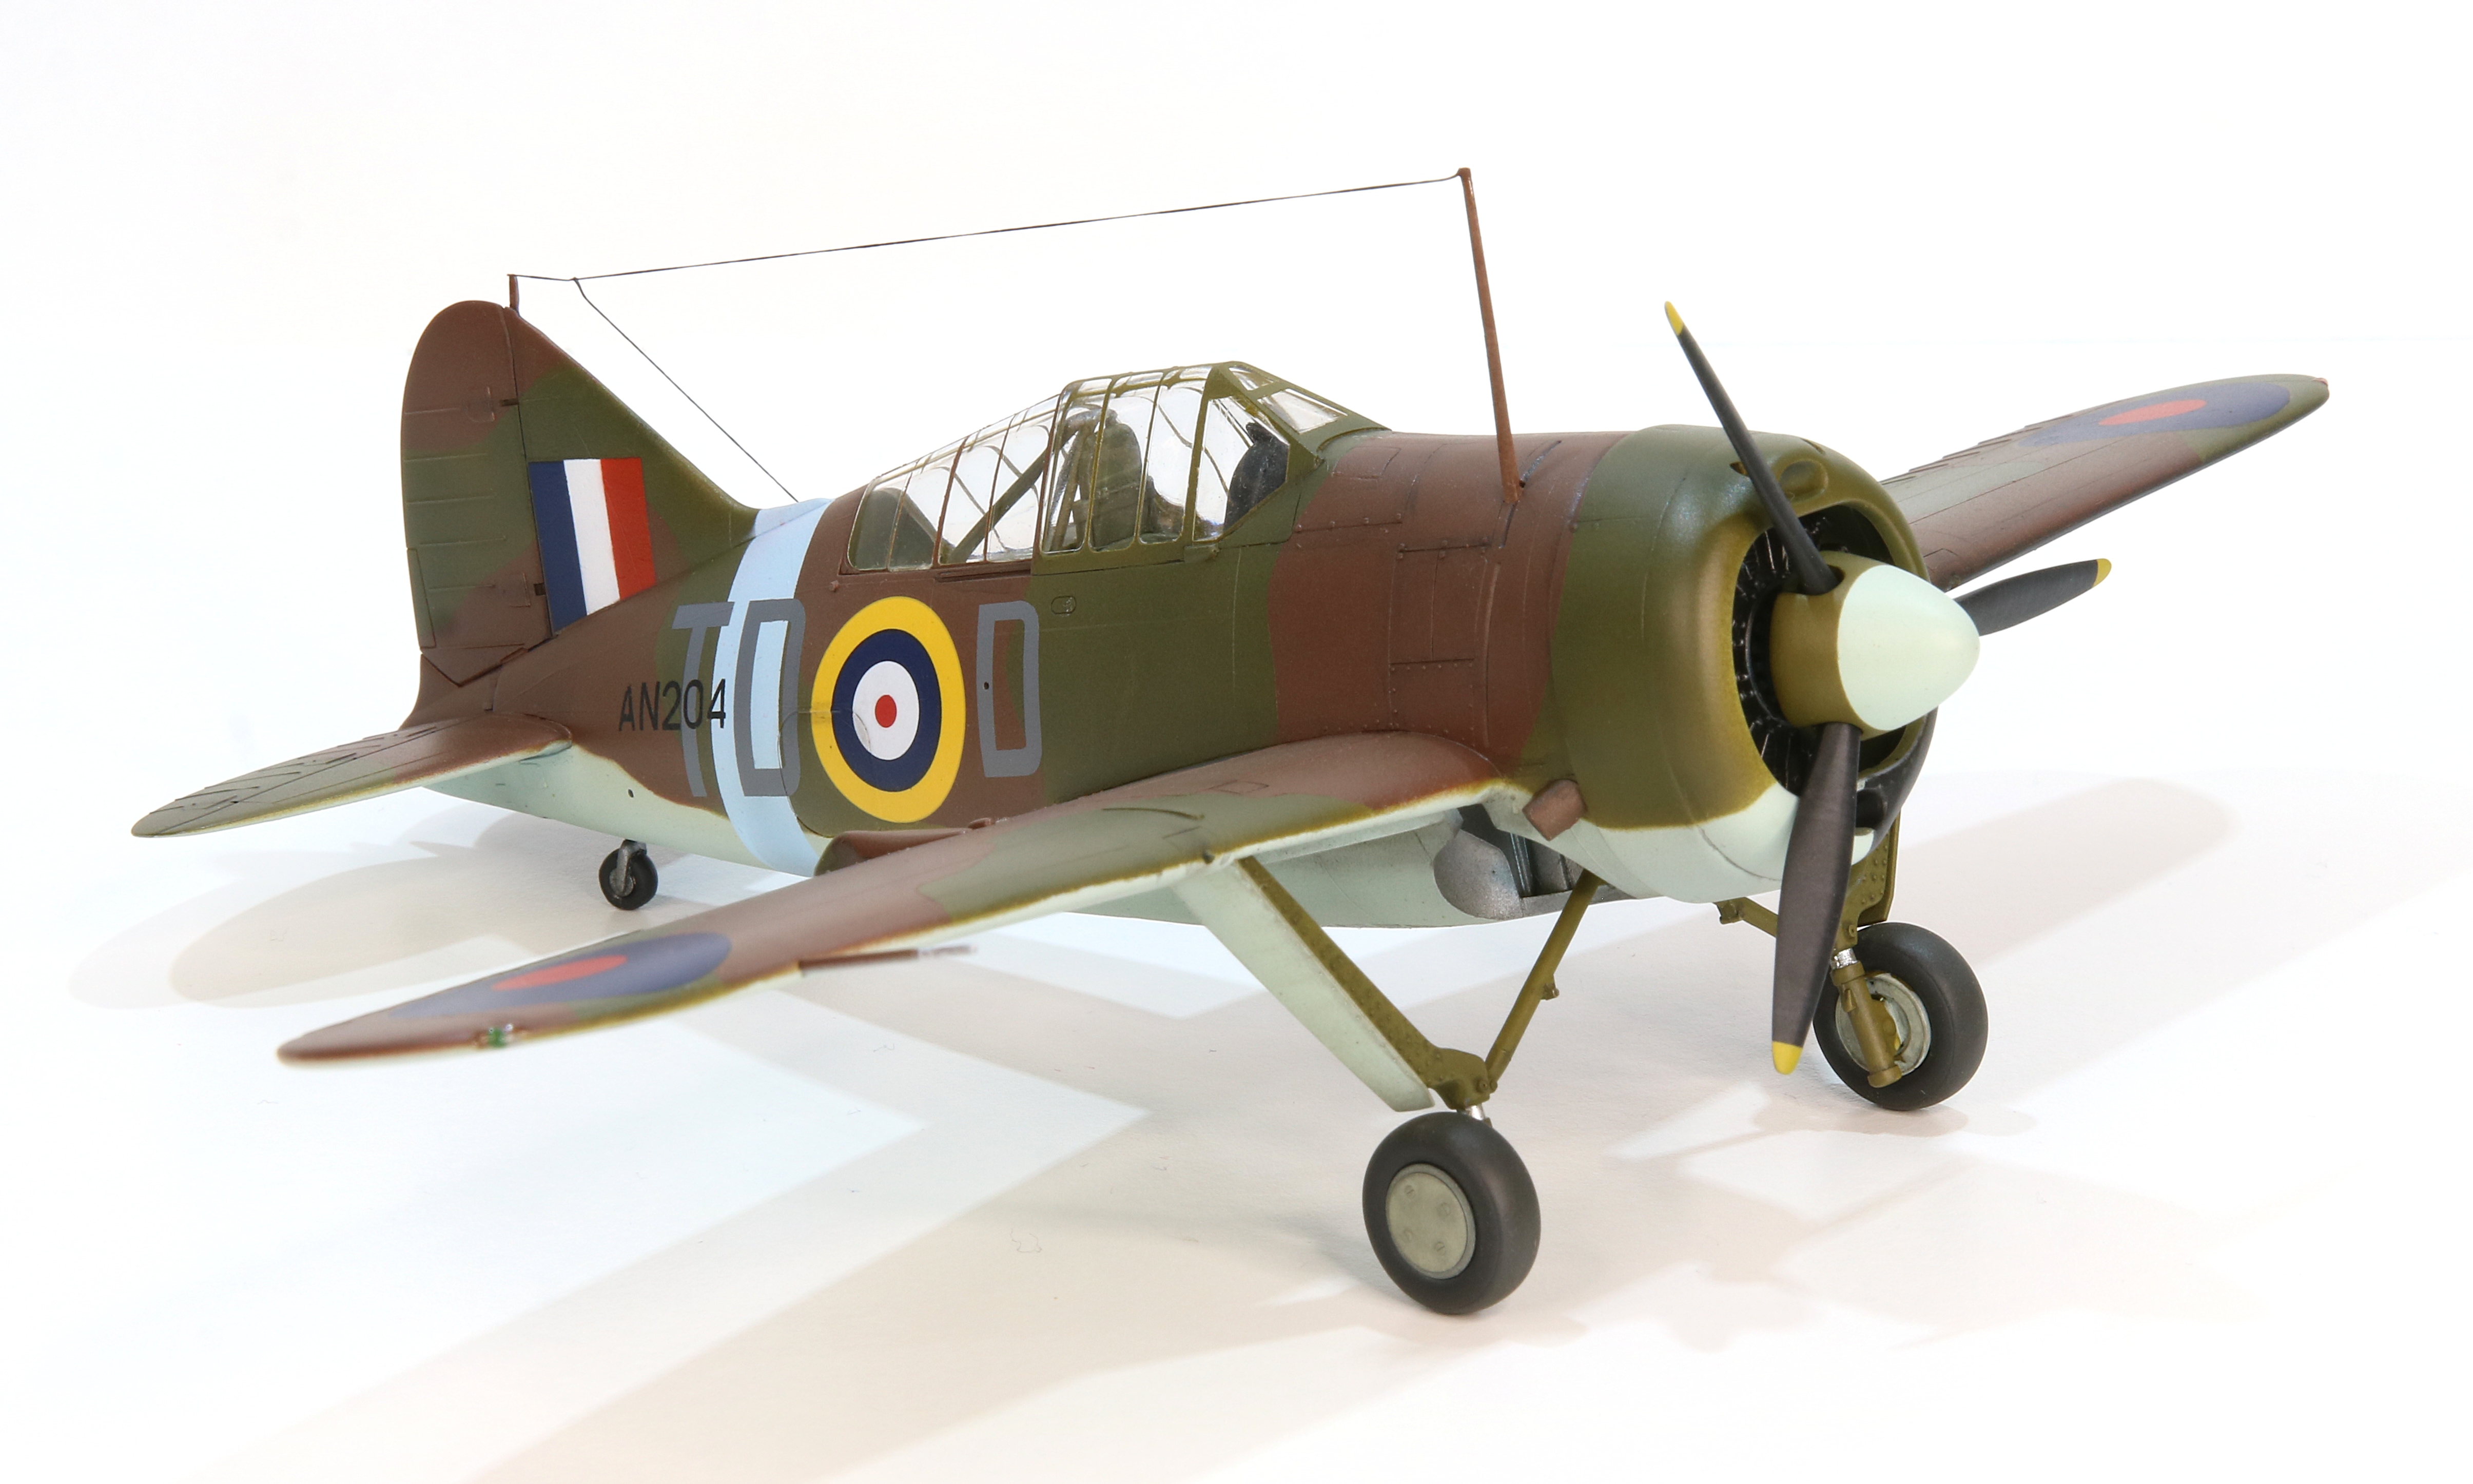
Finish
The finishing steps were fairly straightforward on this fairly straightforward kit. The undercarriage was painted according to my interpretation of the photos and attached. Upon removing the masks, I found the canopy nicely painted, and I was pleased with how the masks had performed. Attaching the aerial is always a little dicey, but this one went smoothly, and once I attached the propeller, it was done.
Click on any of the images below to scroll through the gallery.


I built this kit having been away from the model bench for a couple of months. As a mojo-rebuilder this little Buffalo from Tamiya really fit the bill. I was certainly a little rusty in some areas and made a few mistakes that I wouldn’t have otherwise, but nonetheless I’m quite happy with how this turned out.
Would I build another one? I think I probably would, as there are still a couple of paint schemes that would be an interesting challenge and a Finnish Buffalo would certainly provide a good story to tell.
Gallery


References and Sources
Introduction and summary of references.
- Australian War Museum
- “DEFEAT TO VICTORY No.453 Squadron RAAF” by JOHN BENNETT. https://www.radschool.org.au/Books/Defeat-to-Victory-No-453-Squadron-RAAF.pdf
- http://www.adf-gallery.com.au/index.php?/category/album-453-buffalo
- https://www.britmodeller.com/forums/index.php?/topic/235013981-buffalo-mkis-in-the-far-east/
If you are interested in following the build as it unfolded, as well as the discussion and research that led to the choice of markings, the full build diary is logged in the Britmodeller Aircraft WIP Section.
I really hope you enjoyed this article!
Making-History is a labour of love for me, but it’s becoming more expensive and time consuming. I’m loath to put advertising on it, so if you feel inclined please consider making a donation to help cover site hosting costs as well as the time it takes to produce its content. All donations get a receipt with my thanks.
Mark.
Make a one-time donation
Make a monthly donation
Make a yearly donation
Choose an amount
Or enter a custom amount
Your contribution is very much appreciated and 100% of it will be recycled back into Making-History.
Your contribution is appreciated.
Your contribution is appreciated.
Copyright ©2023
This article, its text, and photos of the model is my original work and is protected by copyright in its entirety, except where noted. All research sources are listed in the References and Sources section above, including photos from official sources. All other images and quoted content were sourced from the internet and are used here under protection of fair-use. Any copyrighted content will be happily removed and/or credited forthwith upon request by its rightful owner.


Leave a comment